How to Create WordPress Custom Widgets: What They Are and How They Work?
Did you know that you can create your own WordPress custom widget? While there are tons of additional widgets that come alongside themes and plugins, WordPress offers its users the option to code custom widgets manually.
It’s not a complicated process as you only need basic knowledge of WordPress and PHP. So, without further ado, let’s get started!
Download all in one WordPress cheat sheet
What Are WordPress Widgets?
WordPress widgets make it easy for you to add additional functions to your website through a simple drag-and-drop interface. By default, WordPress ships with several widgets. They provide you with basic utility features and are compatible with every WordPress theme.
However, sometimes, those standard widgets can’t perform the tasks you want. Your best option is to look for plugins offering you the desired function. Unfortunately, you might find that even third-party plugins can’t fulfill your requirements.
Thankfully, you have the power to create a WordPress custom widget. Just keep in mind that it has to be built from the ground-up so you can personally fine-tune your custom widget based on your needs.
Where to Begin When Creating a Custom Widget?
First, you need to choose whether you want to create the widget using a plugin or via editing the functions.php file. A plugin will enable the custom widget to work on any site while adding code to functions.php. This way, it makes the widget work alongside a specific theme.
Secondly, you have the option to add the widget on a live site or in a local environment. However, we highly recommend you to implement the widget in a local environment first, to test it out. You can easily do this by following our guide on how to run WordPress on Docker.
Once the tool is working correctly, it is time to move it to your website.
How Do WordPress Custom Widgets Work?
In WordPress, you have to create a custom widget using the standard WP Widget class from the Widgets API. There are around 20 functions that you can play around with. Out of these, four is the minimum requirement for any widget to work:
- __construct() – constructor function where you can define your widget’s parameters.
- widget() – contains the output of the widget.
- form() – determines widget settings in the WordPress dashboard.
- update() – updates widget settings.
Of course, you’ve got plenty of other options that provide additional functions. For more on the WP_Widget class, take a look at the WordPress developer page.
Creating a WordPress Custom Widget
Important! It’s strongly recommended to create a full website backup before proceeding further. In addition, you should also use a WordPress child theme to prevent any issues from affecting your main theme.
For this tutorial, we’ll be creating a simple “Greetings from Hostinger.com!” custom widget so you can learn the basics of widget creation in WordPress. Once that is done, you can move on to creating more complex widgets on your own.
One more thing to note is that we’re writing this code in the functions.php file for the currently loaded theme. That being said, you can use the same code for any custom plugin.
1. Extending the WP_Widget class
The first thing you need to do is to open any text editor on your computer and create a new class that extends the base WP_Widget class, like this:
class hstngr_widget extends WP_Widget {
//Insert functions here
}
2. Adding __construct()
Next, we start implementing the four standard functions one by one. The first one is the constructor method, which will determine the custom widget’s ID, name, and description.
function __construct() {
parent::__construct(
// widget ID
'hstngr_widget',
// widget name
__('Hostinger Sample Widget', 'hstngr_widget_domain'),
// widget description
array ( 'description' => __( 'Hostinger Widget Tutorial', 'hstngr_widget_domain' ), )
);
}
3. Adding widget()
Now, let’s focus on the widget() function. It defines the look of your WordPress custom widget on the front-end.
public function widget( $args, $instance ) {
$title = apply_filters( 'widget_title', $instance['title'] );
echo $args['before widget'];
//if title is present
If ( ! empty ( $title ) )
Echo $args['before_title'] . $title . $args['after_title'];
//output
echo __( 'Greetings from Hostinger.com!', 'hstngr_widget_domain' );
echo $args['after_widget'];
}
With this, we have configured the output of our widget so that it displays the phrase “Greetings from Hostinger.com!” and widget’s title as specified by the user.
4. Adding form()
Now, we have to program the back-end of the widget using the form() method. You can see the result when you want to add the widget from the WordPress Dashboard.
public function form( $instance ) {
if ( isset( $instance[ 'title' ] ) )
$title = $instance[ 'title' ];
else
$title = __( 'Default Title', 'hstngr_widget_domain' );
?>
<p>
<label for="<?php echo $this->get_field_id( 'title' ); ?>"><?php _e( 'Title:' ); ?></label>
<input class="widefat" id="<?php echo $this->get_field_id( 'title' ); ?>" name="<?php echo $this->get_field_name( 'title' ); ?>" type="text" value="<?php echo esc_attr( $title ); ?>" />
</p>
<?php
}
Here you can see how a custom widget has been set up. If a user applies a title, then that title will be inserted in the HTML form we created. In this example, we will set the name of the title to Default Title.
5. Adding update()
Once that’s done, we have to implement update(), which will refresh the widget every time you change the settings.
public function update( $new_instance, $old_instance ) {
$instance = array();
$instance['title'] = ( ! empty( $new_instance['title'] ) ) ? strip_tags( $new_instance['title'] ) : '';
return $instance;
}
We’re taking the current title of the newly created instance, removing any HTML/PHP tags. Then, we’re passing the title to the instance and returning it.
6. Registering WordPress Custom Widget
Finally, we have to register the new custom widget using add_action() function. Keep in mind that you should place the following code at the top, before extending the WP_Widget class.
function hstngr_register_widget() {
register_widget( 'hstngr_widget' );
}
add_action( 'widgets_init', 'hstngr_register_widget' );
Adding the Code to functions.php File
So, we’ve defined a new function called hstngr_register_widget(). It registers our widget using the widget ID, which is specified in the __construct() function.
Then, we have tied this function using widgets_init, which loads the widget into WordPress through the built-in add_action() method. Your final WordPress custom widget code should look like this:
function hstngr_register_widget() {
register_widget( 'hstngr_widget' );
}
add_action( 'widgets_init', 'hstngr_register_widget' );
class hstngr_widget extends WP_Widget {
function __construct() {
parent::__construct(
// widget ID
'hstngr_widget',
// widget name
__('Hostinger Sample Widget', ' hstngr_widget_domain'),
// widget description
array( 'description' => __( 'Hostinger Widget Tutorial', 'hstngr_widget_domain' ), )
);
}
public function widget( $args, $instance ) {
$title = apply_filters( 'widget_title', $instance['title'] );
echo $args['before_widget'];
//if title is present
if ( ! empty( $title ) )
echo $args['before_title'] . $title . $args['after_title'];
//output
echo __( 'Greetings from Hostinger.com!', 'hstngr_widget_domain' );
echo $args['after_widget'];
}
public function form( $instance ) {
if ( isset( $instance[ 'title' ] ) )
$title = $instance[ 'title' ];
else
$title = __( 'Default Title', 'hstngr_widget_domain' );
?>
<p>
<label for="<?php echo $this->get_field_id( 'title' ); ?>"><?php _e( 'Title:' ); ?></label>
<input class="widefat" id="<?php echo $this->get_field_id( 'title' ); ?>" name="<?php echo $this->get_field_name( 'title' ); ?>" type="text" value="<?php echo esc_attr( $title ); ?>" />
</p>
<?php
}
public function update( $new_instance, $old_instance ) {
$instance = array();
$instance['title'] = ( ! empty( $new_instance['title'] ) ) ? strip_tags( $new_instance['title'] ) : '';
return $instance;
}
}
Finally, it is time to insert the code to your functions.php file.
- Log in to your WordPress admin area. Then, navigate to Appearance -> Theme Editor -> Theme Functions.
- Paste the code from your text editor to the bottom of functions.php file. Click Update File to save the changes.

Using WordPress Custom Widget
You can finally use your newly-installed widget.
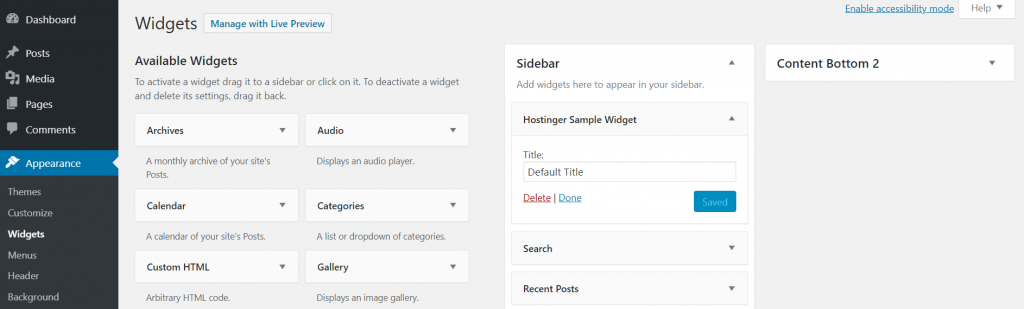
- Go to the Appearance menu, and select Widgets. You should see a widget named Hostinger Sample Widget in the Available Widgets list.
- Next, drag the widget and drop it in the Sidebar section on the right side of the page.

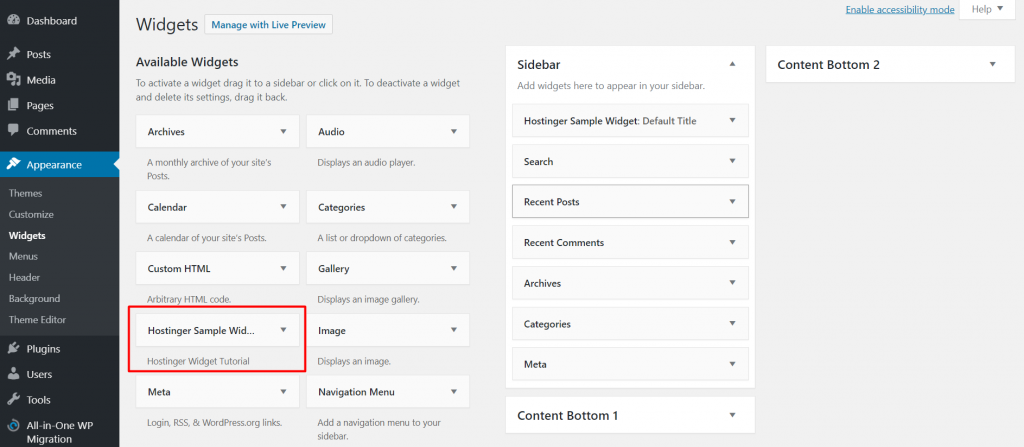
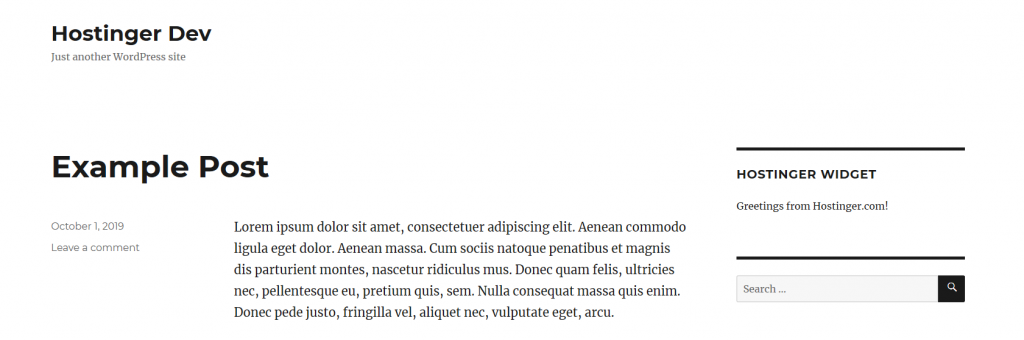
- Save your changes and visit your website. You will be welcomed with a custom widget with the words “Greetings from Hostinger.com” inside.
Congratulations, you have successfully created your first custom WordPress widget!
Conclusion
WordPress custom widget allows you to add a specific function to your website based on your needs. It’s a great solution whenever you can’t find anything in particular that would meet your specific requirements. or when you’re becoming a WordPress developer and want to develop your website.
To summarize, let’s take a look at the steps once again on how to create your own custom WordPress widget:
- Create a new class that extends WP_Widget.
- Begin with __construct() to determine widget’s parameters.
- Use widget() to define the appearance of the widget on the front-end.
- Add form() to configure how the widget will look.
- Don’t forget to add update() to refresh the widget every time you modify it.
- Register the new WordPress custom widget using add_action() function.
- Copy and paste the entire code to the bottom of functions.php file and click Update File.
- Go to the Widgets menu and move the widget to the desired place.
Good luck!
Discover More Expert WordPress Techniques
WordPress Template Hierarchy
How to Create Custom Post Types in WordPress
How to Create Custom WordPress Page Templates
How to Create a Custom WordPress Post Template
How to Setup and Manage Cron Jobs in WordPress
How to Add PHP to WordPress

Domantas leads the content and SEO teams forward with fresh ideas and out of the box approaches. Armed with extensive SEO and marketing knowledge, he aims to spread the word of Hostinger to every corner of the world. During his free time, Domantas likes to hone his web development skills and travel to exotic places.

Comments
October 11 2021
Thank you very much for a great tutorial. I try it in my test plugin and all work as described, Widget appear in Appearance -> Widgets list. But the widget is not listed in Page Edit Add Block list. So I can add it just to sidebar, but not directly to page content. Do I miss something here, is there need another registration? Thank for any advice, I am not able to get over it.
October 12 2021
Hi, generally widgets are possible to add to sidebar, footer, header and some other areas - you can check our more information here. However, you can find more about block-based widgets here.
March 28 2022
Nice short and clear tutorial! Well explained also. It worked fine for me Thanks!
May 28 2022
At 2. Adding __construct() and 3. Adding widget() you use invalid ‘ symbol and if you copy-paste the code you'll get an error. Thank you for your tutorial.
May 31 2022
Hi Alex, thanks for letting me know! I fixed it in the article, so it should be working well now ?
August 20 2022
Hi can we create a custom accordian widget in elementor pro and that one i have is a typical one and i want to create custom controls for that also so i can modify it. is it possible without coding php or not please answer.
August 25 2022
Hey! You can create your own custom accordion widgets with Elementor Pro, you can check this tutorial for more information. I'd like to note that you may need additional add-ons based on the level of customization that you wish to do.
August 02 2023
New to WordPress. Thank you for the guide. Is there any difference between inserting the code into the functions.php theme file versus adding it as a plugin? Thank you.
August 04 2023
Hello there! Usually adding code via plugin applies it to all themes you're using, while adding code to specific theme functions.php only applies it to that particular theme. What is more, adding code via plugins is much easier and you can track or undo any changes pretty quickly compared to manual method.