How to Install phpMyAdmin on Ubuntu

phpMyAdmin is a popular administrative tool for managing MariaDB and MySQL databases through a user-friendly web interface. It lets you execute database administration tasks such as running queries, managing users and permissions, and exporting and importing databases.
Setting up phpMyAdmin on a Linux-based virtual private server (VPS) allows for efficient and secure remote database management. In this article, you’ll learn how to install and configure phpMyAdmin on an Ubuntu server.
Download Ultimate SSH Commands Cheat Sheet
Prerequisites for Installing phpMyAdmin
Before installing phpMyAdmin, make sure your server meets all the necessary requirements:
- Ubuntu VPS. Your VPS should run on recent supported versions of Ubuntu, such as Ubuntu 22.04 or 24.04. If you don’t own a server, consider purchasing a VPS plan from a reputable provider.
- LAMP stack installation. Ensure you have installed the Apache web server, MySQL server, and PHP and its required extensions to run phpMyAdmin. If you haven’t configured them yet, check our guide on installing the LAMP stack on Ubuntu.

How to Install phpMyAdmin on Ubuntu
Now that your server is prepared, let’s install phpMyAdmin. In this tutorial, we’ll use the Ubuntu 22.04 with LAMP Stack template from Hostinger’s VPS.
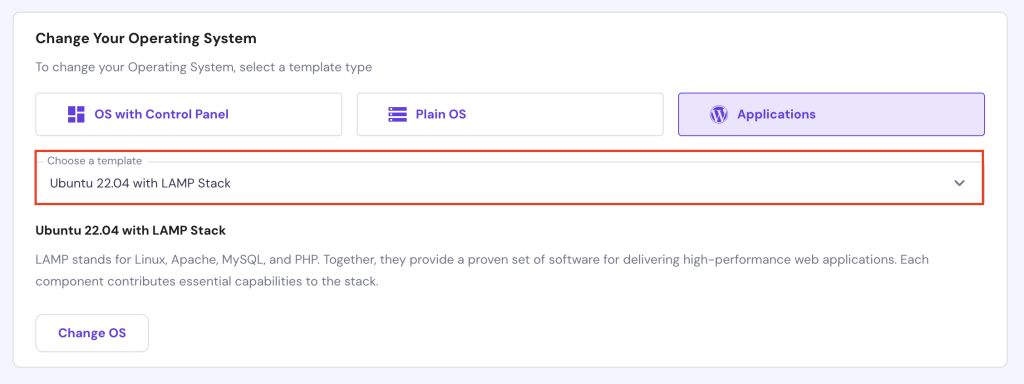
1. Install the phpMyAdmin Package
Make sure you are logged into your Ubuntu server and update your package list before installing phpMyAdmin. Here are the complete instructions:
- Open any terminal software installed on your computer. Then, access your server by running the following command. Replace user with your actual username and ip_address with your server’s IP address:
ssh user@ip_address
- Update and upgrade your package list in the default Ubuntu repositories with this Linux command:
sudo apt update && sudo apt upgrade -y
We recommend installing phpMyAdmin with these PHP modules using the apt package manager:
- php-mbstring. Enables support for multibyte strings, enhancing non-ASCII string handling.
- php-zip. Allows PHP to handle ZIP archives.
- php-gd. Provides tools for manipulating image data.
- php-json. Supports JSON serialization and deserialization.
- php-curl. Enables PHP to communicate with other servers via URL syntax.
To do so, run the following command:
sudo apt install phpmyadmin php-mbstring php-zip php-gd php-json php-curl -y
- You’ll be prompted to choose the web server. Select apache2 by pressing Space → Tab → Enter on your keyboard.
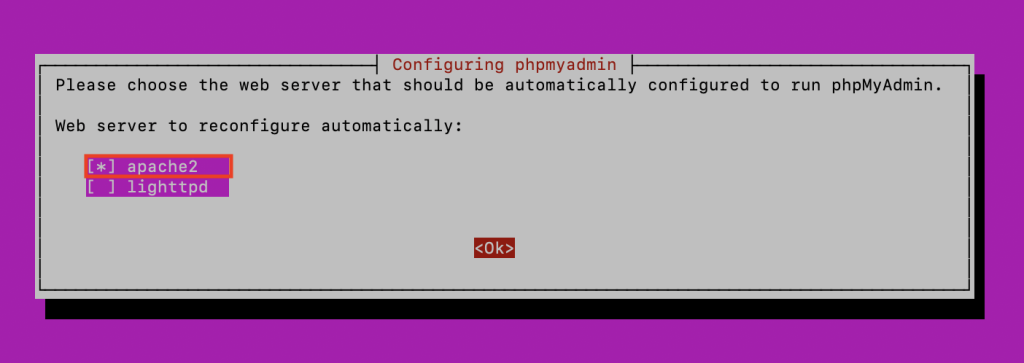
- Initiate the database setup with dbconfig-common by selecting Yes.

- Create and confirm a new MySQL application password when prompted. Make sure to choose a strong password that combines letters, numbers, and special characters to improve security.

- Activate the mbstring PHP extension by executing the following:
sudo phpenmod mbstring
- Restart the Apache server to apply all configurations:
sudo systemctl restart apache2
2. Configure User Permissions
Once you’re done with the phpMyAdmin installation, the next step is to configure MySQL user permissions for secure and efficient database management. Here’s the guide to set up permissions in MySQL:
- Open the MySQL terminal as the root user:
sudo mysql -u root -p
- Enter the root password that was set up during the previous step.
- Check the authentication method used by MySQL users by running this database query:
SELECT user, authentication_string, plugin FROM mysql.user;
- It displays the current authentication method for all added users:

- If the root user is using the auth_socket plugin, switch it to caching_sha2_password to enable password-based authentication. Replace your_new_password with a strong password of your choice:
ALTER USER 'root'@'localhost' IDENTIFIED WITH caching_sha2_password BY 'your_new_password';
- Verify the changes by rechecking the authentication method:

- After validating the authentication method, exit the MySQL session:
EXIT;
3. Access phpMyAdmin on a Browser
With phpMyAdmin installed and user permissions configured, you’re now ready to access the phpMyAdmin interface through your web browser. Follow these steps to connect:
- Open your web browser.
- Type the following URL into your browser’s address bar, replacing your_server_ip with your Ubuntu server’s IP address:
http://your_server_ip/phpmyadmin
- Alternatively, if you’ve connected a domain name to your VPS, append /phpmyadmin to your domain name, for example, mydomain.com/phpmyadmin.
- You’ll be greeted by the phpMyAdmin login page. Log in with the username and password for the MySQL user account you configured earlier.
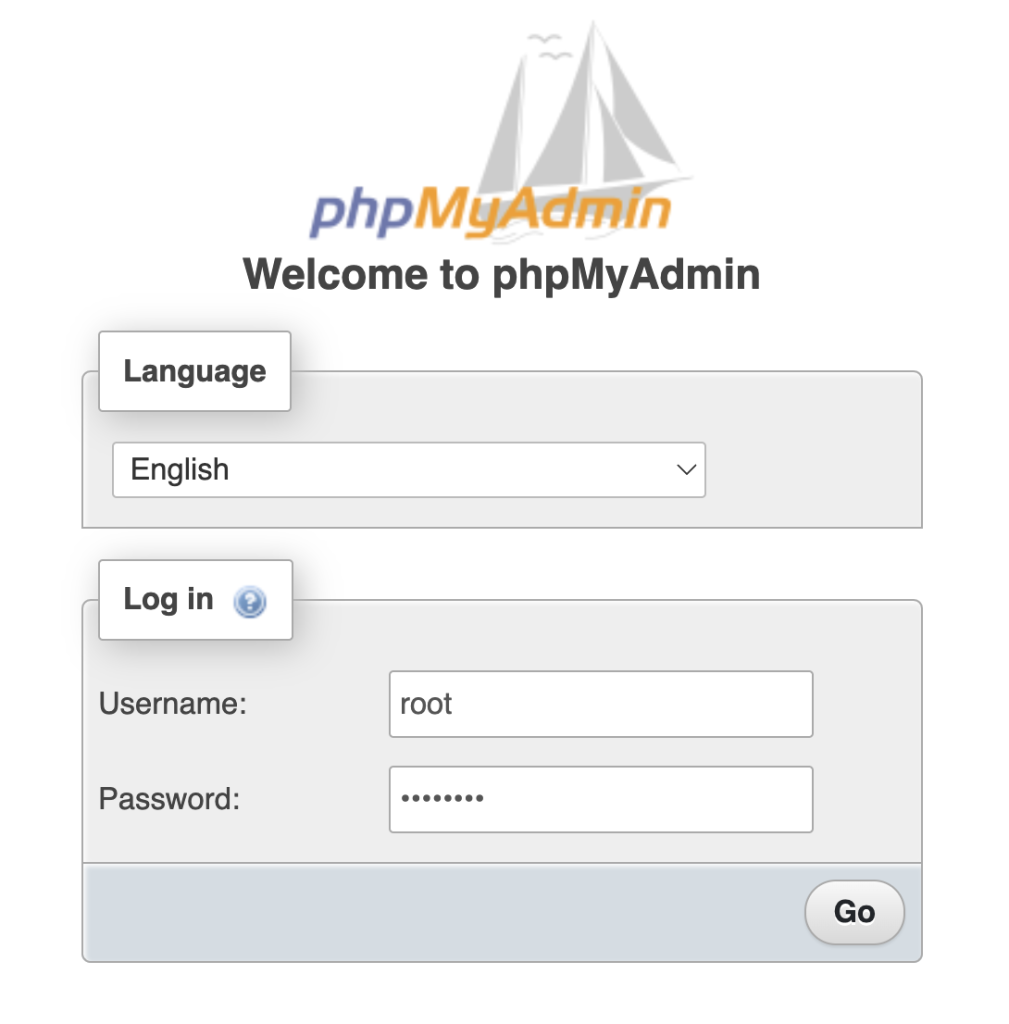
- Once logged in, you can start managing MySQL databases through the phpMyAdmin dashboard.
- When you have completed your database management tasks, exit phpMyAdmin by clicking the Log out button in the top left corner.
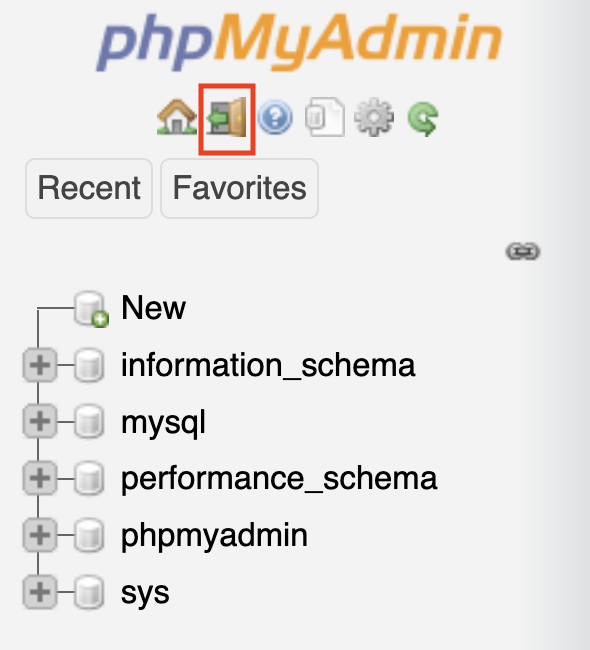
Congratulations, you’ve successfully installed phpMyAdmin on your Ubuntu VPS. However, we recommend implementing additional VPS security measures in subsequent steps to protect your databases from unauthorized access.
4. Create a New phpMyAdmin User (Optional)
Creating a dedicated database user enhances security and management flexibility. This is beneficial when multiple people need to access the database but should have different levels of permissions.
For instance, a web developer may require broader database privileges than a content manager. Therefore, setting up specific users for specific roles can minimize potential security risks.
Using the Command-Line Operation
- Start by accessing your MySQL database server. Enter the root password when prompted:
sudo mysql -u root -p
- Execute this query to create a new user. Replace newuser and password with your desired credentials:
CREATE USER 'newuser'@'localhost' IDENTIFIED BY 'password';
- Assign permissions to the new user. For example, to grant all privileges on a database named newdatabase:
GRANT ALL PRIVILEGES ON newdatabase.* TO 'newuser'@'localhost';
- Make sure the new settings take effect:
FLUSH PRIVILEGES;
- Exit the MySQL shell:
EXIT;
Using phpMyAdmin’s Graphical Interface
- Log in to your phpMyAdmin dashboard through your web browser.
- Go to User accounts → Add user account.
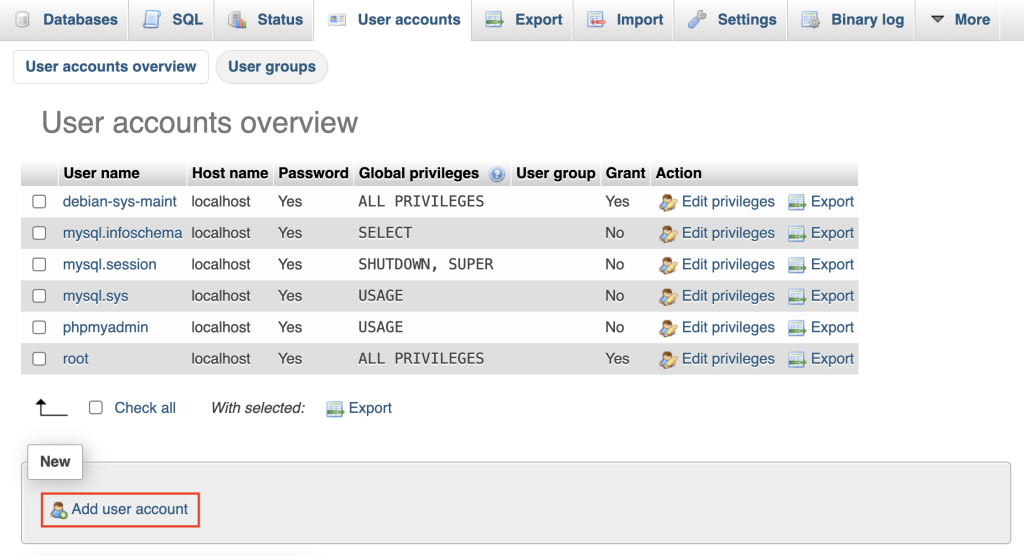
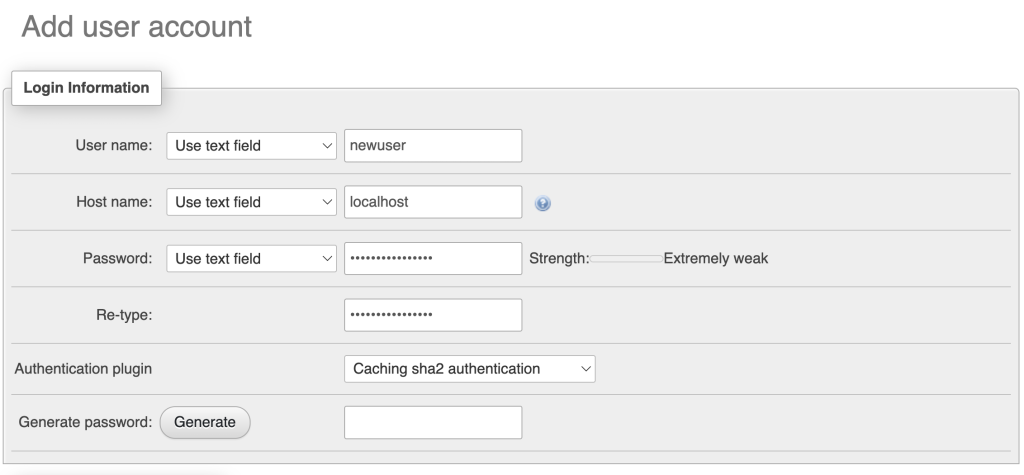
- Fill in the user details, including the username, hostname, and password.
- Scroll down to set the privileges for the new user. You can choose either global or specific privileges for certain databases.
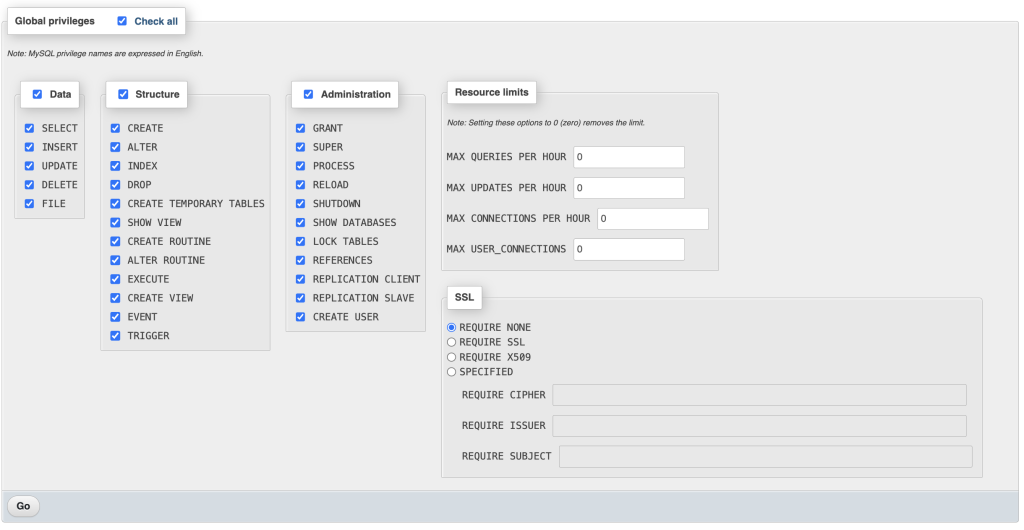
- Click Go at the bottom of the page to create the user account.
5. Set Up an Additional Login Gateway (Optional)
Implement an additional login gateway to make your server more secure. This prevents unauthorized access and secures sensitive information, especially important if your database contains critical or personal data.
Follow this guide to set up a login gateway for phpMyAdmin:
- Use the nano text editor to open the phpMyAdmin Apache configuration file:
sudo nano /etc/apache2/conf-available/phpmyadmin.conf
- Within the <Directory /usr/share/phpmyadmin> section, add the AllowOverride All directive:
<Directory /usr/share/phpmyadmin>

    Options SymLinksIfOwnerMatch

    DirectoryIndex index.php

    AllowOverride All

    . . .

- Save the changes and exit the editor by pressing Ctrl + X → Y → Enter.
- Restart the Apache service to apply these updates:
sudo systemctl restart apache2
- Navigate to the phpMyAdmin directory and create a new .htaccess file:
sudo nano /usr/share/phpmyadmin/.htaccess
- Enter the following directives in this file. These settings configure basic authentication, set a generic message for the login prompt, specify the password file’s location, and restrict access to authenticated users only:
AuthType Basic

AuthName "Restricted Files"

AuthUserFile /etc/phpmyadmin/.htpasswd

Require valid-user
- Once done, save and close the file.
- Create the password file with hashed passwords for authentication. Start with the root user:
sudo htpasswd -c /etc/phpmyadmin/.htpasswd root
- You’ll be prompted to set and confirm a password. To add more users, use the command without the -c flag:
sudo htpasswd /etc/phpmyadmin/.htpasswd newuser
- To ensure all your new settings are active, restart Apache again using the same systemctl restart command.
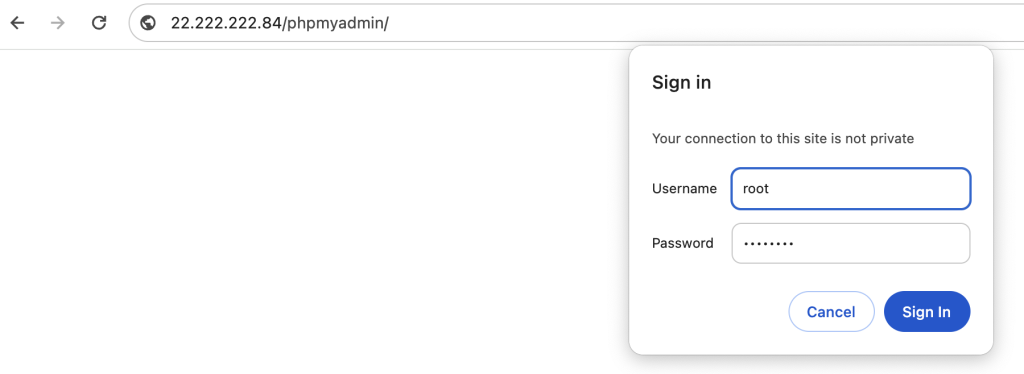
- Access phpMyAdmin in your browser, and you’ll need to enter the username and password you just configured:
Conclusion
Throughout this guide, we’ve covered the instructions for installing and configuring phpMyAdmin on your Ubuntu server:
- Download and install phpMyAdmin from the package repository.
- Set up secure MySQL user accounts.
- Log in to phpMyAdmin via a web browser.
- Configure additional user accounts and custom permissions.
- Add .htaccess authentication to strengthen security.
By following these steps, you ensure a robust environment for managing MySQL databases. Remember, maintaining a secure database system is crucial for database administrators and developers.
How to Install phpMyAdmin on Ubuntu FAQ
This section answers the most common questions about installing phpMyAdmin on Ubuntu.
Is phpMyAdmin Secure?
phpMyAdmin is secure when properly configured. It offers features like brute-force attack prevention and user access controls. To make your web server’s configurations more secure, use strong passwords and regularly update phpMyAdmin.
What Should I Do if I Forgot My MySQL Root Password?
If you forget your MySQL root password, you can reset it by stopping the MySQL service and starting it with the –skip-grant-tables option to enable password-less access. Then, log in as root and set a new password. Finally, restart MySQL and log in to the database using your new password.
Why Can’t I Access phpMyAdmin After Installation?
If you can’t access phpMyAdmin after installation, check if Apache and PHP are correctly configured and running. Make sure phpmyadmin.conf is included in Apache’s configuration and that all required PHP extensions are installed. Also, make sure your MySQL service is active.

Comments
April 19 2022
http://your-server-IP/phpmyadmin it says url not found after installing phpmyadmin in ubuntu instances in aws ??? Why it that so...??
April 19 2022
Hi there! I'd suggest to check two things for starters: 1) Make sure your phpMyAdmin is installed well. You can do this by using the command
dpkg --list | grep phpmyadmin; 2) Double-check your IP when changing it in the URL; it should contain the IP address of your server. If this doesn't help, I would suggest to get in touch with Amazon support team and double-check with them regarding the IP of your server as well as configurations.