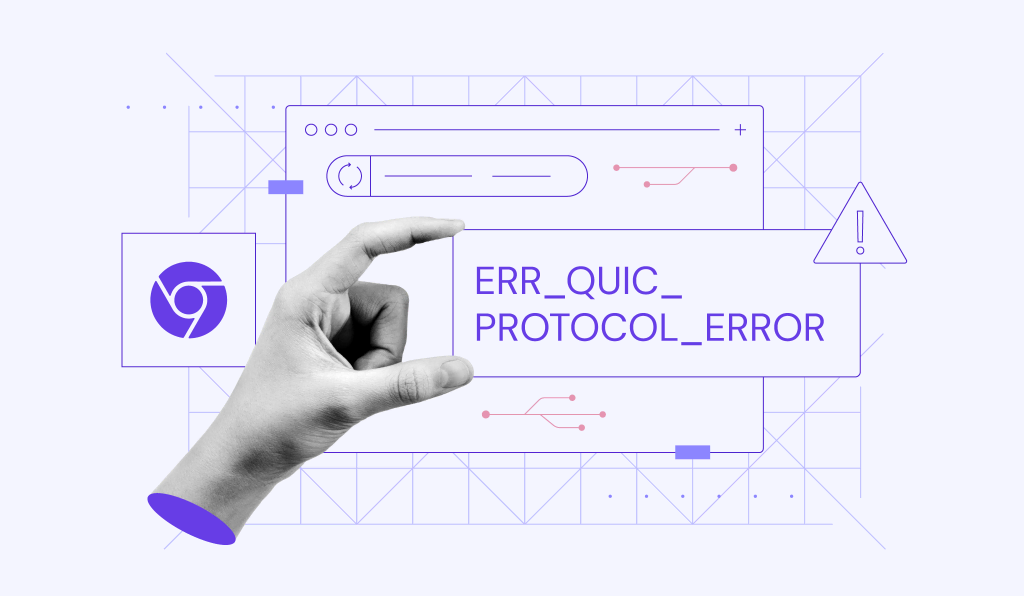
How to Fix the ERR_CONNECTION_TIMED_OUT Error
You’ve typed the website address into your web browser when the ERR_CONNECTION_TIMED_OUT error message appears. What does this mean, and how should you handle the situation?
Continue reading to learn how to resolve ERR_CONNECTION_TIMED_OUT on your browser or website.
Learn How to Fix the ERR_CONNECTION_TIMED_OUT With Hostinger Academy
Find out how to fix ERR_CONNECTION_TIMED_OUT by simple and easy steps explained in our video tutorial.

How to Fix the ERR_CONNECTION_TIMED_OUT Error
Let’s look at some ways to fix ERR_CONNECTION_TIMED_OUT. First, we will discuss methods to repair the issue if you’re on the receiving end of the error while trying to load the site.
1. Check Your Internet Connection
A browser will usually recommend checking the internet connection first to solve the ERR_CONNECTION_TIMED_OUT error. Poor connectivity can make it difficult for a site to reach a computer in time.
Here are the Windows 10 and macOS network troubleshooting guides should you need them.
If the issues persist, it’s best to switch to a different network or restart any relevant devices should you have access to them.

2. Disable Any Proxy Server Settings or VPN
Another common solution web browsers recommend is to check the proxy server settings.
A proxy server works as a middleman between a computer and the website you’re visiting. Its purpose is to protect the user’s IP address, control which sites are accessible, and cache the site data to improve page loading speed.
That said, proxy servers may cause the website you want to access to be unintentionally blocked, causing the ERR_CONNECTION_TIMED_OUT error.
To check whether these servers are the cause of the problem, reset your proxy settings. For Windows 10 users, press the Windows logo key and navigate to the Control Panel. Select Network and Internet Internet Options.
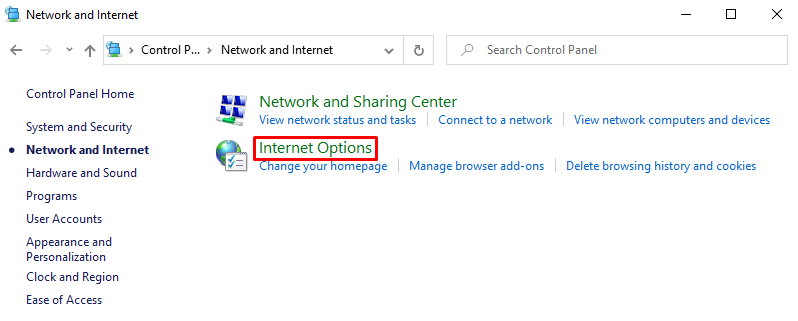
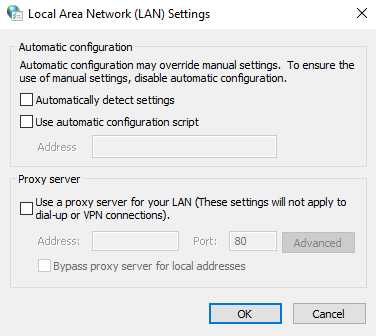
On the Internet Properties window, open the Connections tab -> LAN settings. Make sure to untick all the proxy settings, like so:
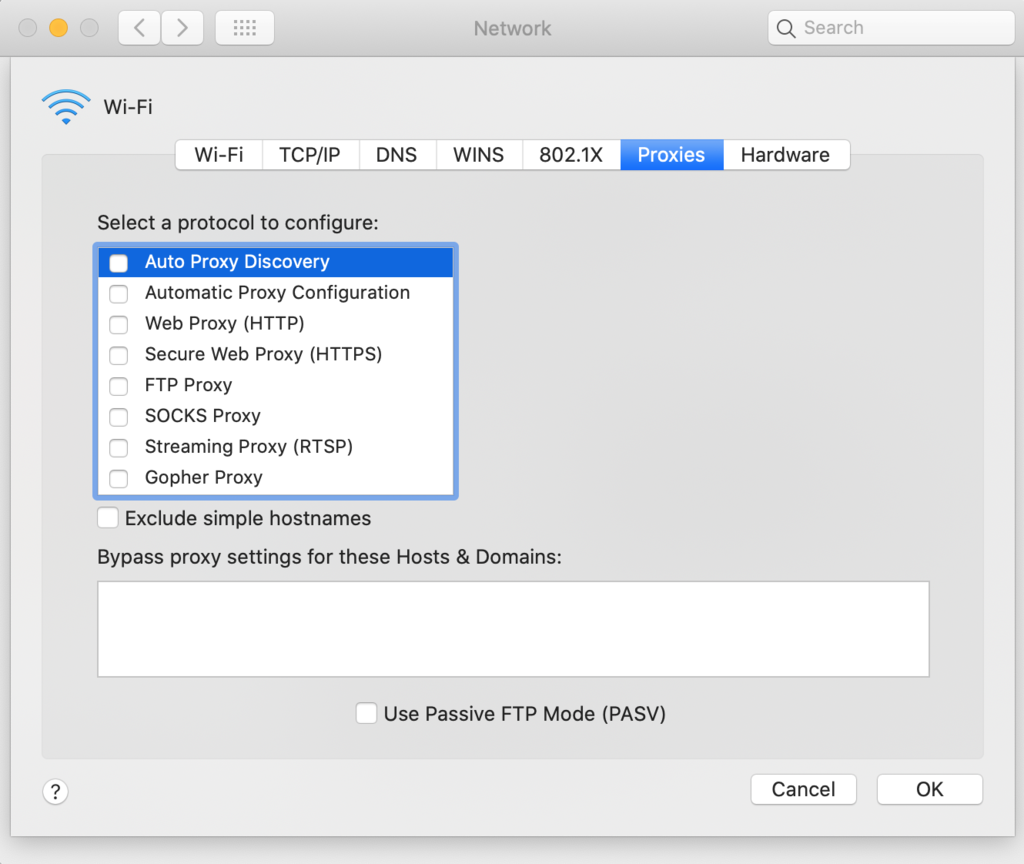
Those using macOS can open System Preferences Network and click Advance. On the Proxies tab, uncheck each box and click OK.
Open the site to see if the error has disappeared. If it has, and you need to use a proxy server for day-to-day tasks, consider reconfiguring the settings or switching to another provider.
The ERR_CONNECTION_TIMED_OUT error may also occur for those using a VPN service. In that case, we suggest changing the VPN protocol – your ISP or firewall may have blocked the one you’re using. Alternatively, try to disable the application temporarily.
3. Clear Browsing Data
Web browser data includes cache files, saved logins, and cookies.
Though they’re excellent for optimizing your browsing experience, they can weigh down the browser’s performance – leading to timeout errors. Thus, it’s best to remove them periodically.
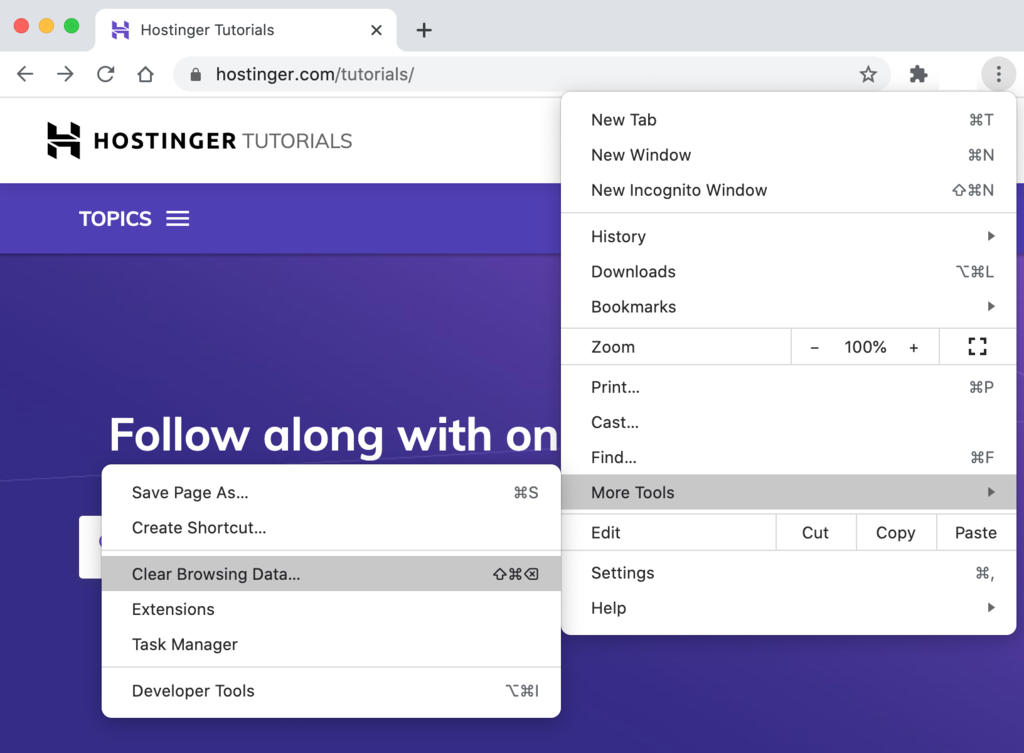
The method to clear browsing data depends on the application. Google Chrome browser users can follow these steps:
- Click the three-dot menu at the top right. Select More tools Clear Browsing Data.
- Go to the Advanced tab and check all the cache files, from Browsing history to Hosted app data. Set the Time range to All time.
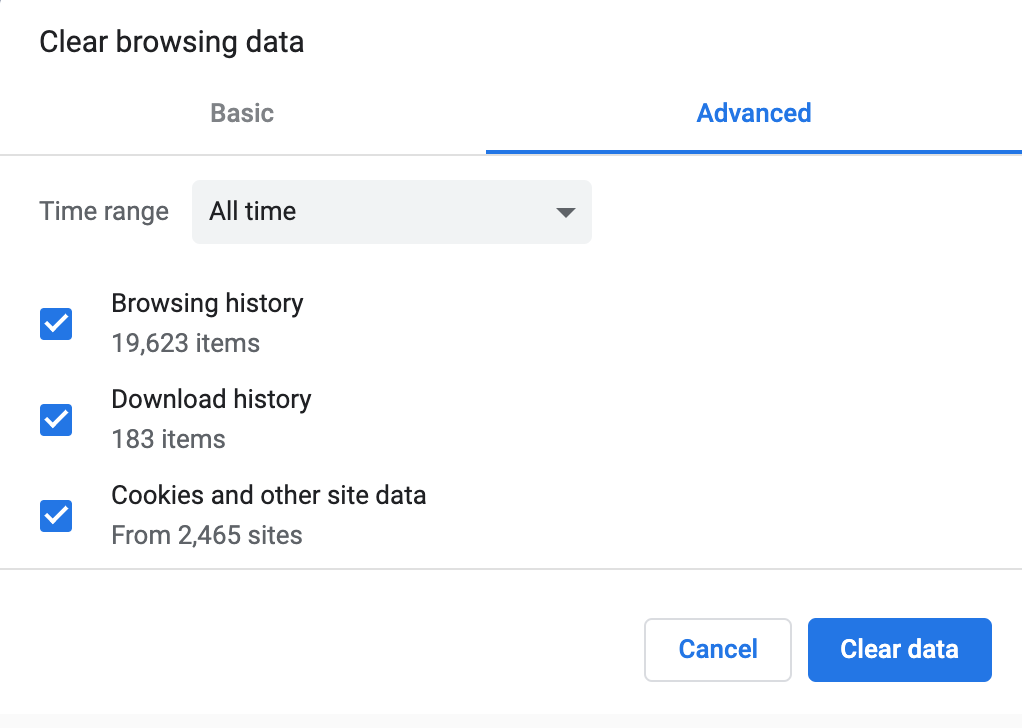
- Click Clear data. You should have removed all Chrome browsing data at this stage.
For non-Chrome users, read this article on how to clear browsing data on other major browsers.
4. Change the DNS Servers
A DNS server converts domain names into IP addresses in order to help the browser locate the website you want to visit.
Your ISP will usually have their in-house DNS servers set up on your internet connection settings. However, they may not provide the best performance.
For this reason, many people prefer to switch to third-party DNS servers from Google or Cloudflare, which are free and reliable for the average user.
If you think DNS servers are the problem, consider replacing them. The tutorials below will show how to change a network’s DNS settings using Google’s Public DNS IP addresses as an example.
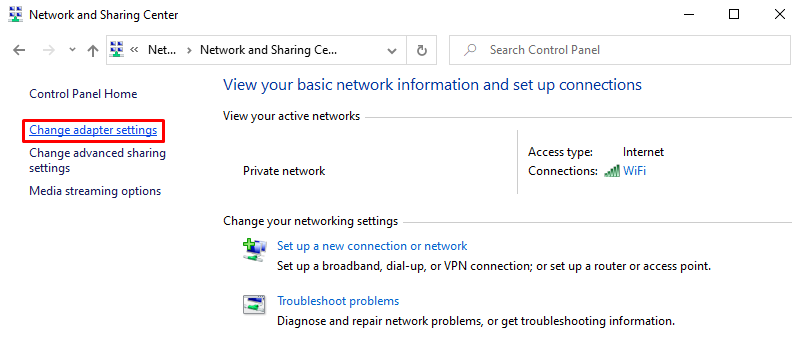
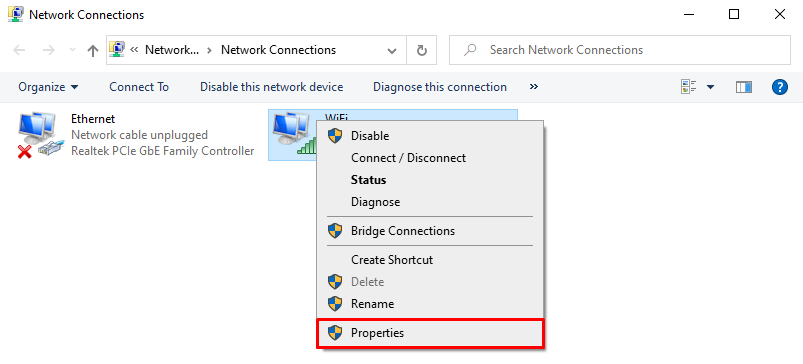
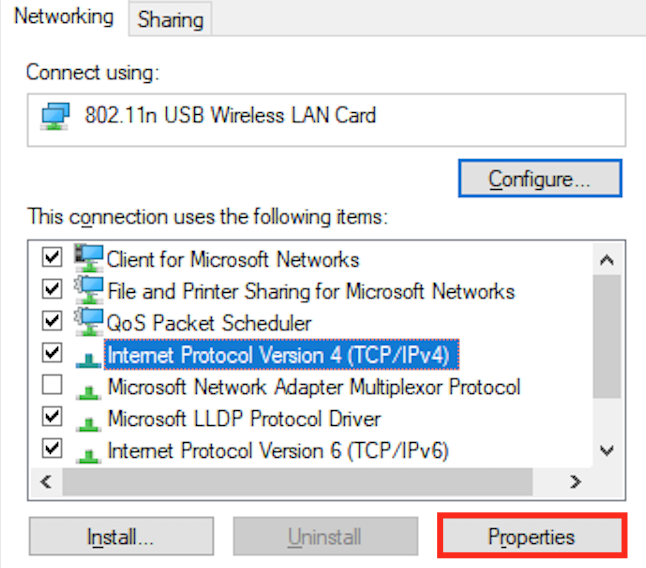
For Windows 10 users, follow these steps:
- Open the Control Panel Network and Internet Network and Sharing Center. Click Change adapter settings on the top left.
- Right-click on the current connection and select Properties.
- Choose whether to use IPv4 or IPv6 addresses for your DNS settings. Then click Properties.
- Replace the IP addresses with the following:
- For IPv4, use 8.8.8.8 and 8.8.8.4
- For IPv6, use 2001:4860:4860::8888 and 2001:4860:4860::8844
It should look like this:
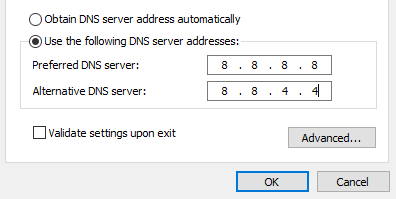
- Click OK and restart the browser.
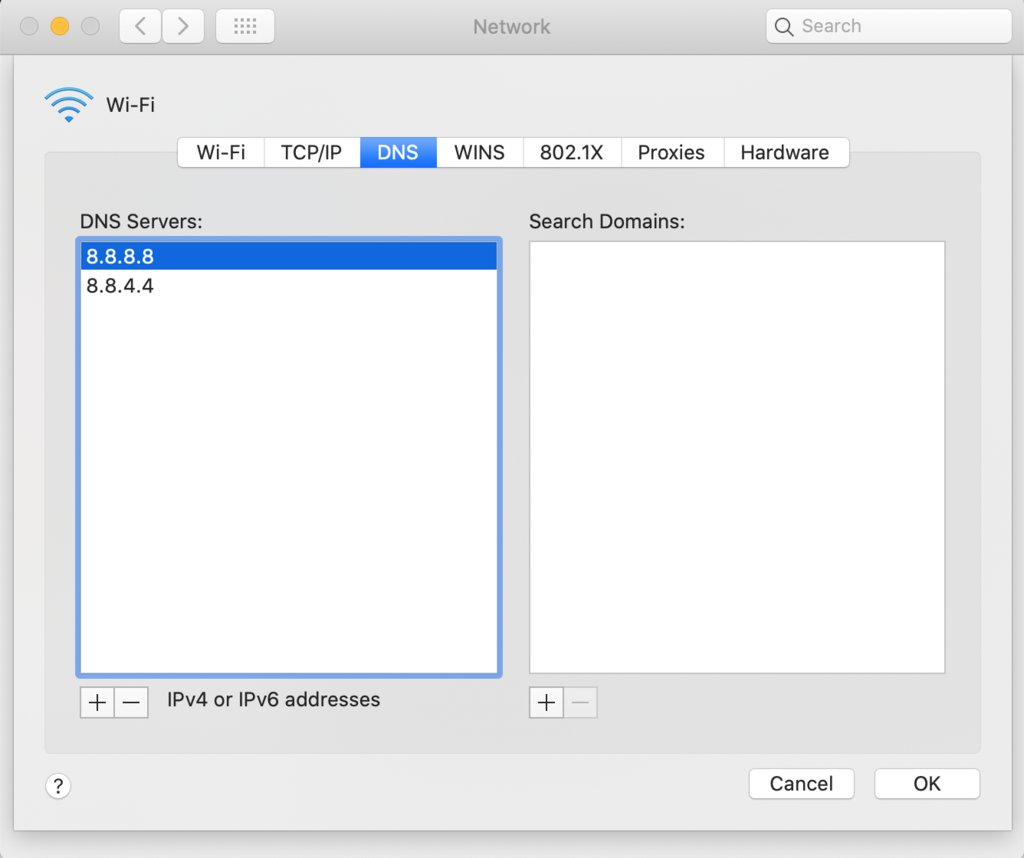
Those using macOS can check out the following guide:
- Open System Preferences Advanced.
- On the DNS tab, click the Plus sign in the DNS Servers section. Type in each IP address one by one. Click OK.
5. Flush DNS and Renew IP Address
To flush DNS means to reset the DNS caches that your computer has saved.
The DNS cache stores information about the IP addresses of the websites you visit. That way, the computer doesn’t have to translate the domain name to the IP address from the beginning each time you open the site.
Much like browser data, however, the DNS cache can be outdated. The IP addresses may be old, thus causing problems when trying to open the site.
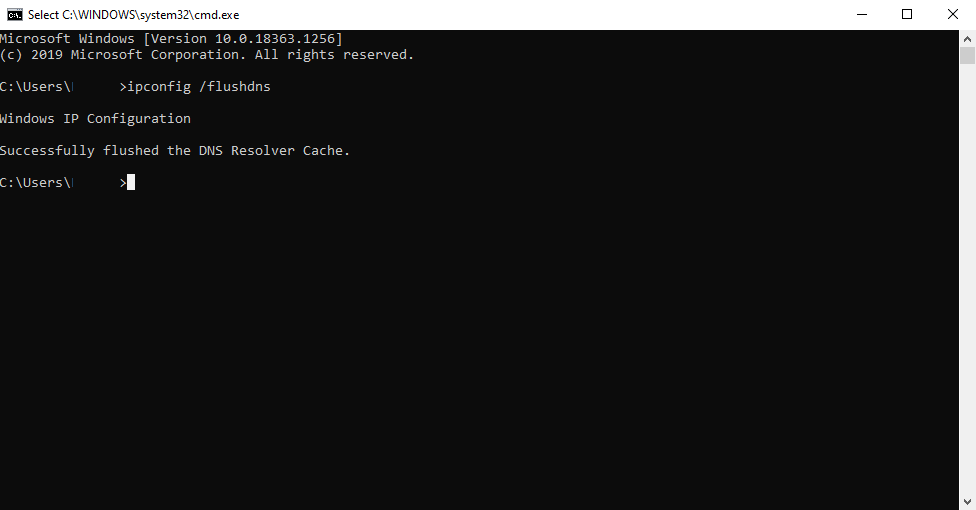
Those using Windows 10 can flush DNS via the Command Prompt. Press the Windows logo and R keys to activate the Run command. Then type “cmd” on the dialog box and click OK.
In the Command Prompt window, type the following and hit Enter:
ipconfig /flushdns
If successful, it will show a message like below:
Then insert the following lines to troubleshoot the network and renew the IP address. Make sure to hit Enter each time you add a new command:
ipconfig /registerdns
ipconfig /release
ipconfig /renew
netsh winsock reset
Once finished, restart your computer and open the browser to see if the commands were successful.
For macOS users, open the Terminal application and insert the following command:
dscacheutil -flushcache
6. Temporarily Disable Firewall or Your Antivirus Software
Firewalls and antivirus software can keep a computer safe from unauthorized parties. However, they may unintentionally mistake secure websites for unsafe ones, which can cause ERR_CONNECTION_TIMED_OUT.
To see if the firewall or antivirus program is working correctly, try disabling it temporarily.
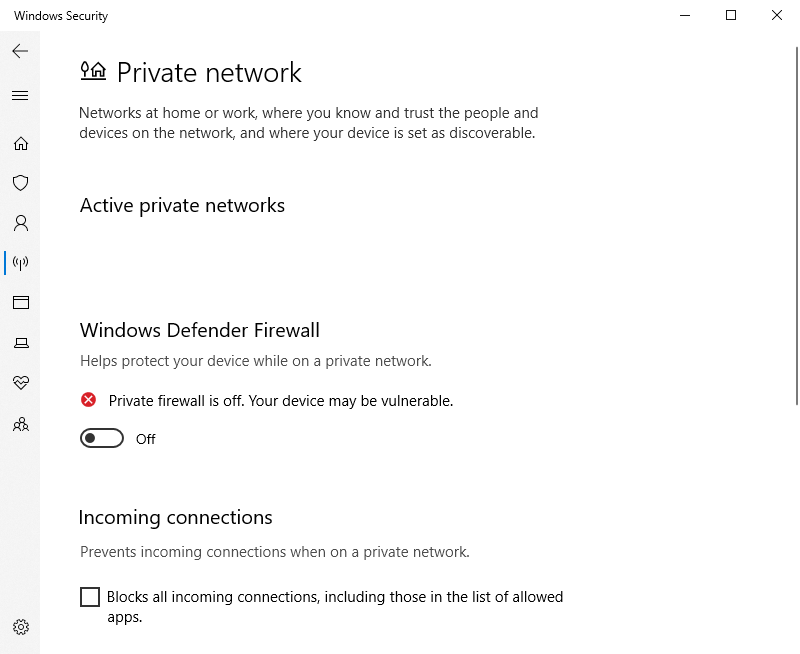
Windows 10 users who use the operating system’s built-in firewall can navigate to Settings -> Update & Security -> Windows Security. Then select Firewall & network protection. Select the network you’re using and Turn off the Windows Firewall.
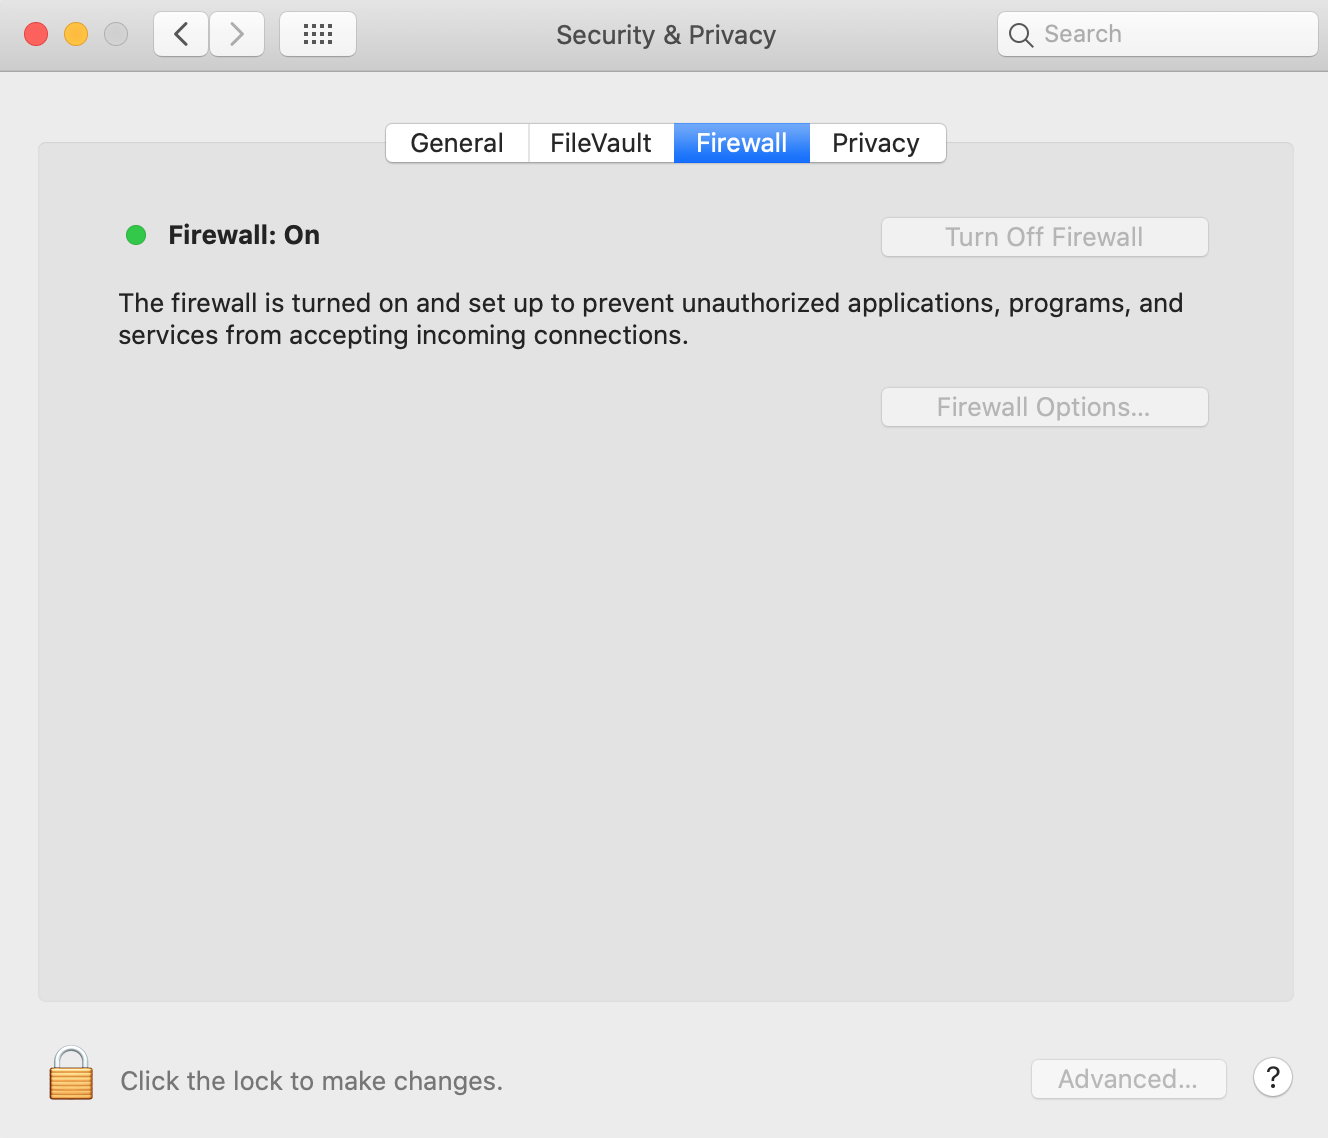
macOS users can navigate to System Preferences Security & Privacy. On the Firewall tab, press Turn Off Firewall.
Those using a third-party application can check the software’s documentation. Some antivirus programs also allow submitting a false positive form if you think the application shouldn’t block a particular website.
7. Check the Hosts File
The hosts file maps all the connections between IP addresses and their corresponding domain names. Every time you visit a website, the computer will check this document to see which IP address matches the site’s domain.
At times, the hosts file may have accidentally blocked a certain IP address or URL, causing the site to be inaccessible. Therefore, it’s good to check whether the document has blacklisted the website you want to open.
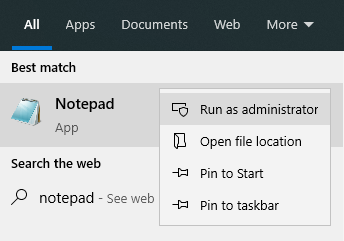
Windows 10 users will require a text editor like Notepad to view the Windows hosts file. On the taskbar’s search box, type in the name of the application and right-click it. Select Run as administrator.
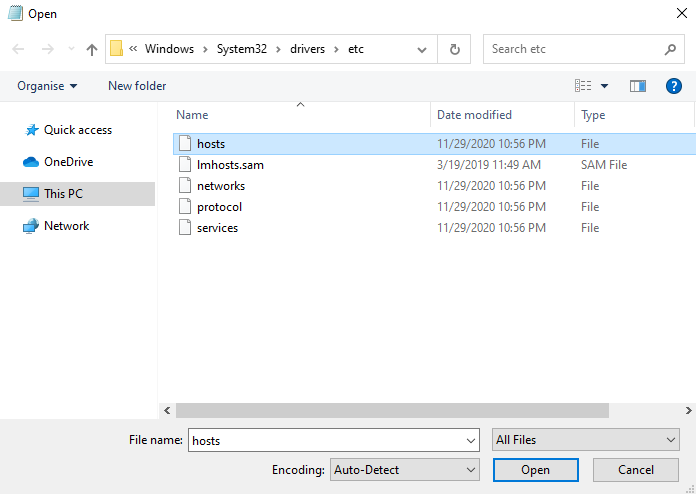
In the top-left menu, navigate to File -> Open and insert the path below into the File name bar.
C:\Windows\System32\drivers\etc\
Then select the hosts file.
The file will show a list of blocked websites below the last line that starts with the “#” sign. Delete them and press Ctrl + S to save changes.

macOS users can open the Terminal, insert this line below, and hit Enter:
sudo nano /private/etc/hosts
Remove the list of websites that are below the “::1” line.

8. Update Your Computer’s Network Adapter Drivers
A network adapter drivers enable a computer to connect with the local area network so that you can use the internet. If the device is dated or improperly installed, it can experience issues that lead to the ERR_CONNECTION_TIMED_OUT error.
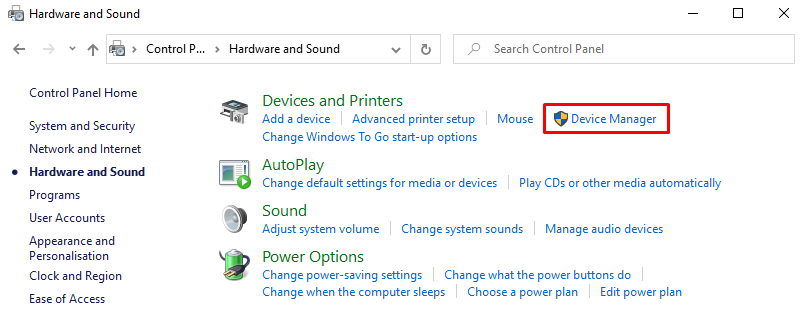
Here’s how to check whether the network adapters of a computer are functional in Windows 10:
- Make sure you’re logged in as an administrator to be able to configure the settings. Then go to Control Panel Hardware and Sound Device Manager.
- On the Device Manager window, Right-click on the networking device and select Update driver.

- In the update wizard, choose Search automatically for updated driver software. It will check whether the network adapter is up-to-date and update the application if it isn’t.
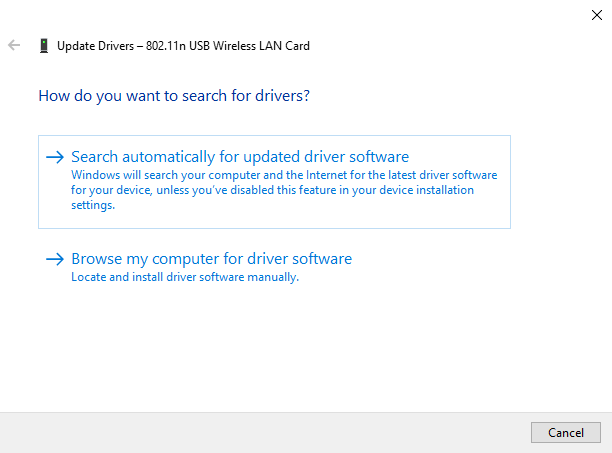
- Restart your computer and open the browser to see if the error persists.
For macOS users, the regular software updates typically include one for network adapter drivers.
How to Fix ERR_CONNECTION_TIMED_OUT on the Website and Server Level
The following section will show ways to fix the ERR_CONNECTION_TIMED_OUT error if the problem occurs on your website.
1. Disable Any New Scripts
If the error occurs after you’ve modified the website’s script, the new code may be the cause of the problem. Some new features might be misconfigured or using an excessive amount of resources, creating performance issues.
In this case, consider removing the new code. Create a backup first, then undo the changes you’ve made to see if the site becomes accessible.
2. Check the Maximum Execution Time
Maximum execution time is the total duration a PHP script can run on a website. The hosting provider will usually pre-configure this, with the typical timeout value being 30 seconds.
If the script runs longer than the defined period, the site will fail to establish communication with the browser – thus causing ERR_CONNECTION_TIMED_OUT.
The good news is that it’s possible to increase the limit. Hosting providers may enable this ability via the user’s control panel or do it for the client should they request it.
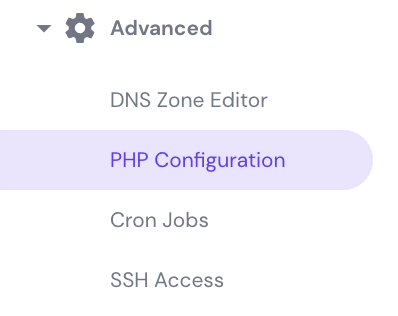
If you’re a Hostinger user, go to the hPanel and navigate to the Hosting Account dashboard. Then click PHP Configuration under the Advanced section.
In the PHP Options tab, search for max_execution_time and increase the number. Somewhere between 120 and 180 seconds is usually more than enough. Once that’s done, scroll down and press the Save button.

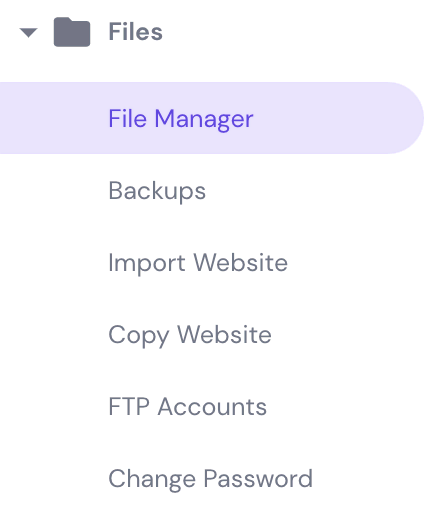
Another way to modify the timeout value is to edit the website’s .htaccess manually. Hostinger clients can access this file through hPanel’s File Manager in the Files section.
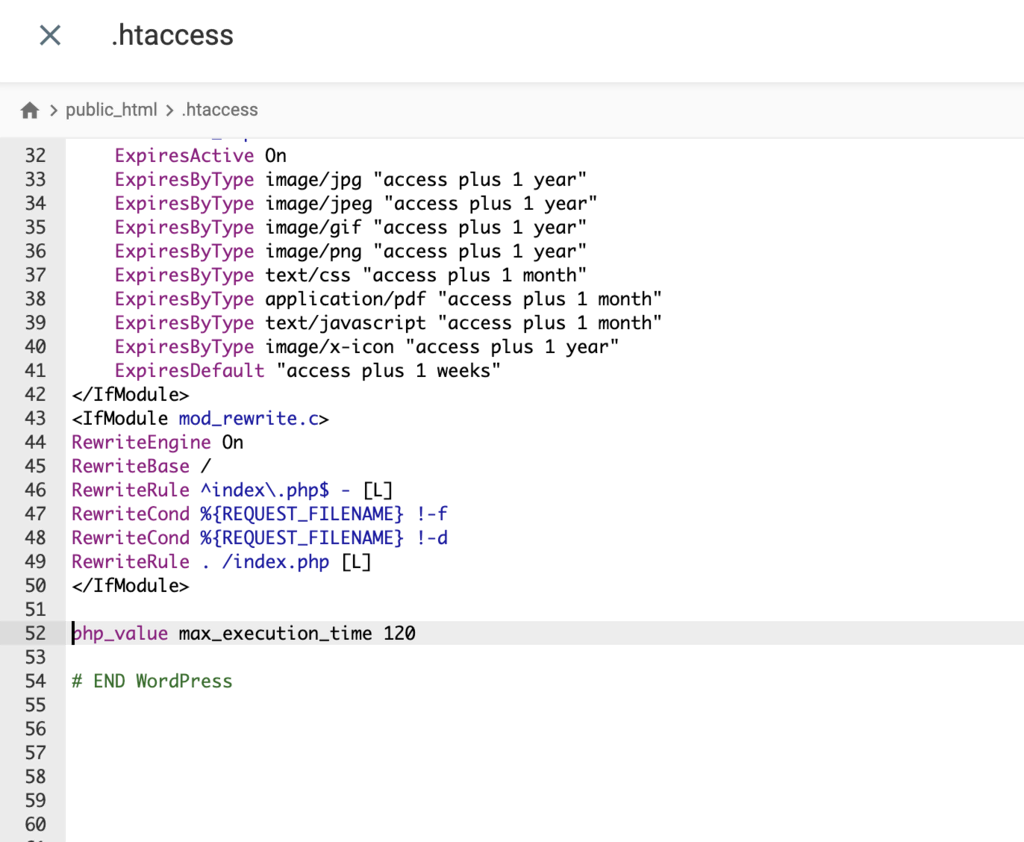
Click on the public_html directory and locate the .htaccess file. Double-click on it and insert the code below before the “END WORDPRESS” line:
php_value max_execution_time 120
It should look something like this:
Finally, press Save & Close. Open the website to see if the error has gone.
3. Increase PHP Memory Limit
Some PHP scripts may consume more memory than the amount they are allowed to, making the site take too long to respond to the browser.
As with the maximum execution time, it’s possible to increase the memory limit. However, the amount should be within the maximum available memory your hosting provider has allocated to your plan.
If you don’t know your hosting plan’s maximum available memory, contact the company’s support team or read the documentation.
To increase the limit, open the .htaccess file on File Manager. Then insert the line below, using the amount of maximum available memory like so:
php_value memory_limit 128M
The code placement should be at the bottom. If you use WordPress, it should be above “END WORDPRESS.”
Finally, press Save & Close.
If the website requires a higher memory threshold, consider upgrading to a higher plan.
4. Temporarily Deactivate WordPress Plugins
WordPress plugins may be problematic if they come from an unreliable source or you’re using more than the amount your website can handle.
To figure out which plugin is causing the issue, we recommend disabling them and reactivating them one by one.
Users experiencing the ERR_CONNECTION_TIMED_OUT error probably won’t be able to open the WordPress admin panel. Thus, an FTP client like FileZilla will be necessary to access your files.
Once the connection is successfully established, locate and open a wp-content directory in the Remote site section. Then find the plugins folder.
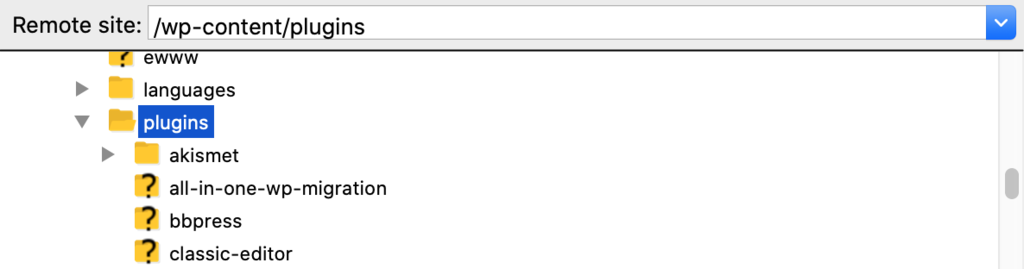
Right-click on the plugins folder and rename it to plugins-deactivated. Doing so will prevent WordPress from finding the directory and using the plugins.
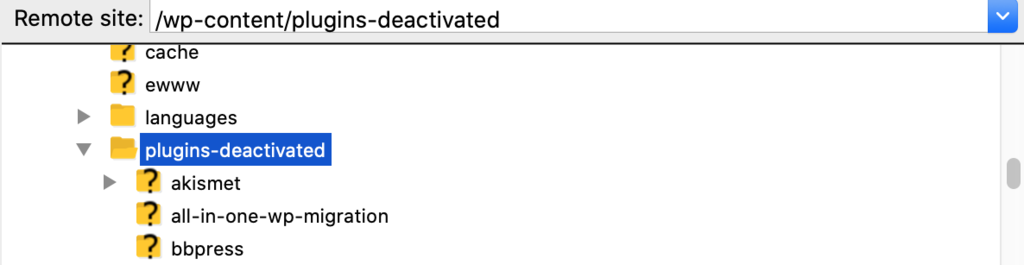
Now try to open the admin panel. If it is accessible, one of the plugins may be the problem. To pinpoint which one, return to the FTP client and rename the plugins folder to its original title. Then open the plugins directory and rename one of the folders, like so:
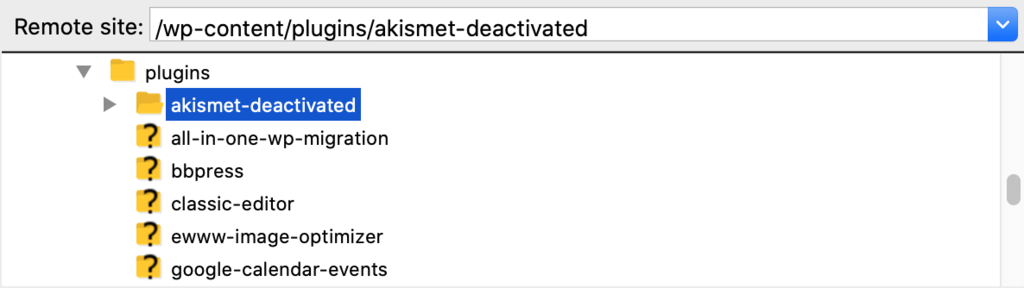
Try to reaccess the admin panel. If you can open it, you have found the culprit.
Should the error message reappear, replace the folder’s title with its original name and repeat the renaming method with other plugin folders until you can access the website.
5. Temporarily Activate the Default WordPress Theme
A theme may cause ERR_CONNECTION_TIMED_OUT if it has bloated code or compatibility issues with a website.
To check if the theme is the issue, WordPress recommends reverting to a default theme. If the admin panel is inaccessible, you can do this manually through phpMyAdmin.
Before that, you need to know the name of your WordPress database.
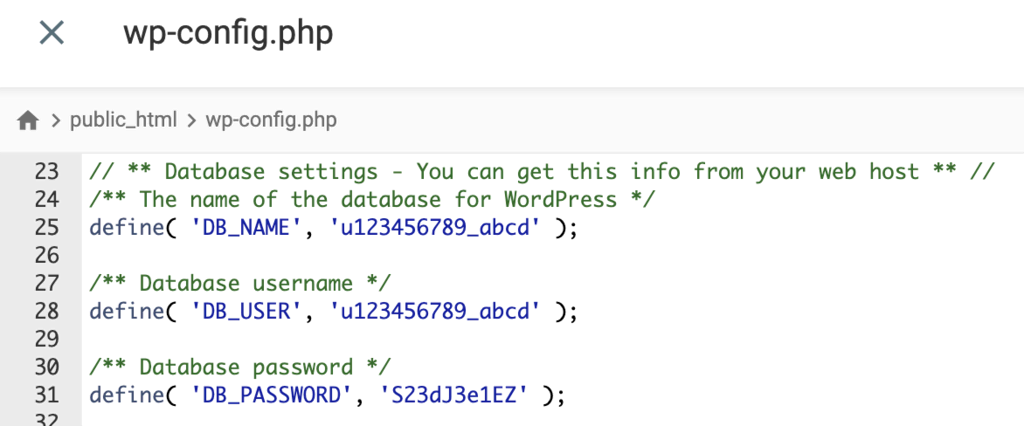
Hostinger users can do this by going to the hPanel’s File Manager public_html and then locating and opening the wp-config.php file.
The name will be available under the “The name of the database for WordPress” line. In this example, the term is u123456789_abcd.
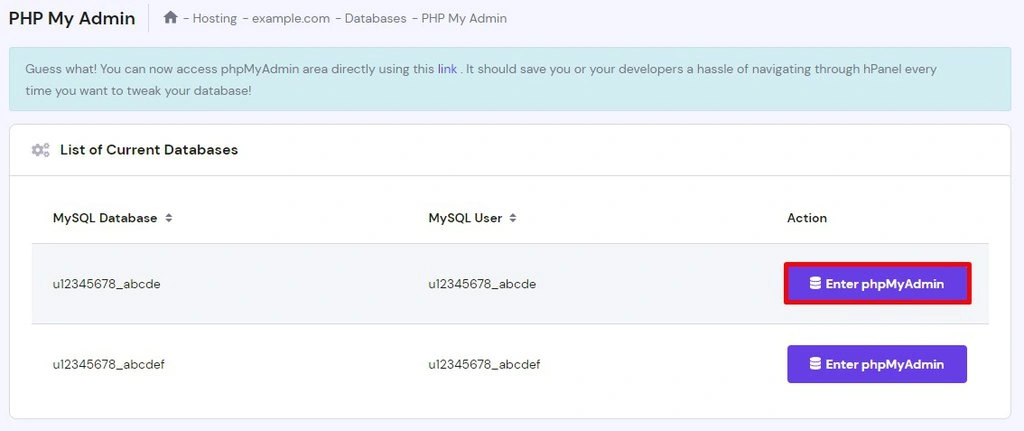
Return to the hPanel and click phpMyAdmin under the Databases section. Navigate to the database using the name you found and press Enter phpMyAdmin.
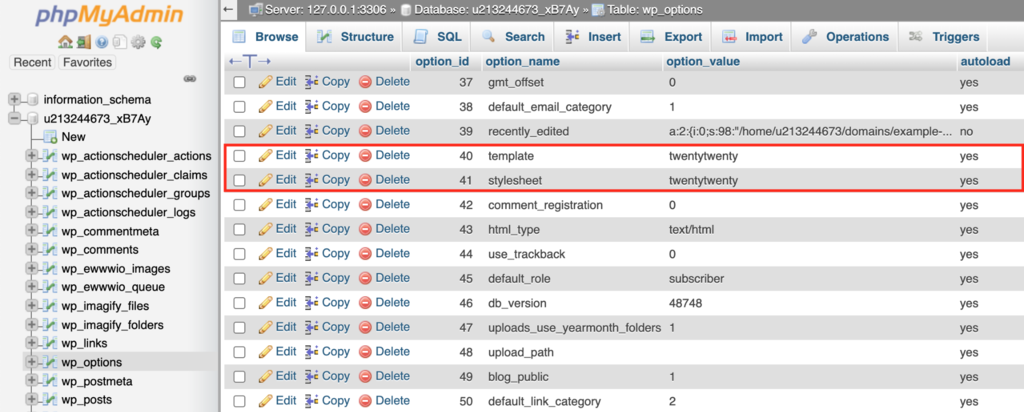
In the phpMyAdmin area, click on wp_options. Then find two queries using the names template and stylesheet. They may be on the second or third page.
After finding them, double-click on the option_value column and replace the current theme’s name with a default one. It can be twentytwentyone, twentytwenty, or twentynineteen.
See if the admin panel and website are now available. If they are, consider reinstalling the theme or changing it.
What Does the ERR_CONNECTION_TIMED_OUT Error Mean
ERR_CONNECTION_TIMED_OUT, also called the timeout error, means a website took too long to respond to the browser’s request.
Generally, a site can establish communication with a computer within 30 seconds. If it takes longer than that, the browsing application will terminate the connection.
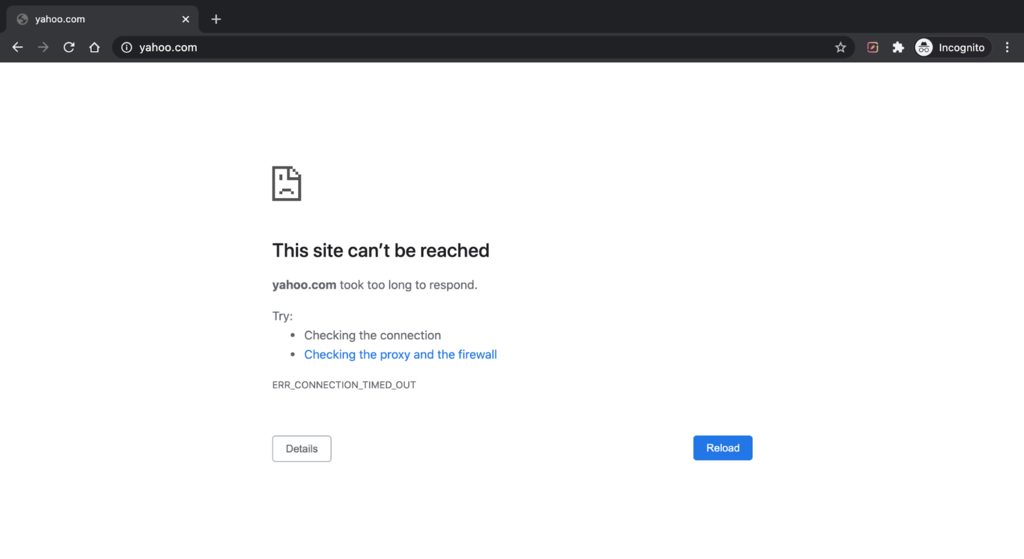
This communication problem is quite common, though web browsers may have different names for it. The timeout error in Google Chrome is called ERR_CONNECTION_TIMED_OUT.
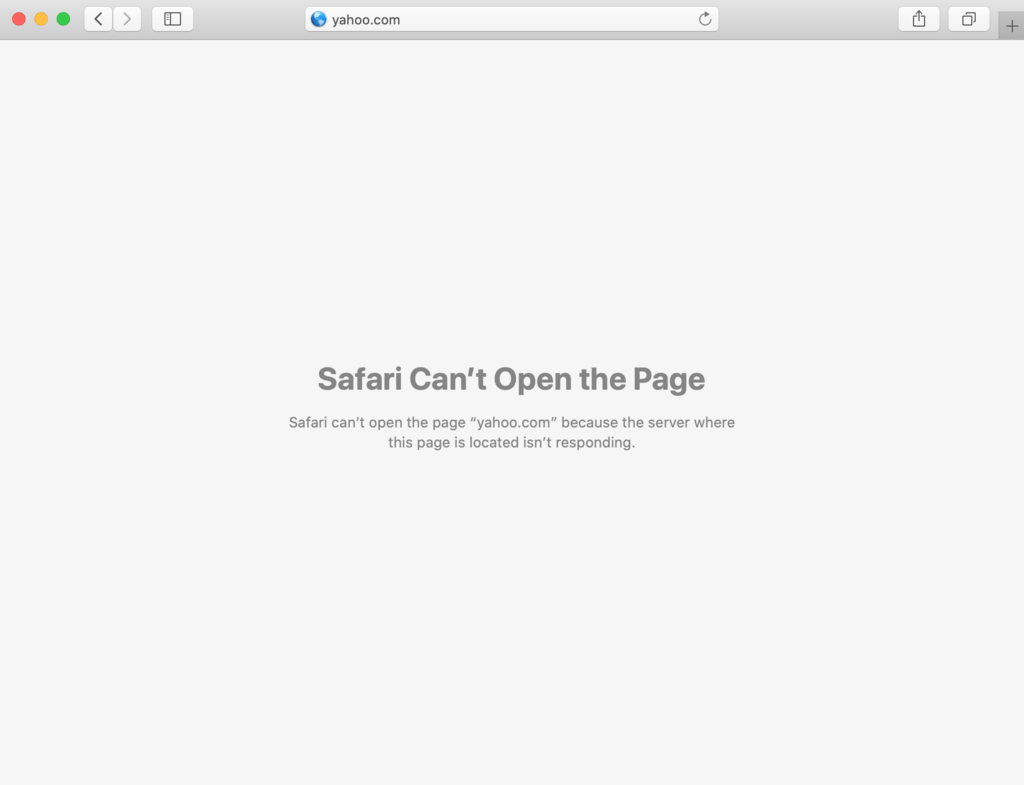
Meanwhile, the error message in Safari appears as “Safari Can’t Open the Page” message:
What Causes the ERR_CONNECTION_TIMED_OUT Error Message
Various factors can cause ERR_CONNECTION_TIMED_OUT. If you’re trying to open a website, the error may be due to:
- Software-related problems, such as those with the browser, antivirus, or firewall
- Internet connection issues
On the other hand, the problem may also stem from the site itself or its hosting configuration. According to WordPress, it may indicate that the web application is overworking the server.
With that in mind, webmasters need to be familiar with their site and hosting settings so that the problem doesn’t occur frequently.
Conclusion
We have provided you with 13 ways to fix ERR_CONNECTION_TIMED_OUT on your browser or website. If all else fails, consider contacting your ISP or hosting provider to help you.
Let us know which method you tried and which one solved the error. Good luck!
Toubleshooting Other Errors
What Are HTTP Status Codes
How to Fix the ERR_CONNECTION_REFUSED Error
How to Fix the ERR_CONNECTION_RESET Error
How to Fix the ERR_NAME_NOT_RESOLVED Error
How to Fix the ERR_TOO_MANY_REDIRECTS Error
How to Fix the ERR_CONNECTION_CLOSED Error
How to Fix the ERR_CACHE_MISS Error
How to Fix the PR_END_OF_FILE_ERROR
Ways to Fix INET_E_RESOURCE_NOT_FOUND Error
How to Fix “Your Connection Is Not Private” Error
ERR_CONNECTION_TIMED_OUT FAQs
Here are some frequently asked questions about the ERR_CONNECTION_TIMED_OUT issue.
How Can I Avoid Getting ERR_CONNECTION_TIMED_OUT Errors in the Future?
To avoid getting ERR_CONNECTION_TIMED_OUT errors in the future, you can try optimizing your network settings, disabling any VPN or proxy services, clearing your browser cache and cookies, or trying a different web browser.
What Are Some Common ERR_CONNECTION_TIMED_OUT Messages?
Some common ERR_CONNECTION_TIMED_OUT messages include “This site can’t be reached” and “Connection timed out”. These messages indicate that the web server is not responding within the expected time frame, potentially due to network connectivity or server issues.

Maisha is a proponent of high-quality, actionable content. When she's not writing for Hostinger Tutorials and Blog, she immerses herself in the English thesaurus. Her love for personal development essays drives her to help her fellow writers succeed in the world of content marketing.