How to Create an FTP account – A Beginner’s Guide

Creating an FTP account helps you connect to an FTP server, where you can upload, download, and edit web files. It also enables you to involve other people in managing your website without sharing your primary account credentials with them.
This article will show you why you need an FTP account and how to create multiple FTP accounts on hPanel and cPanel. We’ll also guide you in configuring which directory the new FTP users can access.

What Is an FTP account?
A file transfer protocol (FTP) account is a user account created for accessing FTP services. It enables you to communicate and transfer files between your local workstation and a server via an FTP client.
Customarily, hosting providers give users permission to access the server and manage their web files in the form of an FTP account.
An FTP account consists of an FTP host, a username, and a password. It’s usually linked to a website, network, or FTP server.
Why Do You Need an FTP Account?
Managing a large number of files is more convenient and secure if you do it via an FTP connection. While your web hosting control panel’s File Manager can also do this task, FTP does a better job at processing multiple web files.
It’s also possible to have more than one FTP account for different users, allowing you to share the workload with team members. This will grant them authorization access rights to develop the site without giving them the main FTP account password.
If you have many websites, it’ll also help you manage them. As an FTP account will only give access to one domain name, you can provide access to a web developer to one site only, improving the overall security.
How to Create an FTP Account in hPanel?
This section will guide you in creating an FTP account on Hostinger’s control panel, hPanel.
Hostinger provides an FTP account by default. Perform these steps to create a new FTP account so other users can help manage your site.
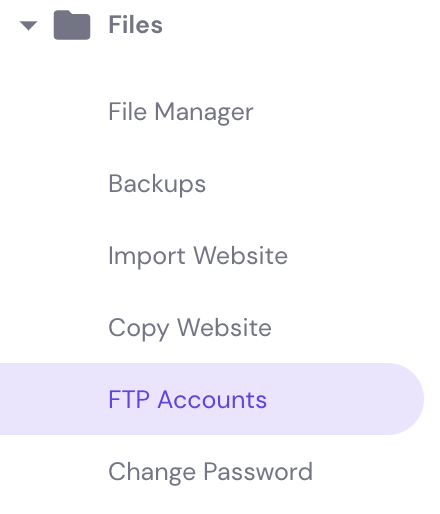
- Under the Files section, select FTP Accounts.
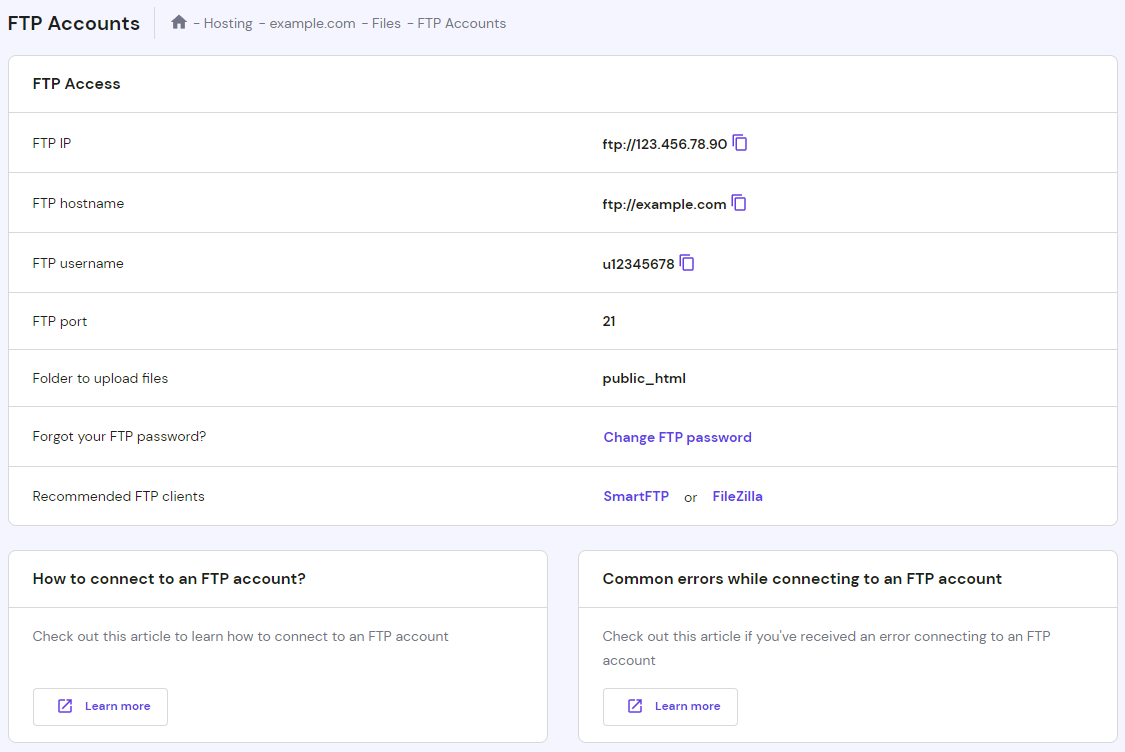
- The first section on the FTP Accounts page is the FTP Access section. It contains the master FTP account credentials, which is the main FTP account of your hosting plan.
- Scroll down to find the Create a New FTP Account section.
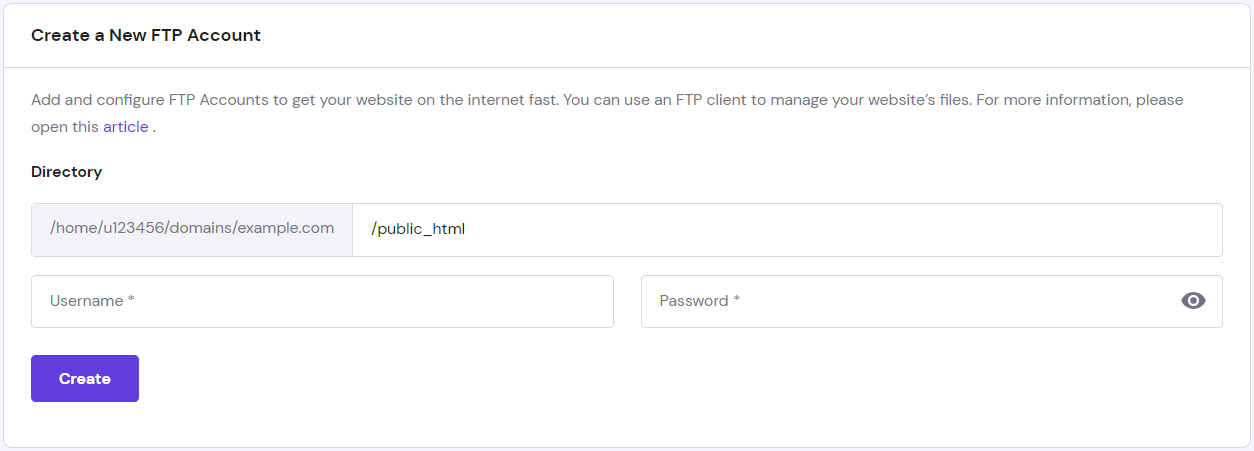
- On the Directory field, enter public_html as the working directory for your new FTP account. By putting your new account on public_html, you’ll grant the new account access to manage any directory and file inside it. If you want to give the new account access to the root directory – which will enable the user to configure the entire system – enter “/”.
- Create a username and password for the new user.
- Click Create.
- The newly created account should appear in the List of Active FTP Accounts at the bottom of the same page. Manage your accounts through this section, where you can delete the accounts if you no longer need them.

Now that you’ve successfully created an additional FTP account on hPanel, connect via an FTP client such as FileZilla or FTP Manager Lite.
How to Create an FTP Account in cPanel?
Hosting services that use cPanel already provide an FTP account for their users by default. You just have to contact your hosting provider and ask them to enable FTP services on your host server.
If your hosting account uses a dedicated IP address, use your cPanel account’s username and password to log in to FTP.
If the account is on a shared IP, which means it’s shared between multiple domains, you must use the full FTP account username – such as test@my-site.com – and password to log in to FTP.
Create an FTP User
Create new FTP accounts if you would like to give access to other users without giving them the main cPanel login credentials. You can also configure the levels of access by assigning each user to a specific directory.
Follow these steps to create an FTP user on cPanel:
- Log in to your cPanel account.
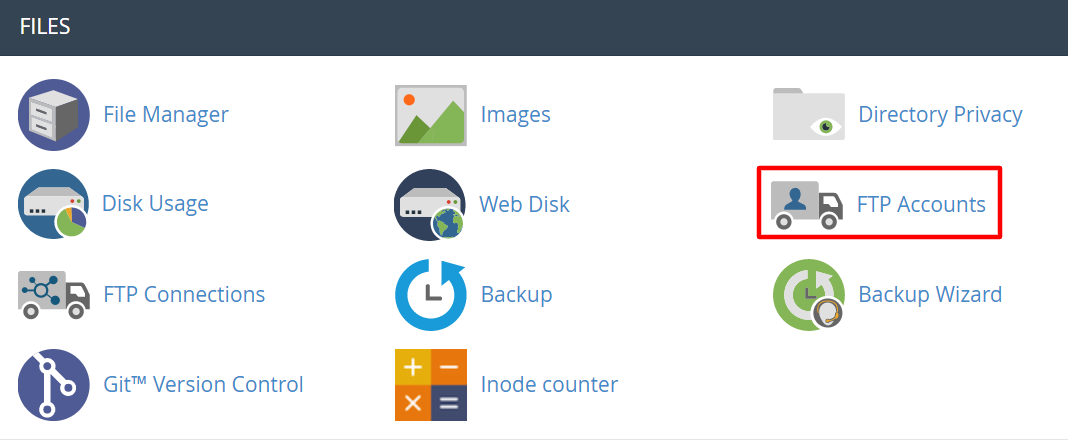
- Under the Files section, click FTP Accounts.
- Under the Add FTP Account section, fill in the Login field with the desired username.

- Select a domain name from the Domain drop-down menu. The cPanel FTP account username will be the combination of the name in the Login field and Domain menu below it. In this example, the username will be test@mysite-dev-cp-1.xyz.
- Enter a password into the Password field. Please note that the cPanel system will evaluate your password and show the indication on the Strength bar. The bar will turn green if your password is considered strong. Click Password Generator if you need help creating a strong password.
- Re-enter your password in the Password (Again) field to confirm it.
- Enter the account’s home directory into the Directory field. Here’s where you determine the user’s level of access. For example, public_html as the home directory means the user can access any directory and file inside the public_html folder. However, the user won’t be able to access folders outside the public_html directory.

- Set a Quota for the FTP account, or select Unlimited. This determines the maximum amount of bandwidth an FTP user can use.
- Click Create FTP Account.
Scroll down to see your new account listed under the FTP Accounts section.

From this section, you can also change the password, change the quota, configure FTP clients, or delete the account if you no longer need it.
Perform these steps to configure an FTP client:
- Install CoreFTP or Cyberduck on your computer. Please note that cPanel only supports auto-configuration for these FTP clients. If you would like to use another client, you will need to configure the client manually.
- On your cPanel -> FTP Accounts section, click Configure FTP Client for the desired FTP account.

- Under the Configuration Files section, choose between CoreFTP or Cyberduck by clicking on the FTP Configuration File button under either logo.
- Open the downloaded configuration script file. The FTP client will automatically open, configure itself, and connect to the FTP server.

Conclusion
Whether you’re a web developer or a site owner, an FTP account is a useful website management tool. It allows you to create and remove directories and handle a large number of files on the server conveniently.
In this guide, you learned how to create a new FTP account using hPanel or cPanel.
By creating a new, separate FTP account, you’ll be able to grant specific people access to certain parts of your website. It will enable you to manage the site more effectively and securely, therefore improving your work quality.

Tomas provides top-notch technical advice on a daily basis to our valued customers. He also likes to create websites and do various coding side projects.

Maya is a Content Specialist and WordPress Contributor. With years of journalistic experience under her belt, her main goals are to help people understand complex processes in a simpler way, and tell the stories of people who thrive thanks to technology. When she’s not writing, you can find her watching sci-fi movies while eating ramen. Follow her on LinkedIn.

Comments
January 27 2022
you said Under the Files section, select FTP Accounts. What do you mean files section do you mean file explorer or what?
February 04 2022
Hi Johnny, this section refers to your hPanel - under the section "Files", there's buttons to access "File Manager", "Backups" and "FTP Accounts". You'd be looking at the last one here :)
April 03 2022
is there a way to limit permissions on users to say, only download?
April 06 2022
Hi there! If you have a VPS, you would be able to do it following this guide. On shared servers, you'll probably be restricted of using this feature.
April 26 2022
How to vreate quota for a custom folder? Ex: 1=10 Gb, 2=15Gb?
May 04 2022
Hi Stefan! If you're using cPanel, you can setup FTP quota for a specific FTP account; you can find documentation on how that can be done over here. However, on hPanel FTP accounts do not have quotas.