How to Create a Custom Menu Using WordPress wp_nav_menu Function
Menus are some of the most common elements on websites. With WordPress, you can easily customize menus and choose from multiple display options if your theme supports it. However, if you want to use menus in a custom location, you’ll need to edit your theme files and add the wp_nav_menu function.
By combining this function with register_nav_menu, you’ll be able to create and place menus anywhere on your website. Adding and configuring these functions is relatively simple, even if you’re not a developer. Plus, you can edit the menus right from your WordPress dashboard.
In this article, we will talk about how the WordPress wp_nav_menu function works. We’ll show you what arguments and classes work with wp_nav_menu and then explain how to use the function with your theme. Let’s get to it!
Download all in one WordPress cheat sheet
What Is the WordPress wp_nav_menu Function?
wp_nav_menu is a function that can display custom menus on WordPress websites.
Unlike wp_page_menu, which shows a list of existing pages, wp_nav_menu only works with custom menus.
You can add the function to any of your theme’s template files to control where you want the menu to appear. Here’s a quick example of what the function looks like without any specific parameters:
wp_nav_menu( array $args = array() )
You’ll need to specify which menu you want to display for the code to work. In practice, a wp_nav_menu example function in a page template would look like this:
wp_nav_menu( array(
    'theme_location' => 'custom-menu') );
A wp_nav_menu function can include multiple parameters. In that example, we used theme_location to specify the name of the custom menu we want to use.
If you’re not comfortable adding code to your website, you can opt for WordPress menu plugins instead. Some tools will enable you to create and place custom menus, just as if you were using wp_nav_menu.
You might also be able to utilize some WordPress page builders. If you’re already using one of these tools, check to see if it offers custom menu functionality.
WordPress wp_nav_menu Parameters and CSS Classes
Most WordPress functions offer various predetermined parameters to modify their effects. In the case of wp_nav_menu, you have both parameters and CSS classes. Let’s start with the former!
wp_nav_menu Parameters
You can customize the wp_nav_menu function using one or more parameters. Here are the available options:
- ‘menu’ – indicates which menu you’re using. You can specify a menu using an ID, slug, name, or object.
- ‘menu_class’ – configure the CSS class for your menu. By default, the function will use the menu class.
- ‘menu_id’ – specify the ID for the menu. The default value or ID is the menu’s slug with an appended or incremented number.
- ‘container’ – choose what type of container to use for the menu. By default, the function uses div containers.
- ‘container_class’ – set a CSS class that applies directly to the menu’s container. By default, that menu class will be menu-{menu slug}-container.
- ‘container_id’ – set an ID for the menu’s container. As with the menu’s ID, the container will use its slug incremented by default.
- ‘fallback_cb’ – if WordPress can’t find the menu you want to display, this parameter tells it which other element it should show.
- ‘theme_location’ – if you register a custom menu using register_nav_menu, this parameter will display it.
- ‘items_wrap’ – by default, your menu will display in unordered list (ul) format. This parameter lets you configure how to wrap the menu items.
- ‘item_spacing’ – most menus use whitespace to separate items. If you want to disable that whitespace, you can set this parameter to discard.
There are a few additional wp_nav_menu parameters that we’re not mentioning, including options for adding text to the menu. However, the parameters listed above are the primary elements you’ll use when adding custom menus to a theme.
Here’s an example of a function using multiple parameters:
<?php
wp_nav_menu( array(
    'theme_location' => 'custom-menu',
    'container_class' => 'menu-class'
    'fallback_cb' => ‘wp_page_menu’ ) );
?>
If the number of available parameters seems overwhelming, don’t worry. In most cases, you’ll only use the theme_location and container_class parameters. That makes configuring the function remarkably simple.
wp_nav_menu CSS Classes
When you use the wp_nav_menu function, it automatically applies a range of CSS classes to every displayed menu item.
Here are the most important wp_nav_menu CSS classes:
- .menu-item – this class applies automatically to every menu item.
- .menu-item-has-children – applies to menu items with sub-items only.
- .menu-item-object-{object} – applies to every menu item. The object placeholder can be a post_type or taxonomy.
- .menu-item-object-category – these menu items correspond to a specific WordPress category.
- .menu-item-object-tag – menu items that correspond to a WordPress tag.
- .menu-item-object-page – menu items within static pages.
- .menu-item-object-{custom} – items that correspond to custom post types.
- .menu-item-type-{type} – applies to every menu item. The type placeholder can be post_type or taxonomy.
- .menu-item-type-post_type – items that correspond to any post_type.
- .menu-item-type-taxonomy – items that correspond to any taxonomy.
As you can see, there’s a lot of overlap with the wp_nav_menu CSS classes. The broad number of options at your disposal means that you can be hyperspecific when using CSS to style custom menus.
Remember that you can also use WordPress custom CSS classes with wp_nav_menu parameters. That approach can be a great option if none of the predetermined classes target the exact menu or items that you want to style.

How to Create and Customize a Menu Using WordPress wp_nav_menu Function
Now that you know how the wp_nav_menu function works, it’s time to learn how to use it within your theme. Let’s start by talking about wp_nav_register.
Step 1: Create a Custom Menu Using wp_nav_register Function
As we mentioned before, wp_nav_menu doesn’t allow you to create custom menus but lets you place them. That means you need to make the menus manually before using that function.
wp_nav_register lets you create or “register” menus for a specific theme. You’ll need to edit the theme’s functions.php file to use it.
Before you get to work, we recommend setting up a child theme if you’re not already using one. Working with a child theme will prevent any changes to the theme’s code from disappearing when you update it. It’s also wise to fully back up your website before changing essential files.
Once that is resolved, you’ll need to access your theme’s functions.php file. The easiest way to do this is by navigating to the Appearance → Theme File Editor page in the dashboard.
The theme editor should open to your active theme, and you can select the functions.php file using the menu to the right.
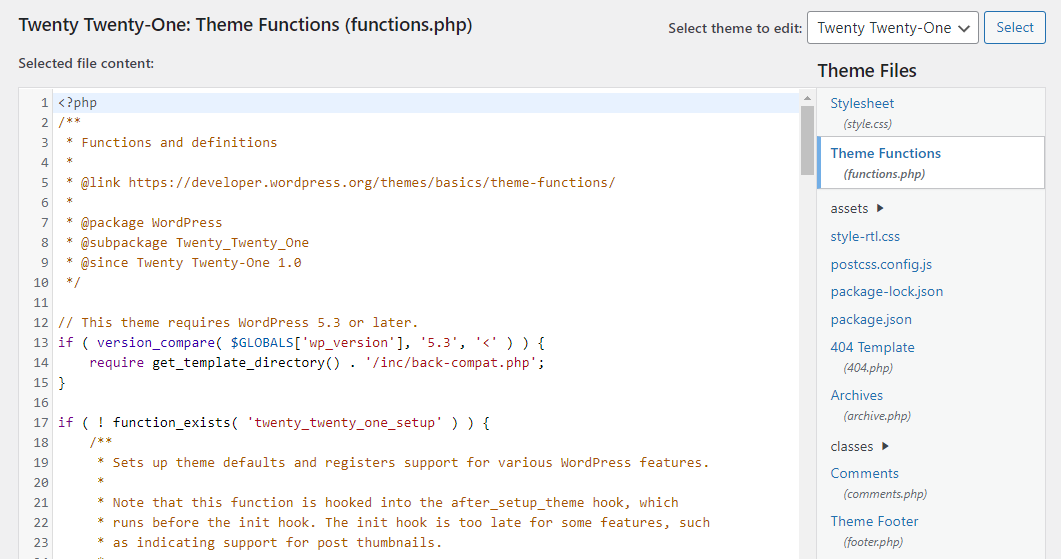
Alternatively, you can access functions.php using File Transfer Protocol (FTP). We recommend this approach if you prefer using a full-blown text editor. You’re only going to add a single snippet of code, so the built-in WordPress code editor should suffice.
Navigate to the end of the file and add the following code to it:
function wpb_custom_new_menu() {
  register_nav_menu('custom-menu',__( 'Custom Menu' ));
}
add_action( 'init', 'wpb_custom_new_menu' );
You’ll need to modify the custom-menu slug and the menu’s name, which would be the Custom Menu field. However, you can set any name for the custom menu.
Save the changes to the functions.php file. Now it’s time to edit which items will be included in the new menu.
Step 2: Edit Your Custom WordPress Menu
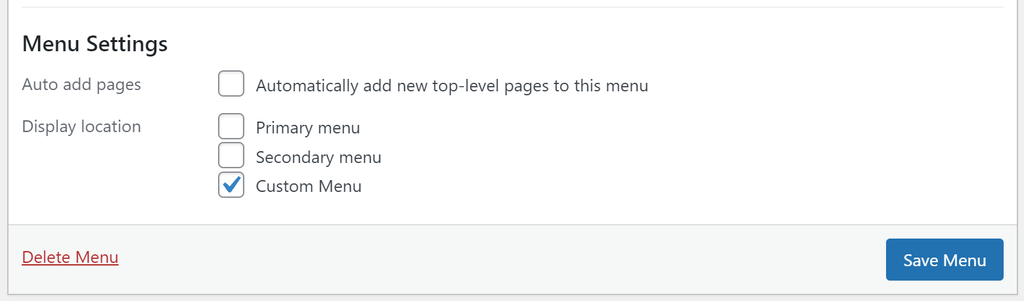
To edit the custom menu you just set up, head to Appearance → Menu. Look for the Menu Settings section at the bottom right of the screen.
That section should include the new menu location you registered in the first step.
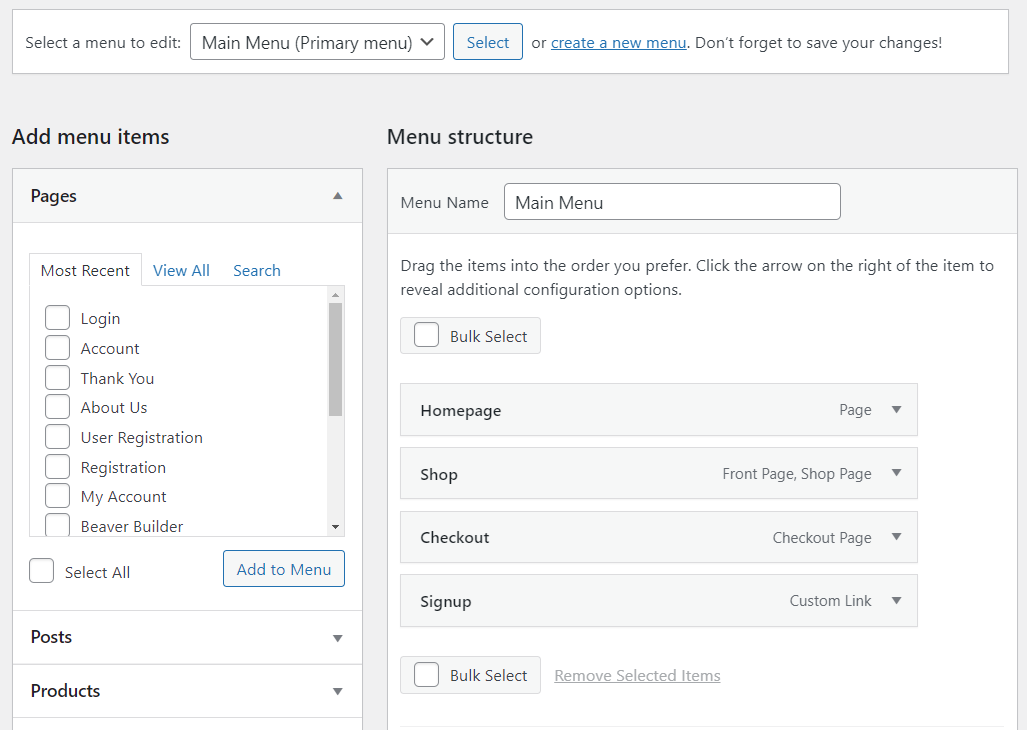
To edit which items that location will show, pick a menu using the Select a menu to edit: option or create a new one.
Afterward, choose which elements you want the menu to include using the list to the left and rearrange them under the Menu structure section.
Each menu item includes a display name and a link. When you’re pleased with your selections, remember to verify if your new custom menu is active under Menu Settings. If it is, save the changes to the menu.
Step 3: Use the wp_nav_menu Function to Display the New Menu
At this stage, you should have a ready-to-go menu registered with your theme. However, although the menu exists, it won’t appear anywhere until you use the wp_nav_menu function to specify its placement.
You need to add the wp_nav_menu function within a page template to place the custom menu. The page template files you have access to will depend on which theme you’re using.
Navigate to Appearance → Theme File Editor to access these files in the dashboard. The Theme Files section to the right contains a list of all the files that you can edit from this screen.
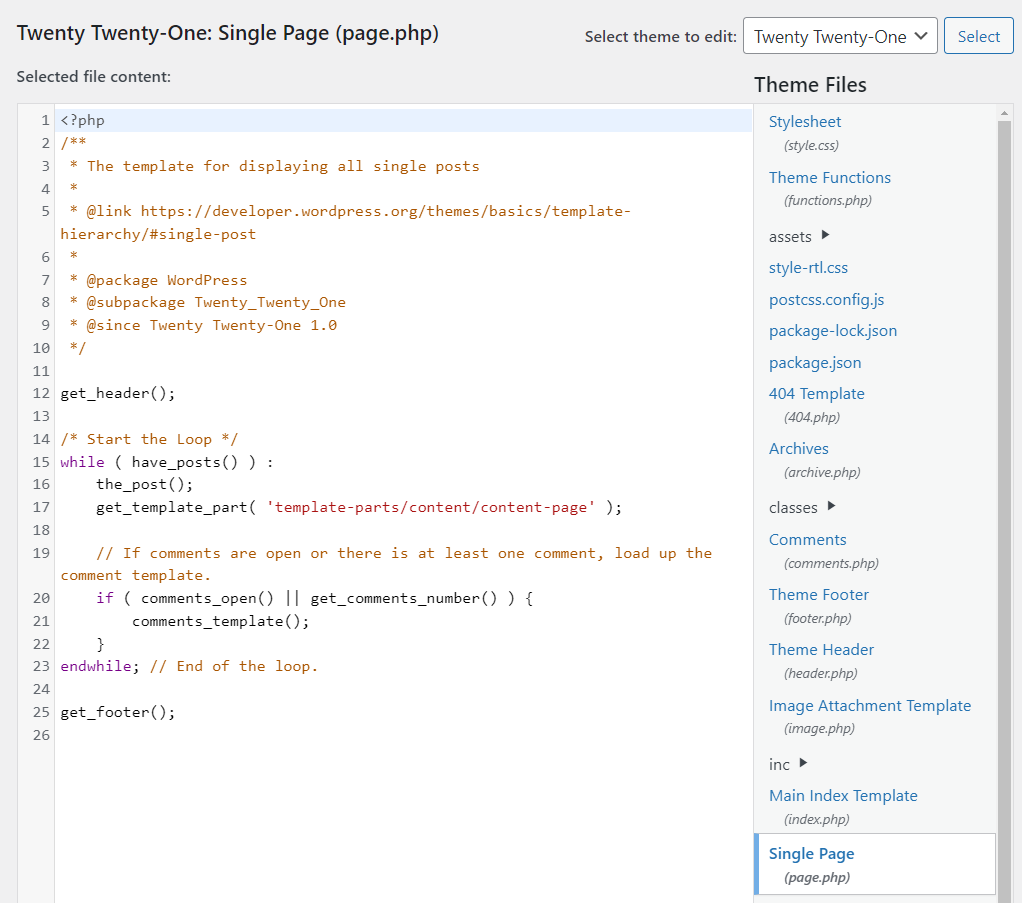
In our example, we selected our theme’s single-page template. The code you need to add to the template should look something like this:
<?php
wp_nav_menu( array(
    'theme_location' => 'custom-menu',
    'container_class' => 'menu-class'
    'fallback_cb' => ‘wp_page_menu’ ) );
?>
Before saving the changes to the template file, remember to update the placeholders with your custom theme’s slug and the other parameters that you want to use. We’re including the container_class and fallback_cb parameters in our example.
However, the code that you use can be as simple as:
<?php
wp_nav_menu( array(
    'theme_location' => 'custom-menu' ) );
?>
The position of that code will determine the location of the menu on the page. If you’re unsure how that placement works, you can experiment with different locations within the template file.
We don’t recommend changing any other part of the code when editing template files unless you know what it does. Since you’re only adding a few lines of code, you can remove them if there are any errors.
After editing, check to see if the menu is loading by visiting one of the pages that use the template you were working on. If the menu doesn’t display, there may be an error with the slug for the theme_location parameter, so go ahead and double-check it.
Conclusion
Although WordPress enables you to create custom menus easily, it doesn’t let you add custom menu locations. That’s where the wp_nav_menu function comes in. With this function, you can display custom menus created using register_nav_menu on any part of your website.
Here’s a quick recap of how to use the WordPress wp_nav_menu function:
- Create a custom menu using the register_nav_menu function.
- Edit your custom WordPress menu.
- Use the wp_nav_menu function to display the new menu.
Do you have any questions about using the wp_nav_menu function in WordPress? Let’s discuss them in the comments section below!
Learn More WordPress Techniques
How to Create a WordPress Mega Menu
How to Use wp_update_post Function in WordPress
Complete WordPress Guide
How to Use WordPress do_shortcode
WordPress Multisite: What It Is, How to Activate and Manage It
How to Use WordPress WP_Query
A Quick Guide to Headless WordPress
How to Locate and Create the WordPress .htaccess File on cPanel and hPanel

Will Morris is a staff writer at WordCandy. When he's not writing about WordPress, he likes to gig his stand-up comedy routine on the local circuit.
