How to Install Magento 2 Automatically and Manually
Known as a powerful open-source eCommerce platform, Magento 2 offers flexibility and extensive features to drive success for online stores. However, installing Magento 2 can be quite challenging for some users due to its rather tricky technical demands.
In this article, you’ll learn how to install Magento 2 on a Linux VPS, both through a VPS template and a manual approach. By practicing our clear and easy-to-follow Magento 2 installation guide, you’ll be one step closer to launching your online store.
Download ultimate SSH commands cheat sheet
Prerequisites
Before setting up Magento 2 on a Linux server, it’s essential to have a few key components ready, such as:
- VPS plan. A robust Linux-based VPS is crucial as it provides the environment needed for running resource-intensive applications like Magento. This VPS will host your web server and Magento installation, as well as store your online store’s files.
- Domain. Connecting a domain name to your VPS before installation helps in later stages, such as configuring the Apache server and setting the base URL in Magento. It ensures your store is accessible under your chosen web address right from the start.
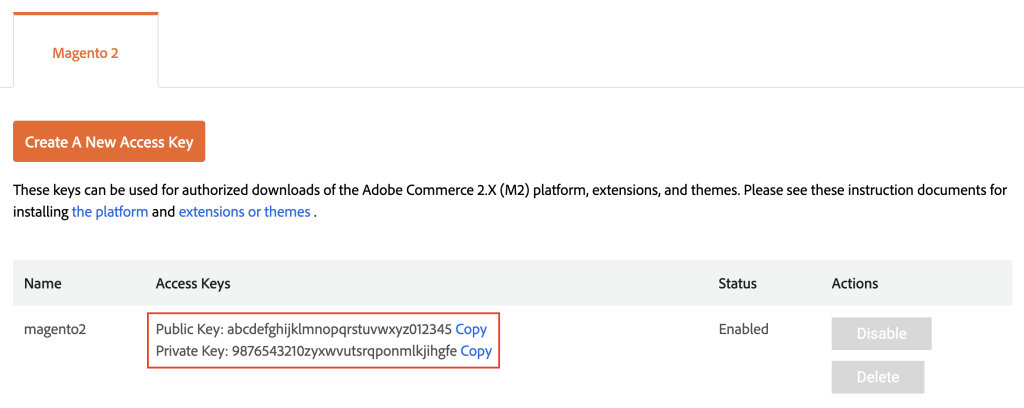
- Adobe Commerce account. To install Magento via Composer, you’ll need an Adobe Commerce account to generate a set of public and private keys. These keys are essential for authenticating and downloading the Magento software package.
How to Install Magento 2 Automatically Using a VPS Template
Installing Magento 2 via Hostinger’s VPS template is the easiest way to build your online store. Available on all our VPS plans, this method simplifies the entire setup process by including all necessary software and configurations right from the start. For more details, visit our Magento Hosting page.
Follow these steps to install the Magento 2 template on Hostinger’s VPS:
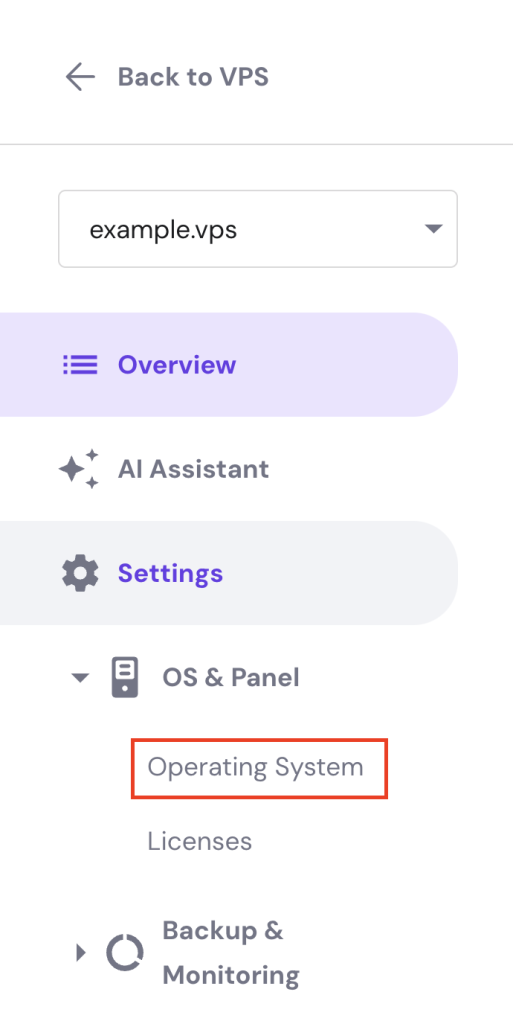
- Log into your Hostinger account and navigate to the VPS dashboard.
- From the dashboard’s left sidebar, go to Settings → OS & Panel → Operating System.
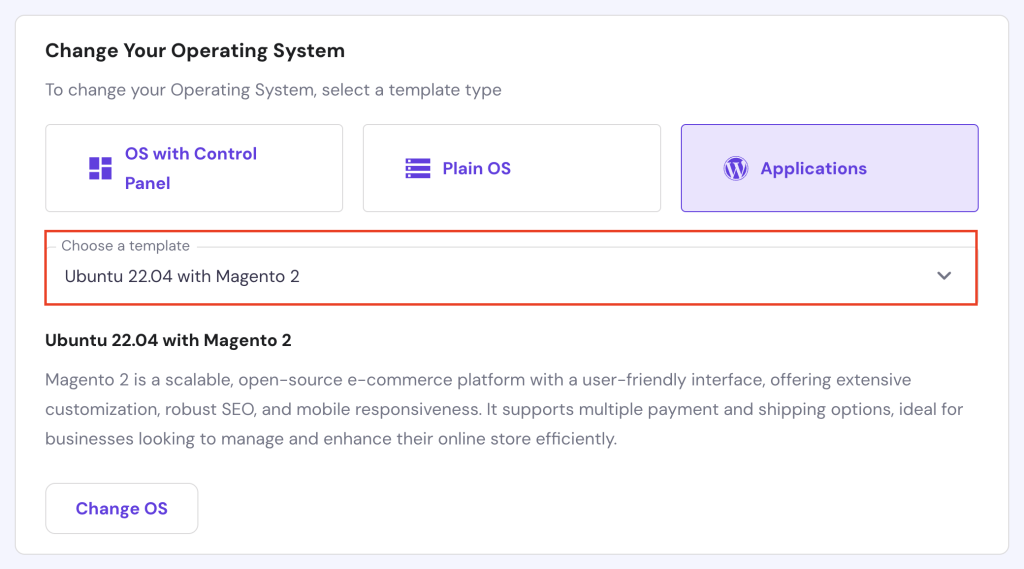
- In the Change Your Operating System section, select Applications.
- Choose Ubuntu 22.04 64bit with Magento 2 and click the Change OS button.
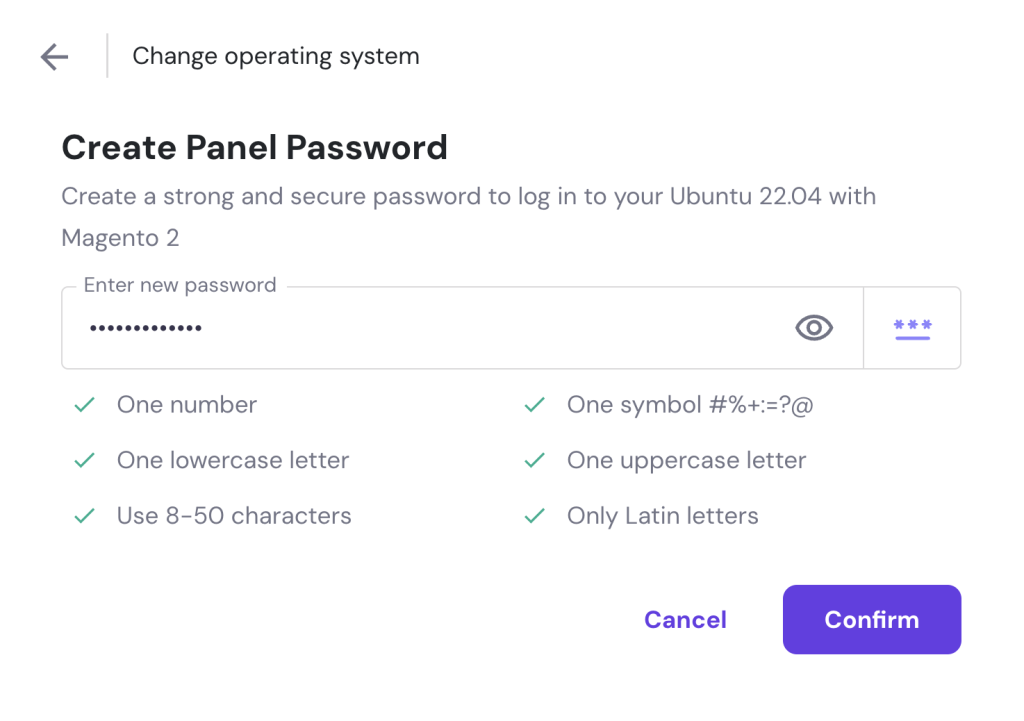
- A pop-up window will appear. Check the acknowledgment box and click Confirm.
- Create a new password for the Magento admin panel and select Confirm.
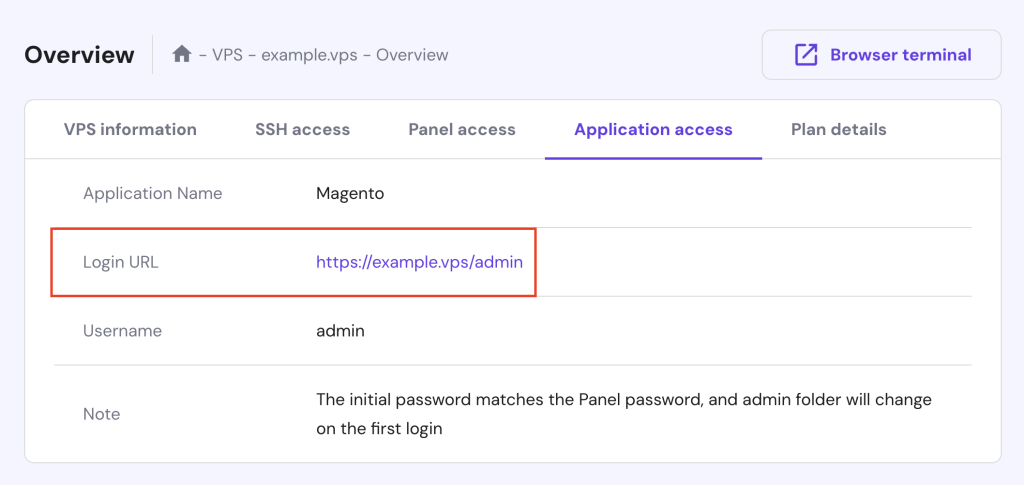
Wait for the installation process to finish. It shouldn’t take more than 10 minutes. Once done, go to Overview → Application access and click the login URL provided to open Magento 2’s dashboard.
After successfully logging in to the admin panel, you can follow our Magento 2 tutorial, which covers setting up basic information, customizing your online store’s design, adding products to your site, and utilizing Magento’s advanced features.

How to Manually Install Magento 2
This section will guide you through setting up Magento 2 manually on an Ubuntu 22.04 distribution using Linux commands. If you use other distributions, such as CentOS, the commands may differ slightly.
1. Update Linux Packages
Before installing Magento on Linux, it’s essential to update your VPS packages. This step ensures compatibility with Magento requirements and enhances your server’s security and performance.
Follow these steps to update your Linux VPS packages:
- Open an SSH client like PuTTY or other terminal software to access your server. Run the following command, replacing username and ip_address with your actual credentials:
ssh username@ip_address
- Update the package list available for upgrade:
sudo apt update
- Upgrade the packages to their latest versions:
sudo apt upgrade -y
- Remove any unnecessary packages or dependencies that were installed during the upgrade:
sudo apt autoremove
2. Install and Configure Apache
After your system is updated, the next step is to install the Apache web server to host your Magento store. You’ll also configure it to start automatically and set up a virtual host for Magento.
Here are the instructions:
- Install the Apache web server by running:
sudo apt install apache2 -y
- Enable Apache to start automatically on system boot:
sudo systemctl enable apache2.service
- Create a virtual host file for Magento named magento2.conf with the nano editor:
sudo nano /etc/apache2/sites-available/magento2.conf
- Copy and paste the following lines into the file, replacing yourdomain.com with your actual domain name:
<VirtualHost *:80>

ServerAdmin webmaster@localhost

DocumentRoot /var/www/html

ErrorLog ${APACHE_LOG_DIR}/error.log

CustomLog ${APACHE_LOG_DIR}/access.log combined

</VirtualHost>

<VirtualHost *:80>

    ServerName yourdomain.com

    DocumentRoot /var/www/html/magento2/pub

</VirtualHost>
- Save your changes and exit nano by pressing Ctrl + X → Y → Enter.
- Activate the new site configuration for the web server group:
sudo a2ensite magento2.conf

sudo systemctl restart apache2.service
- Enable necessary Apache modules for Magento to function properly:
sudo a2enmod rewrite

sudo a2enmod headers

sudo systemctl restart apache2.service
3. Install MariaDB and Create a Database
Now, it’s time to install a database management system (DBMS) and create a database for your Magento store. Here, we’re going for MariaDB instead of MySQL due to its better performance and adaptation to Magento’s high demands.
Below are the steps for installing MariaDB and creating a database:
- Install MariaDB on your Linux VPS by running:
sudo apt install mariadb-server mariadb-client -y
- Make sure MariaDB starts and operates when you reboot the server:
sudo systemctl restart mariadb.service

sudo systemctl enable mariadb.service
- Run the following security script:
sudo mysql_secure_installation
- When prompted, answer by choosing the following options:
- Enter current password for root (enter for none) – press Enter
- Switch to unix_socket authentication [Y/n] – n
- Set root password? [Y/n] – Y
- New password – type your password
- Re-enter new password – confirm your password
- Remove anonymous users? [Y/n] – Y
- Disallow root login remotely? [Y/n] – Y
- Remove test database and access to it? [Y/n] – Y
- Reload privilege tables now? [Y/n] – Y
- Log into MariaDB with the root user:
sudo mysql -u root -p
- Create a new database for Magento:
CREATE DATABASE magento_db;
- Create a new user for the database. Replace magento_user with your desired username and your_password with a strong password:
CREATE USER magento_user@localhost IDENTIFIED BY your password;
- Grant privileges to the new user:
GRANT ALL ON magento_db.* TO magento_user@localhost IDENTIFIED BY your password WITH GRANT OPTION;
- Flush privileges and exit MariaDB:
FLUSH PRIVILEGES;

EXIT;
4. Install PHP and Extensions
Let’s move on to the fourth step, installing PHP and its required extensions. PHP is the core scripting language that Magento runs on, and properly configuring it is crucial for optimal performance.
Follow this guide:
- Install PHP along with common extensions that Magento uses by running:
sudo apt install php8.1 libapache2-mod-php8.1 php8.1-common php8.1-gmp php8.1-curl php8.1-soap php8.1-bcmath php8.1-intl php8.1-mbstring php8.1-xmlrpc php8.1-mysql php8.1-gd php8.1-xml php8.1-cli php8.1-zip -y
- Magento 2 requires higher system resource limits to run efficiently. Edit the PHP configuration file with this command:
sudo nano /etc/php/8.1/apache2/php.ini
- Find these lines with Ctrl + W and change their values:
file_uploads = On

allow_url_fopen = On

short_open_tag = On

memory_limit = 512M

upload_max_filesize = 128M

max_execution_time = 3600
- Save and exit the editor, then restart Apache to use the updated PHP configuration:
sudo systemctl restart apache2.service
5. Install Elasticsearch
Magento 2 requires a powerful search engine for handling complex product searches and catalog management efficiently. Therefore, you need to install Elasticsearch, which provides fast and accurate search results for your online store.
To install Elasticsearch, follow these steps:
- Import the Elasticsearch GPG key by executing:
wget -qO - https://artifacts.elastic.co/GPG-KEY-elasticsearch | sudo gpg --dearmor -o /usr/share/keyrings/elasticsearch-keyring.gpg
- Add the Elasticsearch repository to your system with the following:
echo "deb [signed-by=/usr/share/keyrings/elasticsearch-keyring.gpg] https://artifacts.elastic.co/packages/8.x/apt stable main" | sudo tee /etc/apt/sources.list.d/elastic-8.x.list
- Update the package database to ensure it includes the latest Elasticsearch package:
sudo apt update
- Install Elasticsearch using:
sudo apt install elasticsearch
- Start and enable the Elasticsearch service on boot:
sudo systemctl start elasticsearch.service

sudo systemctl enable elasticsearch.service
- Open the elasticsearch.yml file for editing:
sudo nano /etc/elasticsearch/elasticsearch.yml
- Replace this line’s value with false to turn off Magento security features:
xpack.security.enabled: false
- Save your changes and restart the Elasticsearch service:
systemctl restart elasticsearch.service
- Verify that Elasticsearch runs correctly using the curl command:
curl -X GET "localhost:9200/"
Here’s the output you should see:
{

  "name": "srv123456",

  "cluster_name": "elasticsearch",

  "cluster_uuid" : "gVGFaOTqRSa6HvNz1PX28g",

  "version": {

    "number": "7.17.20",

    "build_flavor": "default",

    "build_type": "deb",

    "build_hash" : "b26557f585b7d95c71a5549e571a6bcd2667697d",

    "build_date" : "2024-04-08T08:34:31.070382898Z",

    "build_snapshot": false,

    "lucene_version" : "8.11.3",

    "minimum_wire_compatibility_version" : "6.8.0",

    "minimum_index_compatibility_version" : "6.0.0-beta1"

  },

  "tagline": "You Know, for Search"

}
6. Download and Install Composer
The next crucial step is to install Composer on your VPS. Composer is a dependency manager for PHP that Magento 2 uses to manage both official and third-party libraries and their packages.
Follow these steps to download and install Composer:
- Execute this command to download the Composer setup script:
curl -sS https://getcomposer.org/installer | php
- Move the Composer executable to a global directory accessible from any location on your system:
sudo mv composer.phar /usr/local/bin/composer
- Check that Composer has been installed correctly by running:
composer --version
This command should display the installed Composer version. For example:
______

  / ____/___ ____ ___ ____ ____ ________ _____

 / / / __ \/ __ `__ \/ __ \/ __ \/ ___/ _ \/ ___/

/ /___/ /_/ / / / / / / /_/ / /_/ (__ ) __/ /

\____/\____/_/ /_/ /_/ .___/\____/____/\___/_/

                    /_/

Composer version 2.7.2 2024-03-11 17:12:18
7. Run the Magento Installation Script
With Composer set up and all prerequisites in place, you are now ready to run the Magento installation command. This will configure your Magento store, link it to the necessary database, and set up the admin account.
Here are the steps to install Magento 2:
- Open your web browser and log in to your Adobe Commerce account. Then, navigate to My Profile → Access Keys to find your authentication keys.
- Return to your terminal window and run this command to download Magento into the /var/www/html/magento2 directory:
composer create-project --repository-url=https://repo.magento.com/ magento/project-community-edition /var/www/html/magento2
- When prompted, use your public key as the username and private key as the password.
- Navigate to the Magento installation system path:
cd /var/www/html/magento2
- Set the correct ownership and permissions to read and write Magento files:
sudo chown -R www-data:www-data /var/www/html/magento2/

sudo chmod -R 755 /var/www/html/magento2/
- Run the Magento setup script with the required parameters. Replace placeholders with your actual details:
php bin/magento setup:install \

  --base-url=http://yourdomain.com \

  --db-host=localhost \

  --db-name=magento_db \

  --db-user=magento_user \

  --db-password=your_password \

  --admin-firstname=Admin \

  --admin-lastname=User \

  --admin-email=admin@example.com \

  --admin-user=adminuser \

  --admin-password=admin123 \

  --language=en_US \

  --currency=USD \

  --timezone=America/New_York \

  --use-rewrites=1
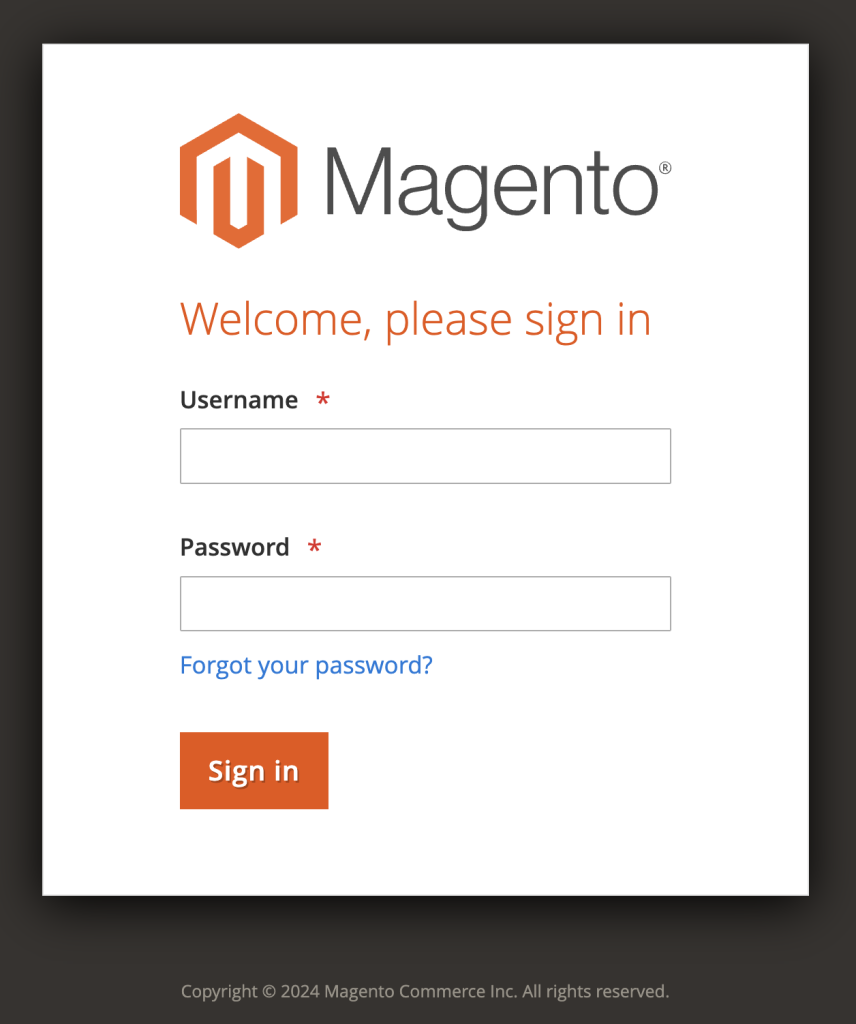
- Access your Magento admin address in the browser, for example, http://yourdomain.com/admin. You should be able to log in with the admin credentials you set during the installation.
Congratulations, you’ve successfully installed Magento 2 on your VPS hosting environment using the command-line operation. However, if you can’t access the Magento server after installation, scroll down to the troubleshooting section.
Troubleshooting the Magento 2 Admin 404 Error
One of the most common post-installation issues of Magento 2 is facing a 404 error on the admin page. This error indicates problems with file permissions or web server configurations. Here are several troubleshooting methods to resolve this issue:
Correct File Permissions
Ensure that the var, pub, and generated directories have the proper permissions.
- Navigate to the Magento root folder by typing:
cd /var/www/html/magento2
- Set the correct permissions for the Magento file system owner:
chmod -R 777 var pub generated
Replace .htaccess Files
Sometimes, .htaccess files may be corrupt or improperly generated. Therefore, you need to remove and recreate the .htaccess files in the Magento root and pub directories.
- Ensure you’re in the Magento folder, then delete the .htaccess file with the rm command:
rm .htaccess
- Create a new .htaccess file with this command:
sudo nano .htaccess
- Paste the following content into the file, then save your changes:
RewriteEngine on

RewriteCond %{REQUEST_URI} !^/pub/

RewriteCond %{REQUEST_URI} !^/setup/

RewriteCond %{REQUEST_URI} !^/update/

RewriteCond %{REQUEST_URI} !^/dev/

RewriteRule .* /pub/$0 [L]

DirectoryIndex index.php
- Navigate to the pub directory:
cd pub
- Repeat the same process for the .htaccess file here.
Allow Override in Apache Configuration
The Apache configuration must allow overrides for .htaccess files to function properly.
- Edit the Apache configuration file:
sudo nano /etc/apache2/apache2.conf
- Find the <Directory /var/www/> section and ensure AllowOverride is set to All. It should look like this:
<Directory /var/www/>

    Options Indexes FollowSymLinks

    AllowOverride All

    Require all granted

</Directory>
- Save your changes and restart Apache to apply the latest configuration:
sudo systemctl restart apache2
Run Magento Commands
Sometimes, running specific Magento commands can resolve residual configuration issues.
- Clear the cache by executing:
php bin/magento cache:clean
- To deploy static content, run the following command:
php bin/magento setup:static-content:deploy
Conclusion
In this article, you’ve learned how to install Magento 2 on a Linux VPS using both automated and manual approaches. Regardless of the method you settled on, you’re now equipped to start your online store with the Magento open-source platform.
Keep learning and exploring Magento 2 further to enhance your online store’s functionality and customer experience. Your next steps could redefine your eCommerce success.
How to Install Magento FAQ
This section will answer the most common questions on how to install and configure Magento 2.
Can I Install Magento 2 on a Shared Hosting Plan?
While it’s technically possible to install Magento 2 on shared web hosting, the platform’s resource-intensive nature makes a VPS or dedicated server preferable for optimal performance.
How Long Does It Take to Install Magento 2 With the VPS Template?
The Magento installation process using Hostinger’s VPS template typically takes about 10 minutes. This quick setup time includes loading the Ubuntu 22.04 OS with pre-configured Magento settings.
Do I Need to Get an SSL Certificate for Magento 2?
Yes, you should get an SSL certificate for Magento 2. It secures data transactions, protects user information, and boosts customer trust, which is critical for maintaining a secure and reliable shopping experience.

Ariffud is a Technical Content Writer with an educational background in Informatics. He has extensive expertise in Linux and VPS, authoring over 200 articles on server management and web development. Follow him on LinkedIn.

Comments
August 29 2017
Hi I installed Magento 2.1.8 in a public_html subfolder mydomain.com/store as i already have a live store and was planning to build a new site to test, but how do I access Magento Admin to do the setting. What URL would it have?