Magento 2 Tutorial: Building a Large-Scale eCommerce Site
Magento 2 is a powerful, open-source eCommerce platform known for its flexibility and scalability, making it an ideal choice for large-scale online stores. Compared to its predecessor, Magento 2 offers enhanced performance, a streamlined user experience, and improved code accessibility.
This Magento 2 tutorial will guide you through setting up, managing, and customizing your eCommerce site on a virtual private server (VPS). We’ll explore everything from store configuration and product setup to advanced features, like API integration and performance optimization.
By the end of this article, you’ll have a solid foundation to launch and grow your online business effectively with Magento 2.
Download website launch checklist
Magento 2 Architecture
Magento 2 uses the Model-View-ViewModel (MVVM) architecture, which is similar to the popular Model-View-Controller (MVC) pattern. The difference lies in the ViewModel of MVVM, providing a more automated way of handling data between the Model and the View, in contrast to the more manual and direct involvement of the Controller in MVC.
This architectural framework separates the business logic from the user interface (UI). It’s beneficial when you need to update or customize operational aspects, like special promotions or pricing rules, without altering the visual presentation to the shopper.
Let’s delve further into each component:
- Model. This component stores all data-related logic. The Model represents the actual data or information the application manages, such as product lists or customer data, independent of any user interface. It responds to requests for information from the ViewModel and to instructions to change state, for example, updating a product’s price.
- View. In Magento 2, the View consists of elements that create the storefront with which customers interact, such as the layout, buttons, and displays. It displays data from the ViewModel to the user and sends user commands, like clicks and selections, back to the ViewModel.
- ViewModel. The ViewModel acts as a middleman between the Model and the View. It retrieves data from the Model and formats it for display in the View. Moreover, it handles any user inputs received from the View. This separation helps organize the code better and makes the system more modular.
Additionally, Magento 2 is structured into four distinct layers. These layers collectively define a clear structure from the user interface down to data management and storage.
- Presentation Layer. This layer consists of blocks, layouts, templates, and web components that handle everything the user interacts with on the front end. It’s where the ViewModel operates, managing the logic and forwarding actions to the Model for data retrieval or updates.
- Service Layer. Serving as a bridge between the presentation and domain layers, this layer offers service contracts (APIs) that allow external systems and modules to interact seamlessly with Magento 2. The service layer ensures that functionalities can be accessed both internally and externally without compromising the system’s stability.
- Domain Layer. Here, the actual business logic of Magento 2 resides. It includes models and their methods that implement the system’s core functionality, managing data and business rules.
- Persistence Layer. At the bottom of the architecture is the persistence layer, which handles data storage and retrieval operations. It operates through data models and resource models to interact with the database, ensuring data integrity and security.
Setting Up Magento 2
There are several methods to get Magento 2 up and running on your server. Here, we’ll demonstrate how to install Magento 2 using a preconfigured VPS template and a manual setup.
Using Hostinger’s VPS Template
If you purchase a VPS plan from Hostinger, you can easily install Magento 2 with our specialized template. This method simplifies the setup process, as it includes all necessary software and configurations out of the box.
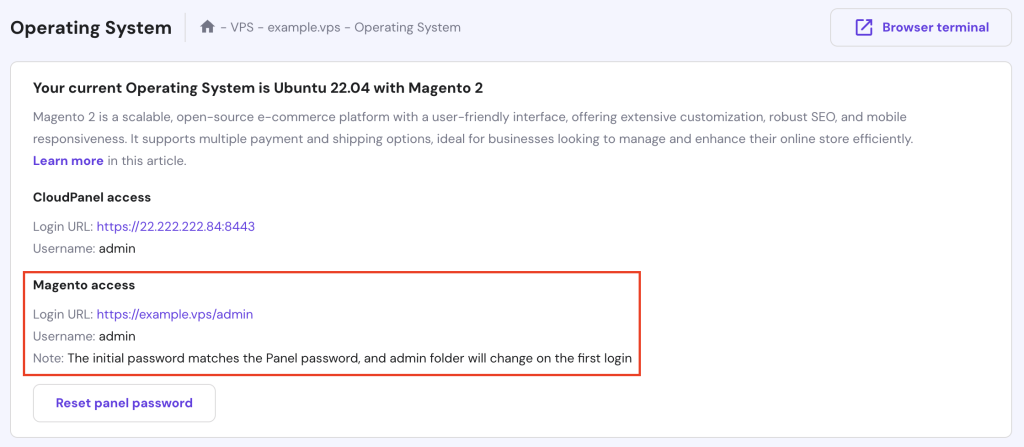
To install the Magento 2 template on our VPS, first log in to your Hostinger account and navigate to VPS → Settings → OS & Panel → Operating System. Then, select Applications → Ubuntu 22.04 64bit with Magento 2 and click the Change OS button.
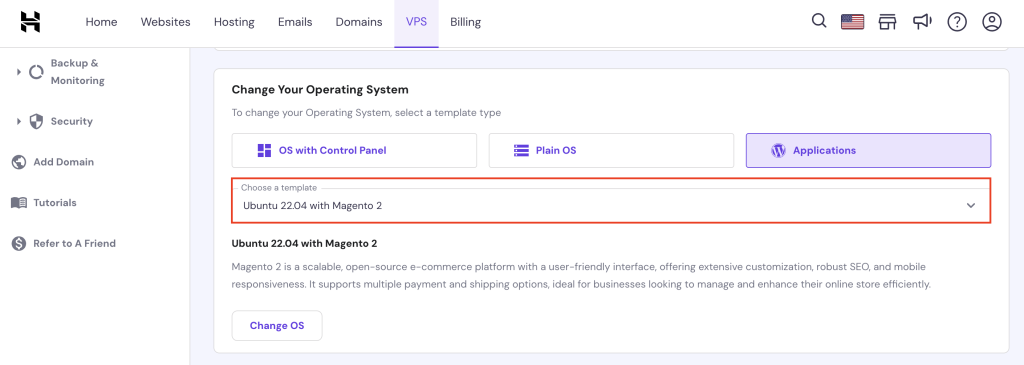
Follow the on-screen instructions and wait for the installation process to complete, which should take about 10 minutes. Once done, use the Magento access login URL provided on the same Operating System page to open its dashboard.

Installing Magento 2 Manually
For those who want more control over their installation, manually setting up Magento 2 is the way to go. This typically involves:
- Updating your server’s repository packages.
- Configuring your web server, such as Apache or NGINX.
- Setting up a database for Magento.
- Installing PHP and all its required extensions.
- Downloading and installing Magento in your installation folder.
Connecting Your Domain
Regardless of the method you use, we recommend that you connect your domain to the VPS beforehand. This is done by pointing your domain’s DNS settings to your VPS’s IP address, ensuring that visitors reach your new Magento store when they type your domain name into their browsers.
Magento 2 Storefront
Before practicing our Magento 2 development tutorial, you need to understand how your online store looks and functions from a customer’s perspective. Here, we’ll walk you through the storefront’s key pages and features that shape the customer’s path to purchase on your site.
Home Page
The home page serves as the face of your brand. It typically features a clean and inviting design with sliders for promotions, a navigation bar for easy access to different categories, and possibly featured products or new arrivals. This page should be visually appealing and functionally intuitive to ensure a positive first impression.
Catalog Page
This page displays all your products or a specific category of products. It should offer filters and sorting options to help customers find what they’re looking for quickly. Product thumbnails should include high-quality images, brief descriptions, and prices to encourage further exploration.
Search Results Page
A robust search feature is important for enhancing user experience. The search results page should clearly display products that match the customer’s query with options to refine the search. This page helps customers quickly navigate through a large inventory to find their desired products.
Product Page
The product page is where details matter most. It should include high-resolution images, informative product descriptions, availability, pricing details, and an easy-to-spot ‘Add to Cart’ button. Additional features include customer reviews, related products, and social share buttons to enhance user engagement.
Shopping Cart
The shopping cart page should summarize the products selected with total costs, and provide options to update quantities or remove items. It should also display available shipping options, estimated delivery times, and a clear call-to-action for proceeding to checkout.
Basics of Using Magento 2
Let’s explore the basics of using Magento 2 to start your online store.
Accessing Your Magento 2 Dashboard
Accessing the Magento 2 admin dashboard is your first step toward managing your online store. This central hub is where you’ll oversee all aspects of your eCommerce operation, from sales data to customer interactions.
Logging In as an Admin
Here’s how to log in to the Magento 2 admin panel:
- Navigate to your website’s admin URL, which typically looks like yourdomain.com/admin.
- Enter your admin username and password, and click Sign In.
- Once authenticated, you’ll be directed to the dashboard.
Exploring the Dashboard
The Magento 2 dashboard presents a complete overview of your store’s performance. It includes key metrics, recent orders, average order amount, search terms, last orders, and best-selling products.
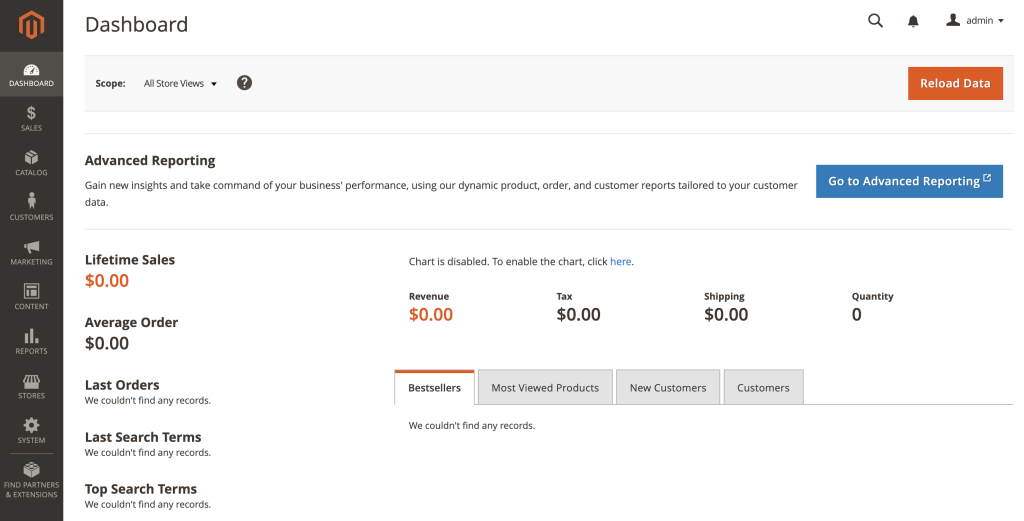
The bottom of the dashboard displays several necessary charts and reports. You can view sales over time, customer activity, and other vital statistics that help you make informed business decisions.
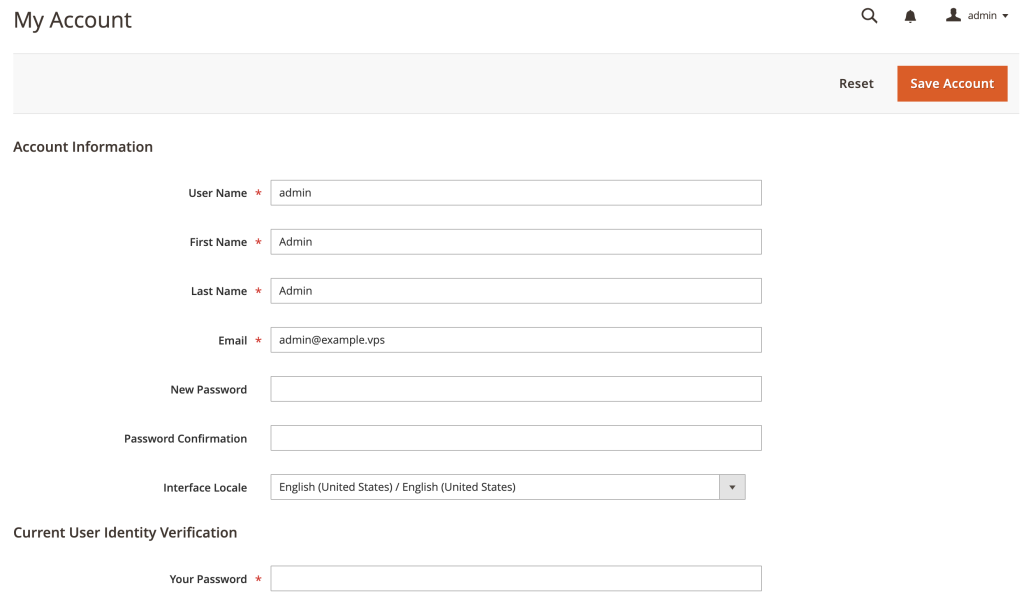
Accessing the Admin Account Section
In the upper-right corner of the dashboard, you’ll find the account section. Here, you can manage your account settings, including your username, password, and email address.
Navigating the Admin Sidebar
The admin sidebar on the left of the screen is your main navigation tool within Magento 2. It contains links to all administrative functions such as Sales, Products, Customers, Marketing, Content, and Reports. Each section is designed to manage specific aspects of your store’s backend.
Understanding the Admin Workspace
The central part of your admin screen, known as the workspace, displays the content of whichever menu item you select from the sidebar. This area will typically show grids, data forms, and tools related to store management.
Configuring Your Store
Properly configuring your Magento 2 store is crucial to ensure it aligns with your business needs and complies with local regulations. This section covers the essentials of setting up various store configurations, from user roles to currency settings.
Creating New Users and Roles
It’s important to create specific roles for your team members based on their responsibilities to improve security.
- Navigate to the Admin sidebar and click System → Permissions → User Roles.
- Click Add New Role and fill in the necessary details for the role, including the role name and specific resources that the role can access.
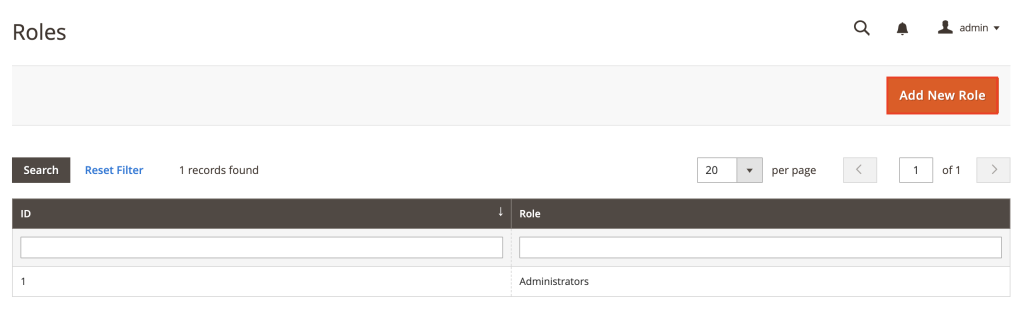
- After creating roles, go to System → Permissions → All Users to add new users.
- Click Add New User and fill in the necessary details such as username, email, and password.
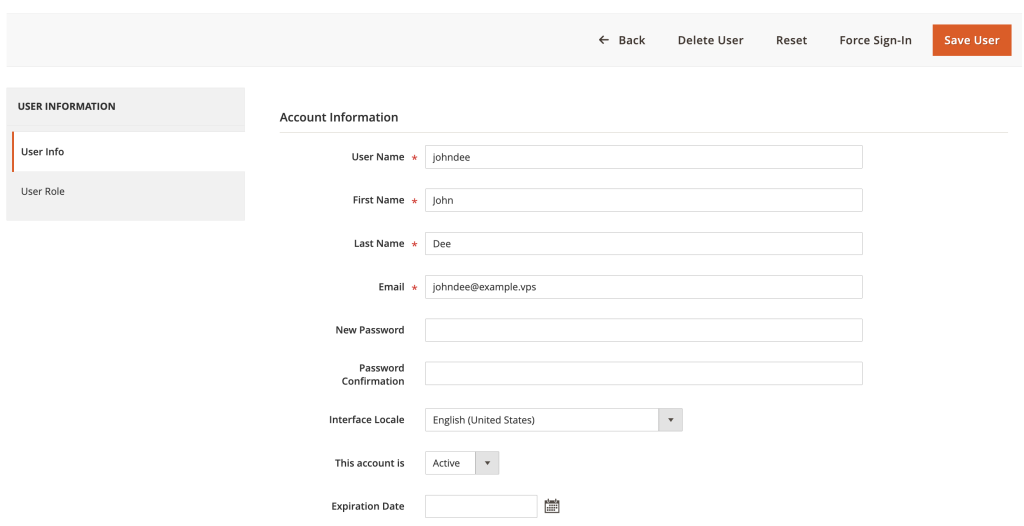
- Assign specific roles based on those you have previously created to the new user under the User Role tab. Once done, click Save User.
Configuring Store Details
Setting up your store’s basic information helps how customers perceive and interact with your brand.
- Go to Stores → Configuration → General.
- Enter your store information, including the name, phone number, hours of operation, and other relevant contact details.
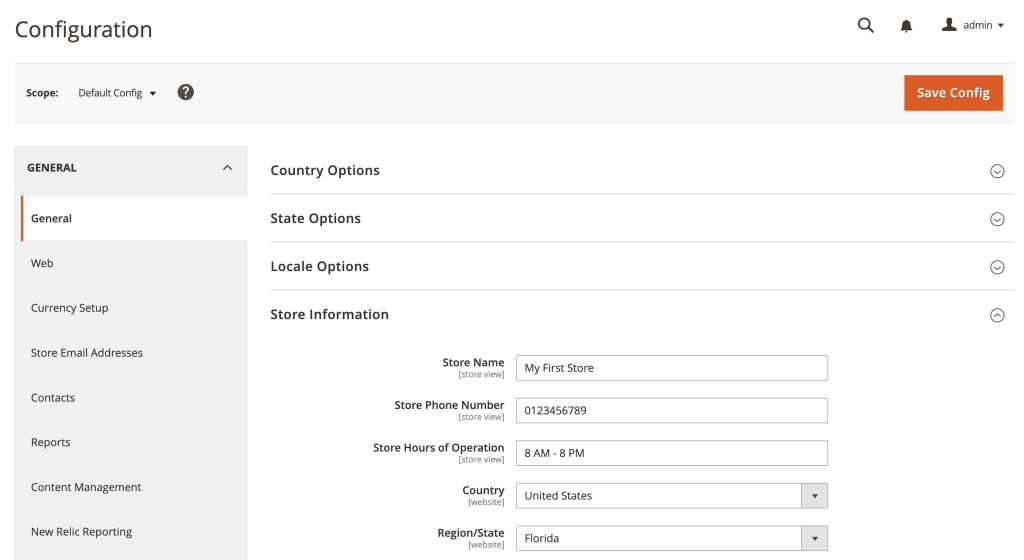
- In the Country Options section, select the default country where your business is based or primarily operates.
- Depending on the selected country, you may also need to set the default state or province.
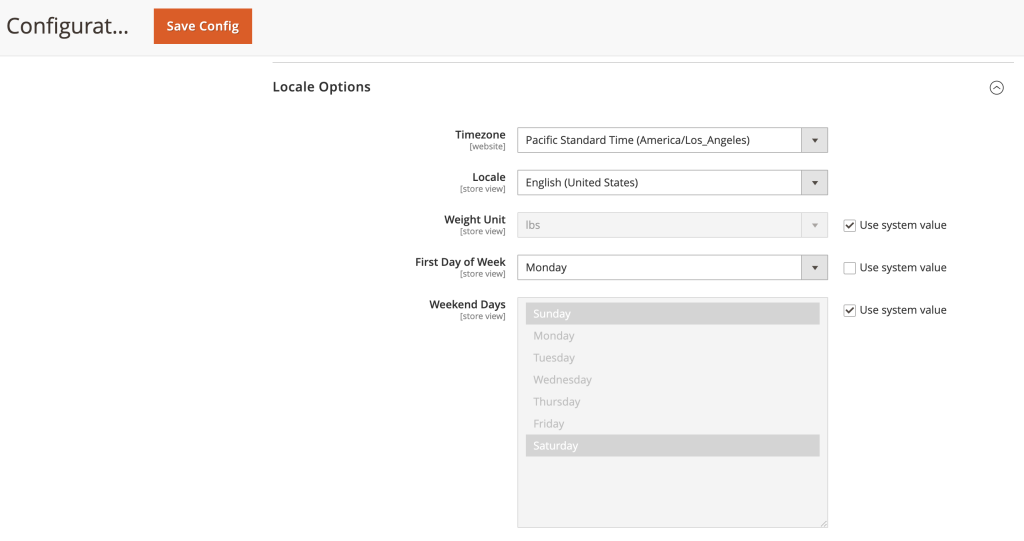
- In Locale Options, choose the locale that best suits your business’s language and regional settings to tailor the shopping experience to your audience.
Setting Up Web-related Settings
This part involves configuring your URLs and other web-related settings.
- Navigate to Stores → Configuration → General → Web.
- Enable the Search Engine Optimization option if you wish for search engines to crawl and index your website.
- Adjust your base URLs and secure those URLs if you are using SSL certificates.

- Manage your default pages, such as the home page and no route page, and configure URL rewrites and redirects.
Configuring Currency Setup
Proper currency configuration is essential if you’re targeting global customers.
- Access Stores → Configuration → General → Currency Setup.
- Set your base currency, which will be used for all online payment transactions.
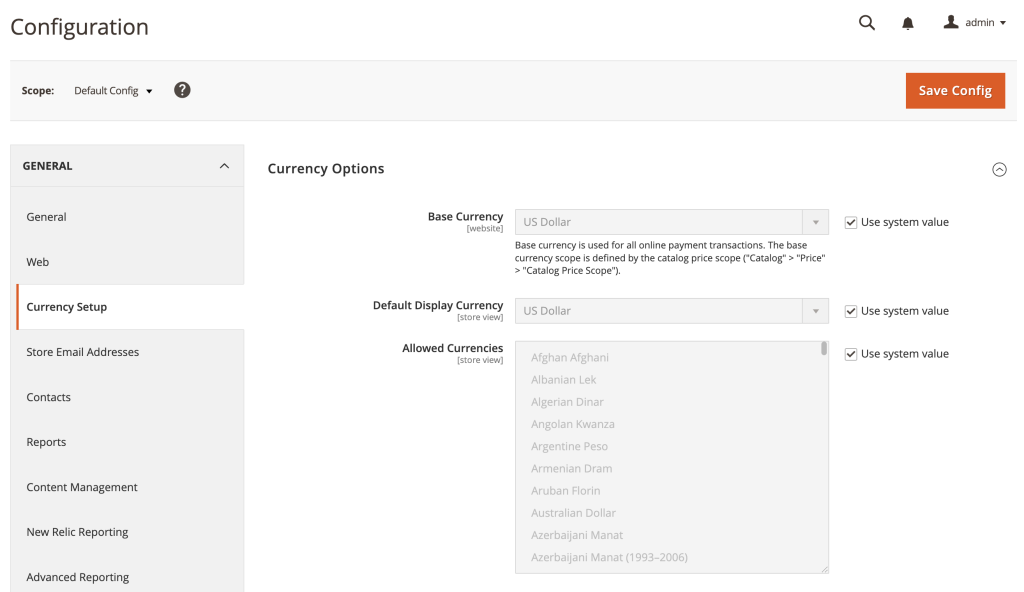
- Select allowed currencies based on the countries you are targeting.
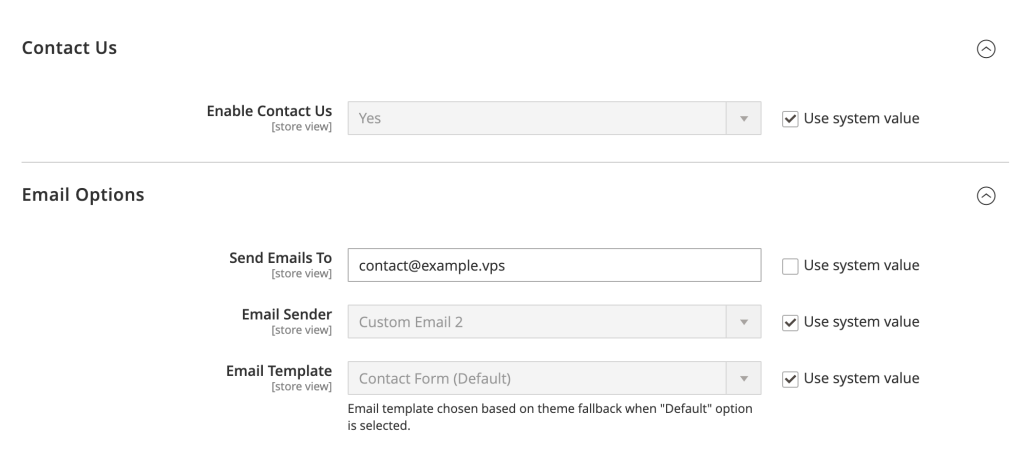
Enabling Contact Us
Enabling a contact page is vital for customer service and feedback.
- Go to Stores → Configuration → General → Contacts.
- Ensure the Enable Contact Us option is set to Yes.
- Configure the email options to decide where customer queries should be sent.
Customizing Your Store’s Design
Once you’re done with the basic Magento configuration, it’s time to enhance your storefront to reflect your brand’s identity and meet your aesthetic goals, helping you stand out in the competitive eCommerce landscape.
Understanding the Default Theme
Magento 2 comes with the default Luma theme, designed to be visually pleasing and functionally robust. This theme serves as a good starting point for customization and offers a responsive design layout.
Customizing Storefront Branding
Your online store should include essential elements like the logo, favicon, and copyright, which represent your brand during customer interactions.
- Navigate to Content → Design → Configuration from the left sidebar.
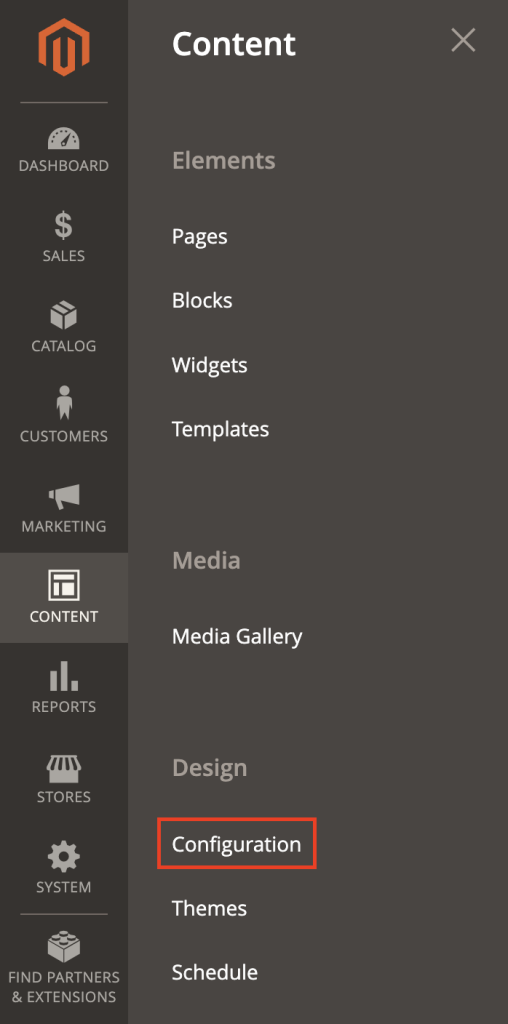
- Select your active theme and click Edit.
- Under the HTML Head section, upload your favicon image in the Favicon Icon field.
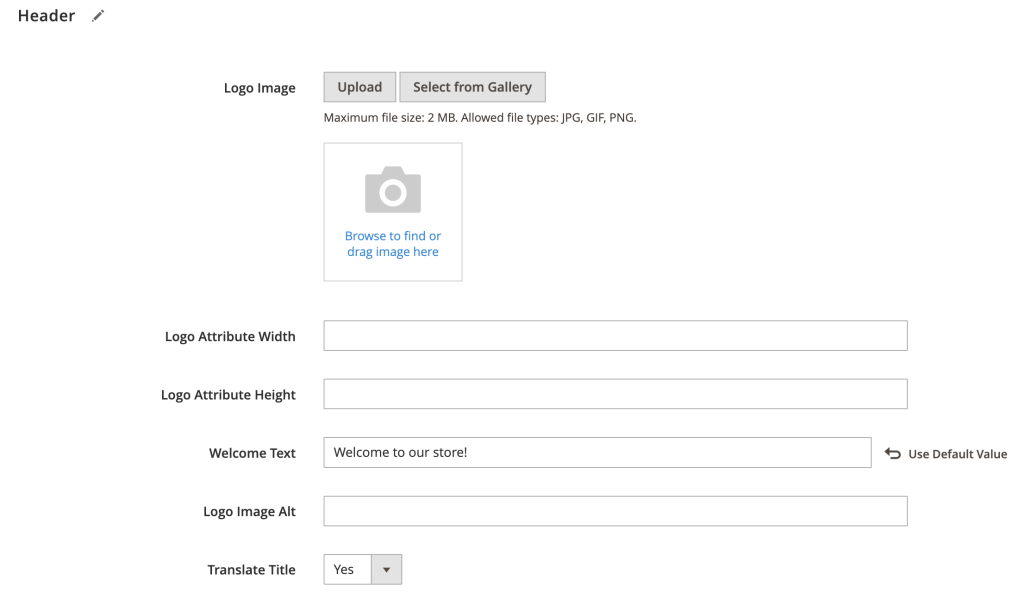
- For the logo, scroll to the Header section, upload your logo image, and specify its width and height to ensure it fits well within your site’s header.
- Fill the Welcome Text field with a custom message that greets visitors as they enter your site.
- Go to the Footer section to customize your copyright text.
Introducing Elements in Magento 2
Magento 2 provides customizable elements such as pages, blocks, widgets, and templates, which are critical for building a dynamic and engaging eCommerce store. You can access them by navigating to Content → Elements.
- Pages. In Magento 2, pages are individual screens of content that users interact with on your site. You can add new pages and edit existing ones, as well as customize the page title, URL key, layout, and content.
- Blocks. These are structural elements on pages that hold content or layout elements within them. Blocks can be static, like text or images, or dynamic, like product lists. Each block consists of a title, an identifier for referencing in layouts or templates, and content.
- Widgets. A Widget is a small Magento application that can be inserted into specific pages or particular blocks to provide specific functionality, such as displaying new products, product filters, or promotional banners.
- Templates. In Magento 2, templates define the overall HTML structure of pages and blocks. They are part of Magento’s theme structure and control how content is rendered on the site. If you need to make template changes, find template files under app/design/frontend/<Vendor>/<Theme>/Magento_<Module>/templates/.
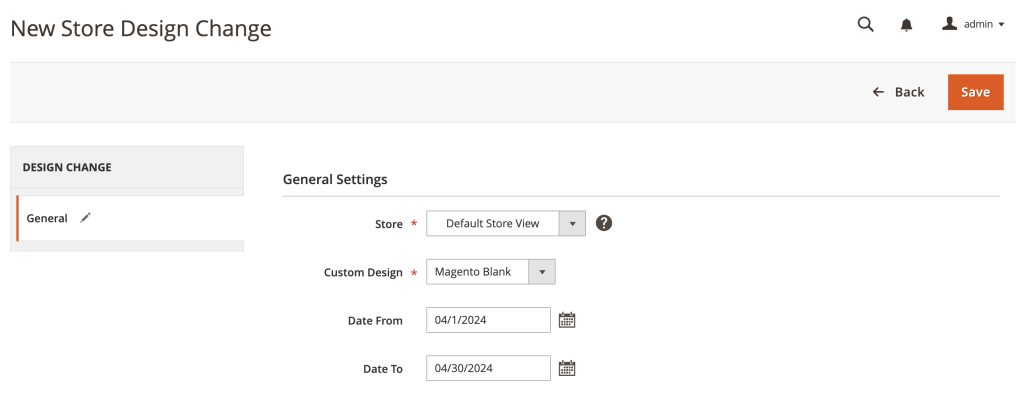
Scheduling Design Changes
Magento 2 allows you to schedule changes to your store design to coincide with marketing events, promotions, or seasons.
- Navigate to Content → Design → Schedule.
- Click the Add New Design Change button.
- Set the date range and select the design changes you wish to apply during this period.
Adding Products
Adding products is a central aspect of managing your Magento 2 store. This involves setting up product categories, defining product types, and handling inventory to ensure that your products are well-organized and adequately stocked to meet customer demand.
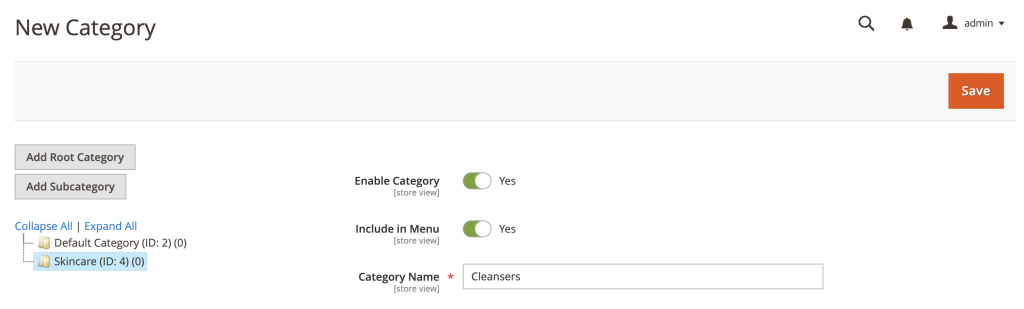
Defining Product Categories
Categories in Magento 2 help organize your store’s items into a navigable structure, enhancing the customer experience. You can create a hierarchical category structure with a root category and several subcategories. Here’s a categorization example for a beauty store:
| Root categories | Subcategories |
| Skincare | Cleansers, moisturizers, serums |
| Makeup | Face, eyes, lips |
| Haircare | Shampoos, conditioners, styling products |
| Fragrance | Women’s perfumes, men’s colognes |
Here’s how to create a category:
- Navigate to Catalog → Categories.
- Create a root category and give it a name.
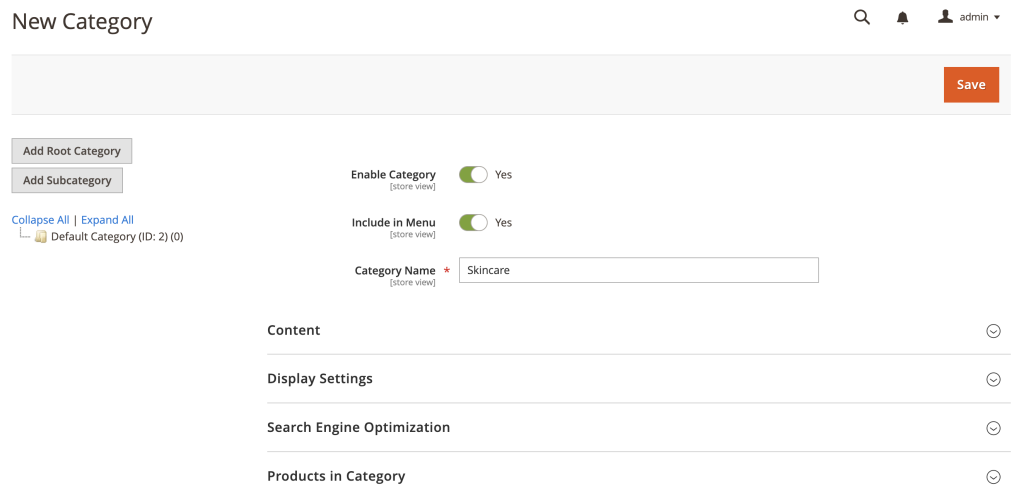
- Make necessary adjustments, such as including it in the menu and adding a category image if needed.
- Add subcategories by choosing the root category and clicking Add Subcategory. Provide details, like the category name, and customize it as needed.
Adding New Products
Magento 2 supports several product types that cater to different sales models, such as:
- Simple products. Standalone items with a single stock-keeping unit (SKU).
- Configurable products. Products that can vary based on attributes, like color or size.
- Grouped products. A collection of simple products that can be purchased together.
- Virtual products. Non-tangible items, such as services or memberships.
- Bundled products. Customizable kits, like a computer build kit.
- Downloadable products. Digital downloads like software or music.
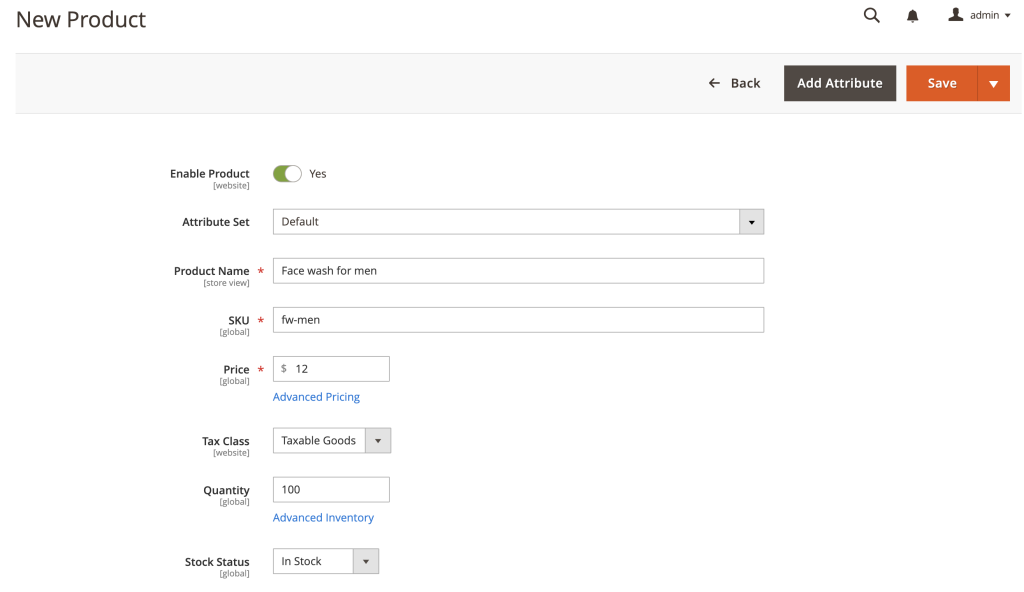
Here’s how to add a product:
- Head to Catalog → Products.
- Click Add Product and select the product type.
- Fill in the product details such as name, SKU, price, categories, and images.
Creating Product Attributes
Attributes are product characteristics that customers can use to filter and search products.
- Go to Stores → Attributes → Product.
- Click Add New Attribute.
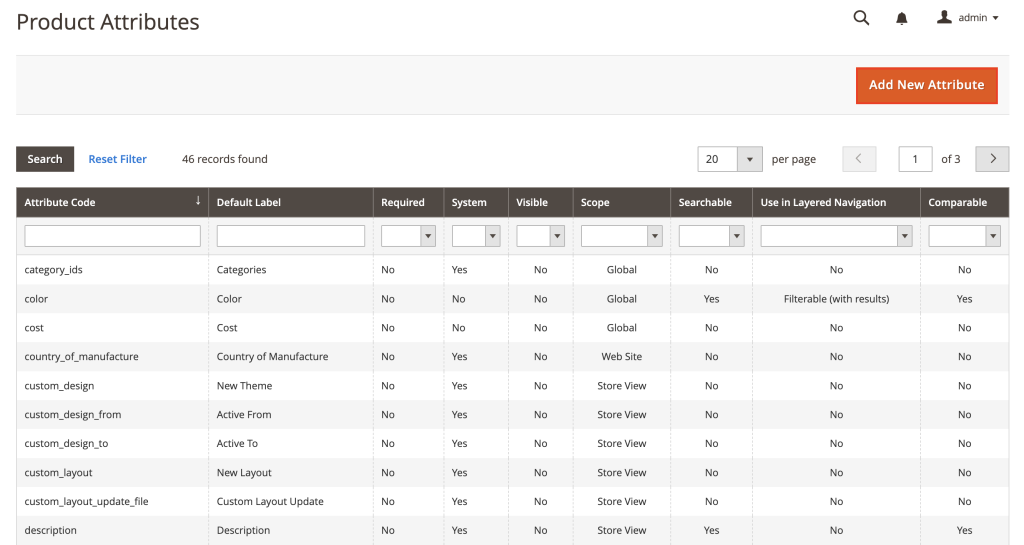
- Set the attribute properties, such as the attribute code, default label, and values required.
After creating an attribute, you can assign it to attribute sets that group various attributes required for specific types of products.
Adding Featured Products to the Homepage
Featured products are a great way to highlight specific items on your store’s homepage, drawing attention to new arrivals, bestsellers, or promotional items. Here’s how to add featured products to the homepage using a widget:
- Navigate to Products → Categories and create a new category named Featured. Ensure it is not included in the main menu but is active for widget configuration.
- Assign products to this category that you want to feature on the homepage.
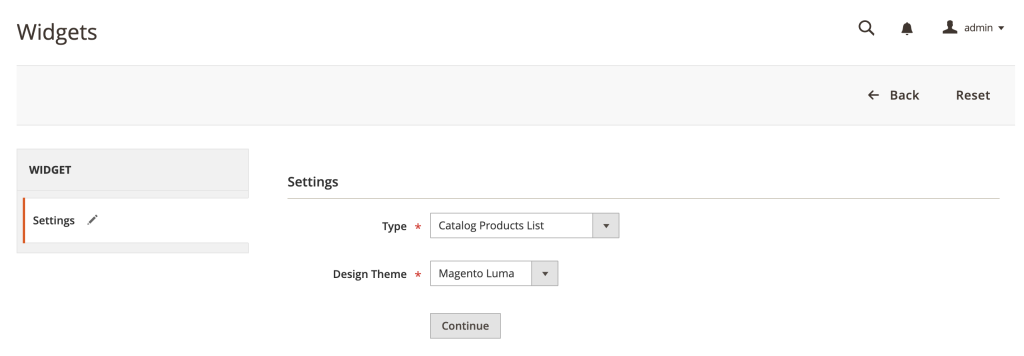
- Go to Content → Widgets → Add Widget.
- Choose the Widget Type as Catalog Products List, select the theme you are using, and then click Continue.
- Enter a title for the widget, such as Featured Products.
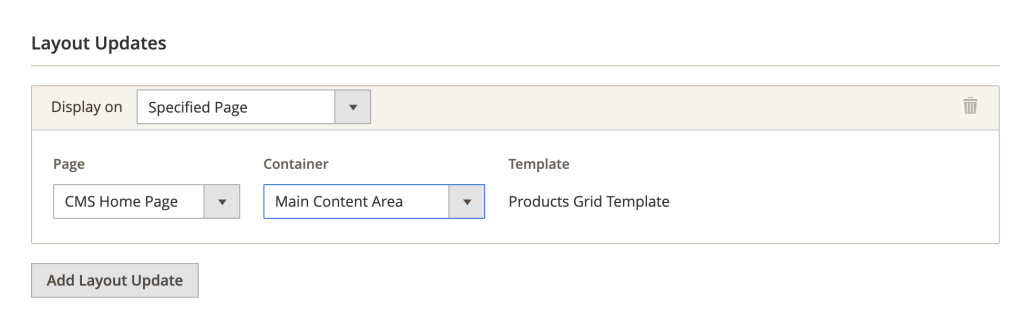
- Scroll to the Layout Updates section, and for Display on select Specified Page, for Page select CMS Home Page, and for Container choose Main Content Area.
- Access the Widget Options tab.
- Set the number of products to display based on how many featured items you want to show.
- Click Add Condition and choose Category → Featured.
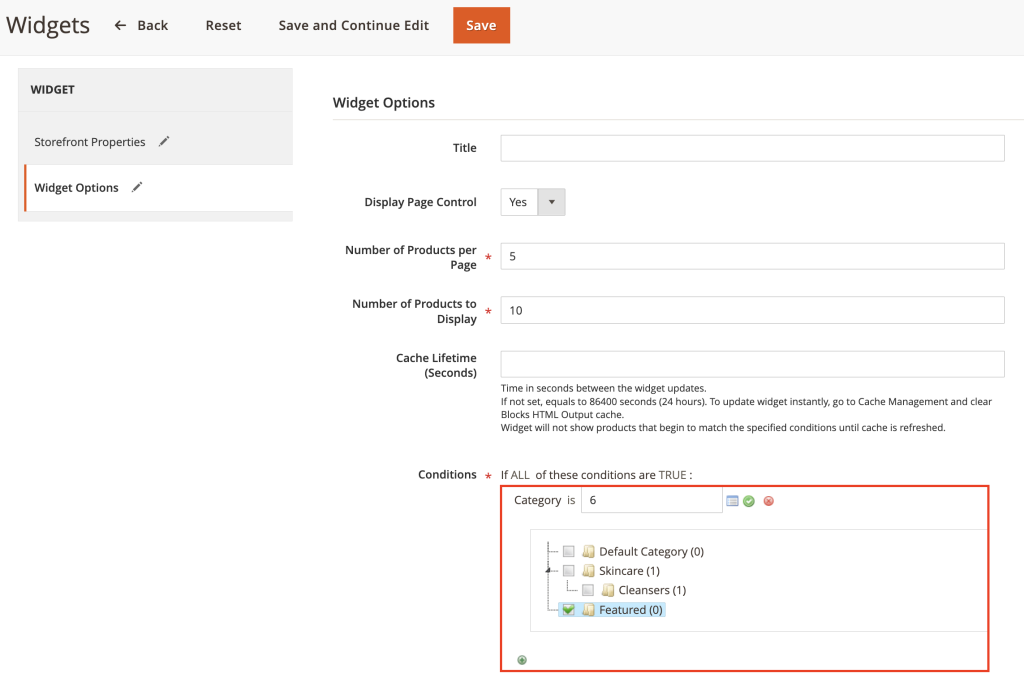
- Save the widget and preview the homepage to see if everything is displaying as intended.
Managing Inventories
Inventory management in Magento 2 allows you to track stock levels and manage backorders. Here’s how to customize the global inventory settings:
- Navigate to Stores → Configuration → Catalog → Inventory.
- Adjust settings such as Manage Stock, Minimum Qty Allowed in Shopping Cart, and Backorders to fit your inventory strategy.
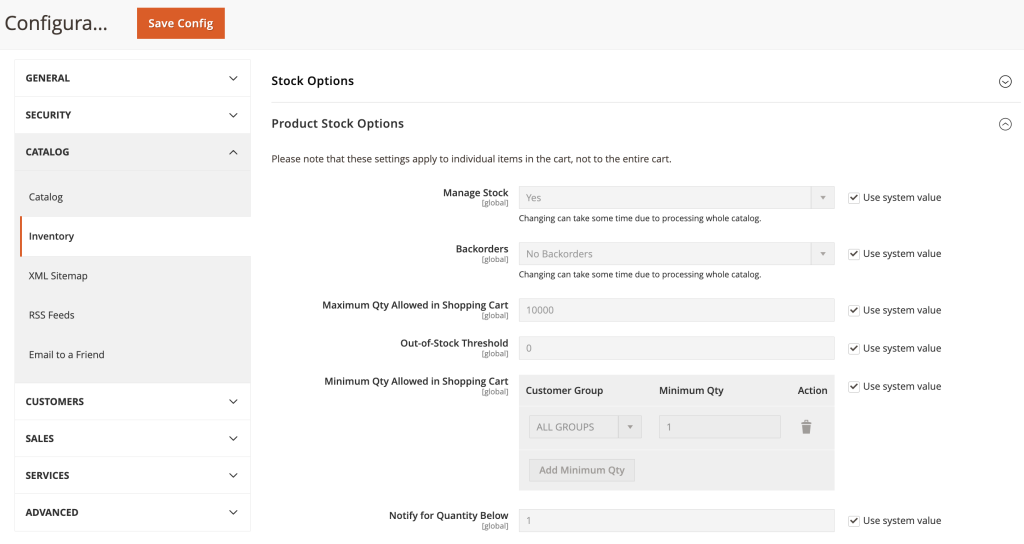
For product-specific inventory settings:
- Access Catalog → Products and select a product to edit.
- Scroll down to Advanced Inventory to override global configurations, such as managing individual stock, defining backorder settings, and setting limits for how many of these products can be bought in a single order.
Setting Up Payment and Shipping
Configuring payment and shipping methods is crucial to ensure your Magento 2 store operates smoothly and meets customer expectations. Below is a detailed guide on setting up standard payment methods and shipping configurations.
Setting Up Payment Methods
Magento 2 supports a variety of payment methods you can integrate to offer flexibility and security to your customers. Here’s how to set up PayPal:
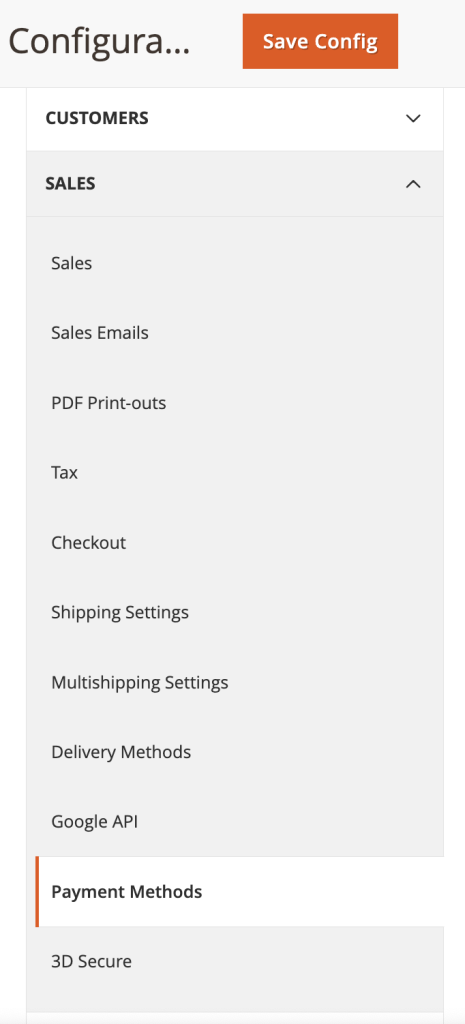
- Navigate to Stores → Configuration → Sales → Payment Methods.
- Find the ADDITIONAL PAYMENT SOLUTIONS section and expand it. You will see several PayPal solutions.
- Configure the preferred PayPal solution, such as PayPal Express Checkout.

- Enter your PayPal API credentials. If you don’t have these, you can obtain them from your PayPal account.
- Configure the basic settings, such as Payment Action, Title, and Sort Order.
- Save the configuration.
If you want to activate the bank transfer option:
- Under Payment Methods, find the Bank Transfer Payment option and enable it.
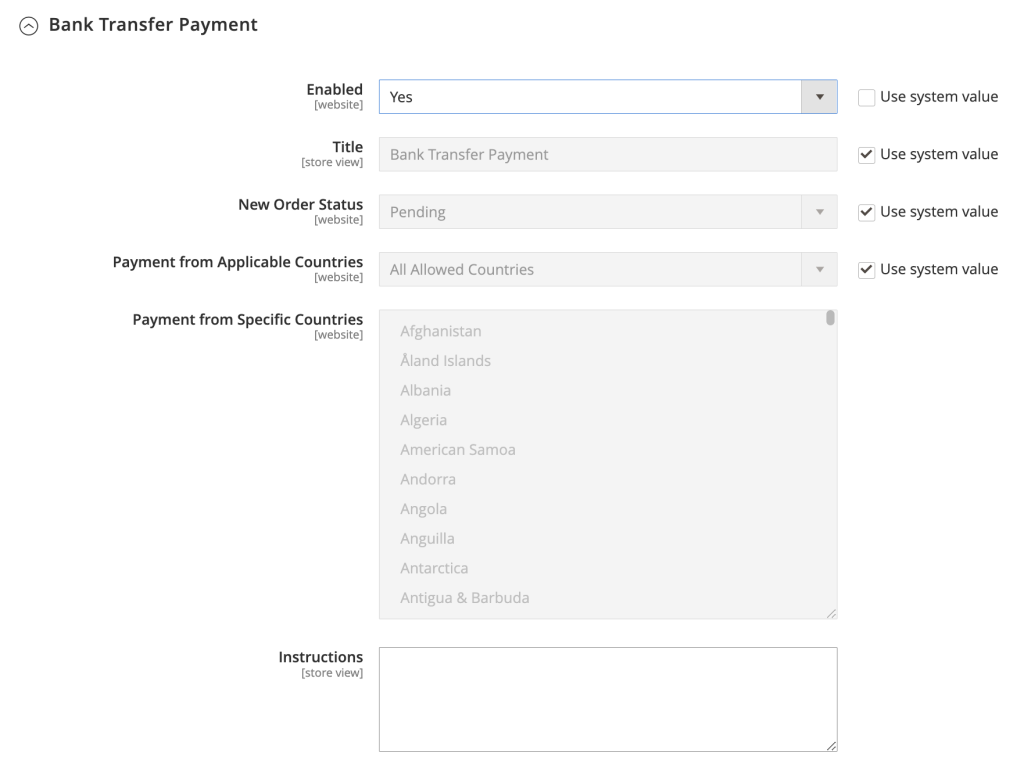
- Specify the countries where this payment method will be available under Payment from Applicable Countries.
- Set instructions that will be shown to the customer during checkout, and then save your settings.
For the cash-on-delivery (COD) method:
- Locate the Cash On Delivery Payment option.
- Enable COD and set a title for it.
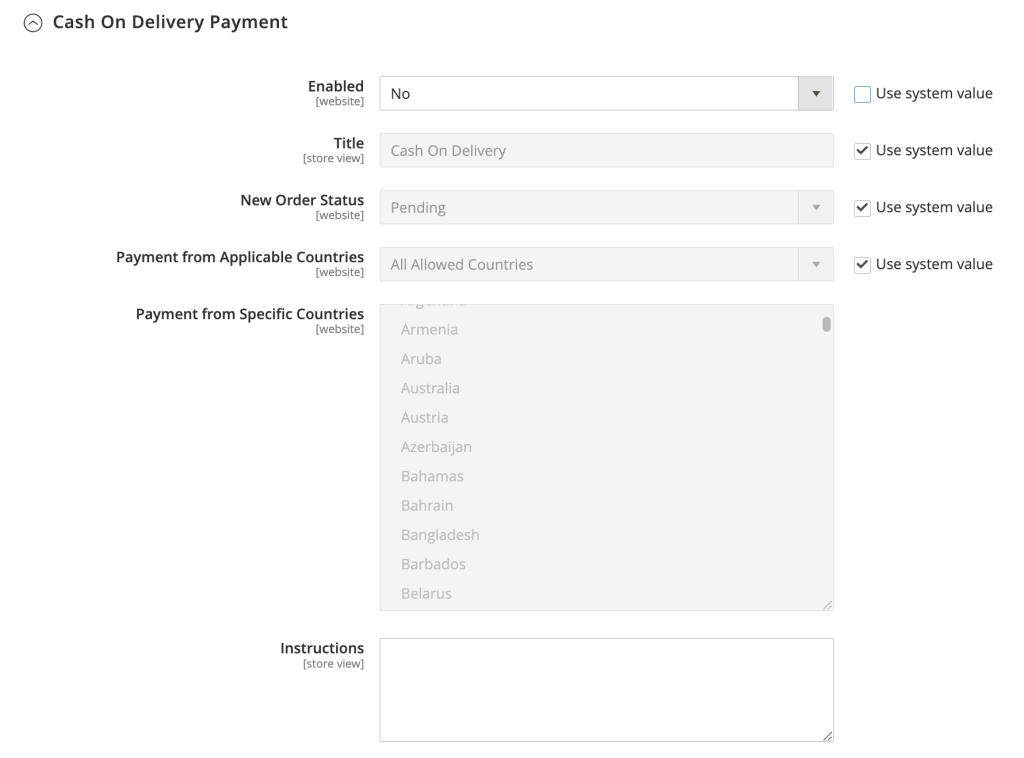
- Define the specific countries where COD should be available.
- Provide instructions and set a minimum and maximum order total for using this payment method.
Configuring Shipping Methods
Shipping methods in Magento 2 can be configured to offer different rates and options based on the customer’s location, quantity, and package weight.
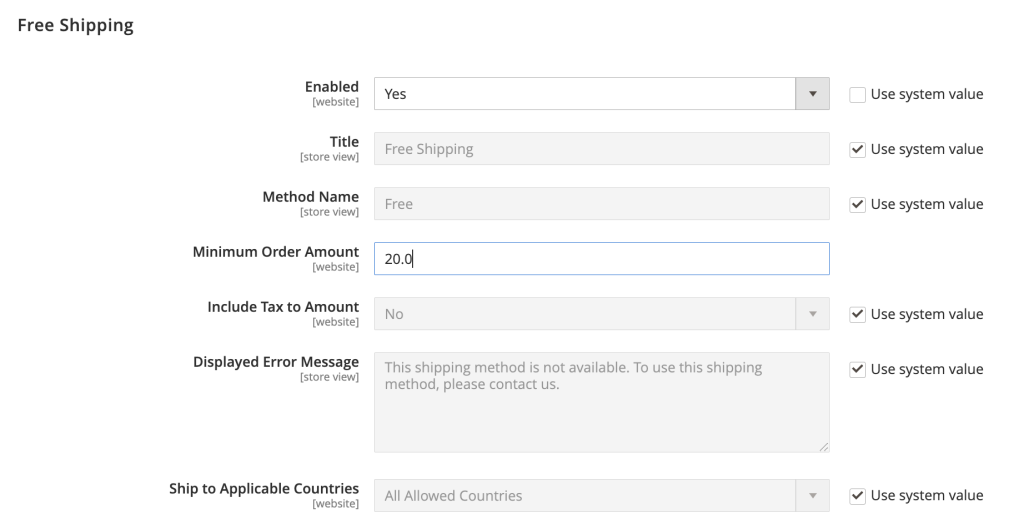
- Go to Stores → Configuration → Sales → Delivery Methods.
- Enable the Flat Rate option and enter the method name, type, and flat rate.
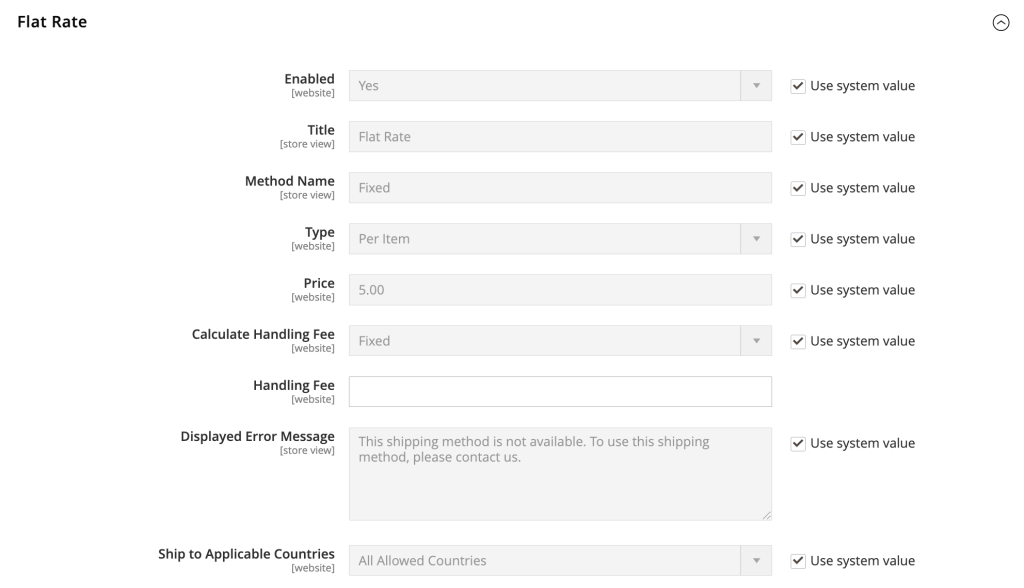
- To activate free shipping, find the Free Shipping section.
- Enable it and set the Minimum Order Amount that qualifies for free shipping.
- Enable Table Rate and set conditions such as Weight vs. Destination or Price vs. Destination.
- Save and test to ensure the rates are applied correctly during checkout.
Advanced Magento 2 Features
Now, let’s explore the advanced features that can take your Magento 2 store to the next level.
Magento Extensions
Extensions in Magento 2 are add-ons or plugins that extend the functionality of your store. You can obtain them from several sources, such as Adobe Commerce, the official platform for Magento extensions and themes.
Installing a Magento Extension
- Purchase or choose a free extension from Adobe Commerce or other reputable vendors.
- Download the extension package. If it’s from Adobe Commerce, you’ll gain access via your Adobe account.
- Upload the extension to your Magento server using an FTP client like FileZilla into this path:
/app/code/Vendor/ModuleName
- Connect to your server via PuTTY SSH or other terminal software and navigate to your Magento installation directory.
- Enable maintenance mode by running:
php bin/magento maintenance:enable
- Register the extension using:
php bin/magento setup:upgrade
- Recompile your Magento project with:
php bin/magento setup:di:compile
- Clear the cache and turn off maintenance mode with the following commands:
php bin/magento cache:clean php bin/magento maintenance:disable
- Configure the extension by navigating to Magento Admin → Stores → Configuration to find settings specific to the extension installed.
The steps for installing Magento 2 themes are quite similar. The difference is you need to upload the theme to /app/design/frontend/<Vendor>/<Theme>/.
Then, after recompiling Magento, activate the theme by navigating to Content → Design → Configuration. Find the store view you want to configure and click Edit. In the Applied Theme dropdown, select your newly installed theme.
Recommended Extensions for Magento 2 Store
- SEO Suite Ultimate by Mageworx. Enhances SEO tooling, including URL rewrites, metadata templates, and rich snippets.
- One Step Checkout by Aheadworks. Simplifies the checkout process to a single step, improving customer experience and potentially increasing conversion rates.
- Amasty Advanced Search. Provides powerful search capabilities that help customers find products more efficiently using various filters and search criteria.
- ShipStation Integration. Streamlines shipping by integrating with ShipStation, allowing for real-time shipping rates, automated order processing, and label printing.
- Yotpo Reviews. Integrates a comprehensive system for collecting and displaying customer reviews, which can help build trust and drive sales.
API Integration
With API integration, Magento 2 can communicate with external software and services, such as CRM systems, payment gateways, and shipping services, in order to read and write data to your Magento store efficiently and securely.
Understanding Magento 2 API Types
- REST (Representational State Transfer). An architecture style that uses standard HTTP methods like GET, POST, PUT, and DELETE for interactions. Magento’s REST API is used for various front-end actions, such as mobile applications and web apps.
- SOAP (Simple Object Access Protocol). A protocol that allows for structured information exchange through XML. Magento’s SOAP API is commonly used by enterprise systems.
- GraphQL. Introduced in later versions of Magento 2, GraphQL is a powerful alternative to REST and SOAP, allowing clients to request the exact data they need, making it ideal for mobile applications and progressive web apps (PWA).
Setting Up API Integration
- Navigate to System → Integrations.
- Click Add New Integration to create a new set of API credentials. Specify the integration’s name and your email.
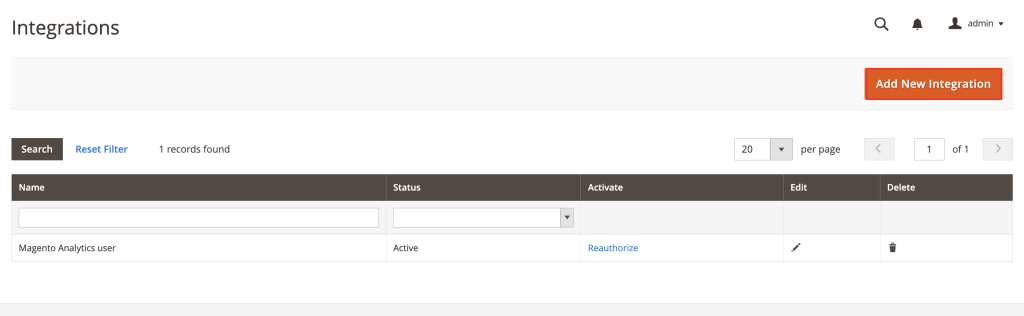
- Set the API permissions under the API tab by selecting the specific resources the integration can access.
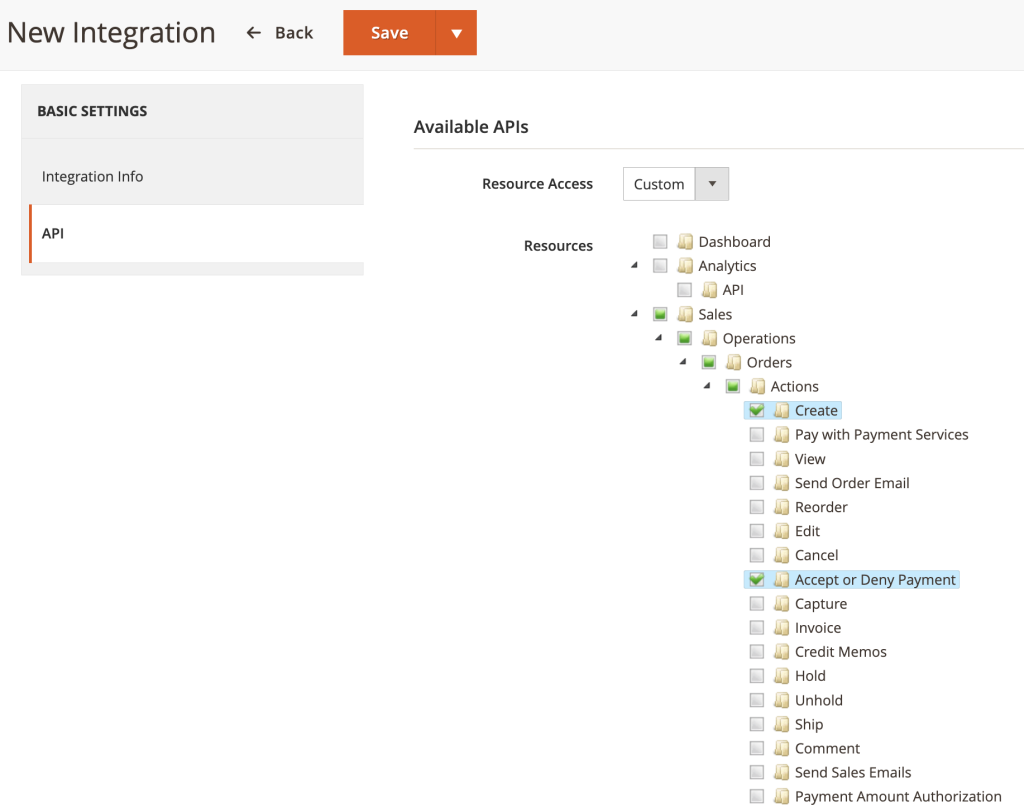
- Save and activate the integration to generate access tokens.
- Use the access tokens generated during the integration setup to authenticate API requests.
Example Use Cases of API Integration
- CRM systems. Sync customer data between Magento and CRM systems to enhance customer relationship management.
- Payment gateways. Integrate third-party payment processors to offer secure and diverse payment options.
- Shipping services. Connect with logistics providers to automate shipping calculations and tracking.
Multi-Store Setup
Magento 2’s multi-store setup feature enables you to run multiple stores using different URLs while managing them under one unified admin panel. This is useful for businesses managing multiple brands and diverse customer segments.
How Multi-Store Setup Works
Magento 2 uses a hierarchy that includes websites, stores, and store views:
- Website. This is the top-level container for stores which defines each store’s customer information, order data, and payment systems.
- Store. Stores are contained within a website. Each store can have its product catalog.
- Store View. A store view is a variation of a store primarily used to manage different languages or themes.
Setting Up a Multi-Store Environment
- Navigate to Stores → Settings → All Stores.
- Click Create Website to add a new website, then Create Store to add a store to that website, and Create Store View to set up different views.
- Go to Stores → Configuration and select the store view you want to configure from the store switcher at the top of the page.
- Head to Web → Base URLs and Web → Base URLs (Secure) and specify the base URL for each store or store view.
- Assign products to the new store and customize the store’s configurations as necessary.
- After configuring each store, deploy Magento’s static content for each store view using the command line:
php bin/magento setup:static-content:deploy --store=en_us
Replace en_us with the appropriate locale code for each store view.
Performance Optimization
Optimizing a Magento 2 store’s performance involves various techniques that improve the speed and efficiency of the platform. Below are key areas to focus on:
Caching Implementation
- Enable full page cache (FPC). Magento 2 comes with built-in full-page caching to store the entire HTML output of a page in the cache. You can enable and configure FPC by navigating to Stores → Configuration → Advanced → System → Full Page Cache.
- Use a varnish cache. For even faster performance, configure Varnish Cache as the frontend cache for Magento. To do this, go to Stores → Configuration → Advanced → System → Full Page Cache and select Varnish Cache as the Caching Application.
- Clear cache after configuration. Every time you make changes, clear the cache to ensure that your changes take effect immediately. Navigate to System → Tools → Cache Management, where you can clear specific cache types or flush the entire cache.
JavaScript and CSS Optimization
- Merge JavaScript files. Combining multiple JavaScript files into one reduces the number of HTTP requests needed to load a page, thus enhancing load speed. Enable this by accessing Stores → Configuration → Advanced → Developer → JavaScript Settings and switching Merge JavaScript Files to Yes.
- Minify CSS and JavaScript. Minifying CSS and JavaScript files removes unnecessary scripts without changing functionality, thus reducing file sizes. Enable minification by going to Stores → Configuration → Advanced → Developer → CSS Settings for CSS and JavaScript Settings for JavaScript. Set both Minify Files to Yes.
Regular Update and Maintenance
- Keep Magento updated. Always use the latest version of Magento, as updates often contain performance improvements and security patches.
- Optimize modules. Regularly review and optimize your Magento custom modules. Disable or uninstall any extensions that are not necessary, as they can slow down your site.
- Perform speed tests. Use speed testing tools like Google PageSpeed Insights or GTmetrix to track your Magento store’s performance and identify areas for improvement.
Security Measurement
Implementing strong security protocols is essential for safeguarding your Magento 2 store against unauthorized access, data breaches, and other malicious activities. Below are several key security measures you should consider:
Use Strong Passwords and Two-Factor Authentication
- Admin passwords. Ensure all admin accounts use strong, unique passwords. Magento enforces password complexity, which helps reduce the risk of brute force attacks.
- Google reCAPTCHA. Enable Google reCAPTCHA for all backend users to add a layer of security. You can configure this by navigating to Stores → Configuration → Security → Google reCAPTCHA Admin Panel.
Secure Data Transmission
- Use HTTPS. Secure all data transmissions by using HTTPS instead of HTTP. This encrypts the data exchanged with your website, protecting it from interception. Ensure you have a valid SSL certificate installed.
- SFTP or SSH. Always use secure FTP (SFTP) or SSH file transfer protocol (SSH FTP) when uploading files to your server. This ensures that file transfers to and from your server are encrypted.
Limit Admin Access
- Change admin URL. By default, the Magento admin panel can be accessed via /admin. Change this to a custom path to reduce the risk of unauthorized access. You can configure this during installation or later by editing the env.php file.
- Restrict admin access by IP. Limit backend access to specified IP addresses to reduce the risk of unauthorized access. To implement this, you need to modify the .htaccess file, for example:
# Restrict admin panel access by IP
<LocationMatch "^/(index.php/)?admin">
    Order Deny,Allow
    Deny from all
    Allow from x.x.x.x # Replace x.x.x.x with your IP address
</LocationMatch>
Conclusion
In this Magento tutorial, we’ve covered everything from setting up your store and adding products to configuring multiple stores. It’s also crucial to recognize the importance of effective caching strategies and robust security measures to enhance and protect your online presence.
As you develop and customize your Magento projects, remember to apply these best practices to ensure a robust, efficient, and secure eCommerce environment. Embracing these strategies won’t only meet but also exceed customer expectations.
Magento 2 Tutorial FAQ
This section will answer the most common questions related to Magento tutorials.
What Are the Differences Between Magento 1 and Magento 2?
Magento 2 offers significant improvements over Magento 1, including a streamlined checkout process, enhanced security features, and a more user-friendly admin interface. It also uses newer technologies and provides more efficient updates to help scale your business.
What Is Magento 2 Used For?
Magento 2 is a versatile eCommerce platform used for creating online stores. It supports extensive customization, multiple store management, and features to enhance user experience, scalability, and performance for businesses of all sizes.
Is Magento 2 Easy to Learn?
Magento 2 is relatively challenging to learn due to its complex architecture and extensive feature set. However, with ample resources and a prospering developer community, Magento beginners can gradually master its functionalities for robust eCommerce solutions.
How Long Does It Take To Learn Magento 2?
The time it takes to learn Magento 2 varies widely based on prior experience. For beginners, it may take several months to become proficient, while experienced Magento website developers might adapt more quickly, especially those familiar with similar technologies.

Ariffud is a Technical Content Writer with an educational background in Informatics. He has extensive expertise in Linux and VPS, authoring over 200 articles on server management and web development. Follow him on LinkedIn.
