How to Host a Discord Bot: Making and Deploying Your Own Bot to VPS in 2024
Adding bots to your Discord server lets you automate tasks and add new features. While there are many popular Discord bots that are ready to use, you may need to create one for your specific needs.
In this article, we will explain how to host a discord bot with Hostinger’s virtual private server hosting plan. First, we will explore the steps to develop your own Discord bot from scratch.
Then, we will explain how to purchase a VPS hosting plan from Hostinger and configure the server environment for your Discord bot. Moreover, you will learn about Discord bot performance optimization and monitoring.

How to Make a Discord Bot
Hosting your own Discord bot that is tailored to your preferences requires it to be developed manually. The steps may differ depending on your bot’s functionality and programming language, but the general procedure is similar.
1. Create a Discord Bot Account
To start making a Discord bot, create a Developer Portal account. In this platform, you will create the bots, manage their settings, and generate the authentication link for inviting them to your Discord server.
To create a Discord account, go to the registration page. You will automatically log in to the new Discord account if you open the Developer Portal. Then, follow these steps:
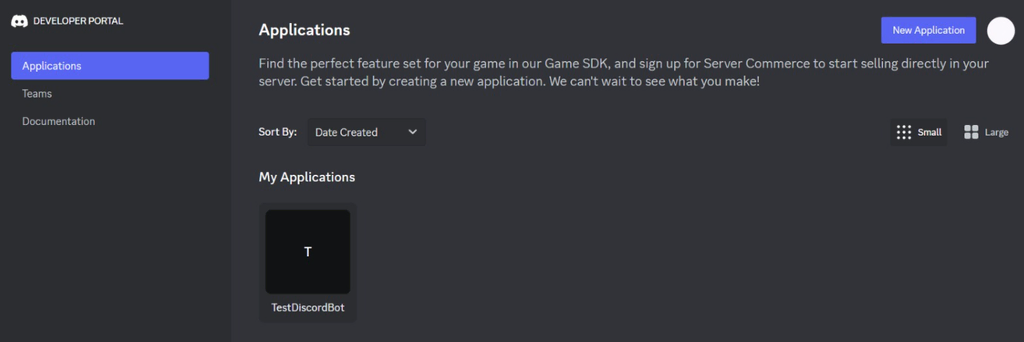
- On the sidebar, click Applications.
- Select New Application in the right corner.
- Enter your bot name and check the privacy policy box. Click Create.
- Change the App Icon. Enter the Description and Tags. Click Save Changes to confirm.
- Copy the Application ID and save it to your computer. We need it later to enable Developer Mode.
Then, configure your bot token – an authentication key that enables your application to communicate with the Discord bot API. Here’s how to do it:
- Navigate to the sidebar → Bot.
- Change your bot username.
- Click Reset Token. Click Yes, do it! to confirm.
- Copy the bot token and save it to your computer.
We’ll insert this token into the bot’s source code. Also, keep the code safe since leaking it may expose your bot and Discord server to security risks.
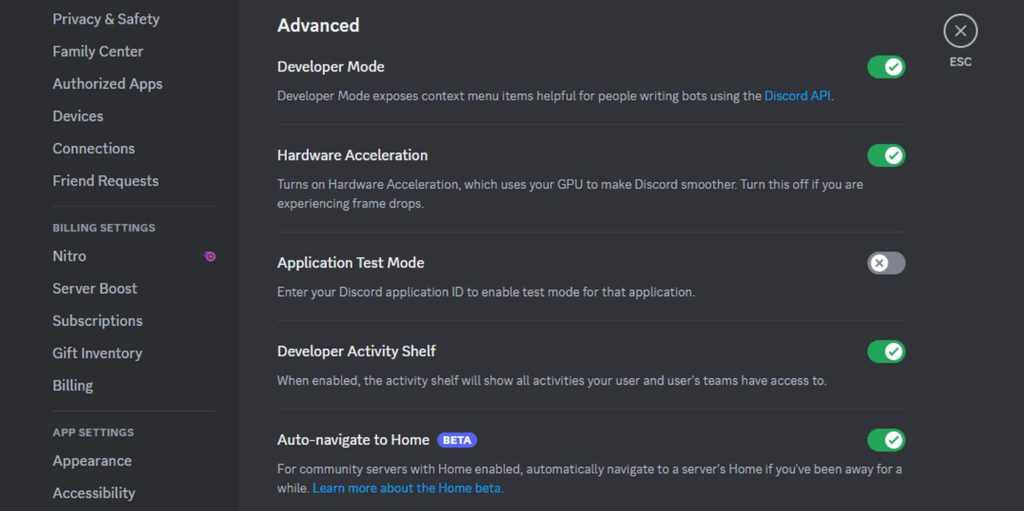
Now, enable the Developer Mode to bypass your Discord bot SKUs-related payment. Here’s how to do it:
- Log in to your Discord application → User settings → Advanced
- Toggle the Developer Mode on.
- Enable the Application Test Mode switch
- Enter your Application ID. Set the URL Origin Type as Localhost and Port Number as 8080.
- Click Activate.
2. Set Bot Permissions
After setting up the application, configure your Discord bot account permissions and authentication method. Here’s how to do it:
- On the Applications page, select OAuth2 → General from the sidebar.
- Under the Default Authorization Link, select In-app Authorization as the method.
- Check the bot box.
- Select the Bot Permissions according to your needs.
- Click Save changes.
- Navigate to the sidebar → OAuth2 → URL Generator.
- Check bot as your application’s scope.
- Recheck the same boxes for the Bot Permissions.
- Copy the Generated URL and save it to your computer. It should contain your bot’s Client ID.
Important! Avoid giving a bot Administrator permissions, as it can modify your server settings.
In addition, go to the Bot section from the sidebar and grant the bot Privileged Gateway Intents. Enable all intents if you are unsure which one your bot will use. However, keep in mind that it will grant the bot access to various Discord data.
Now, open the authentication link using a web browser to invite the bot to your Discord server and grant the necessary permissions.
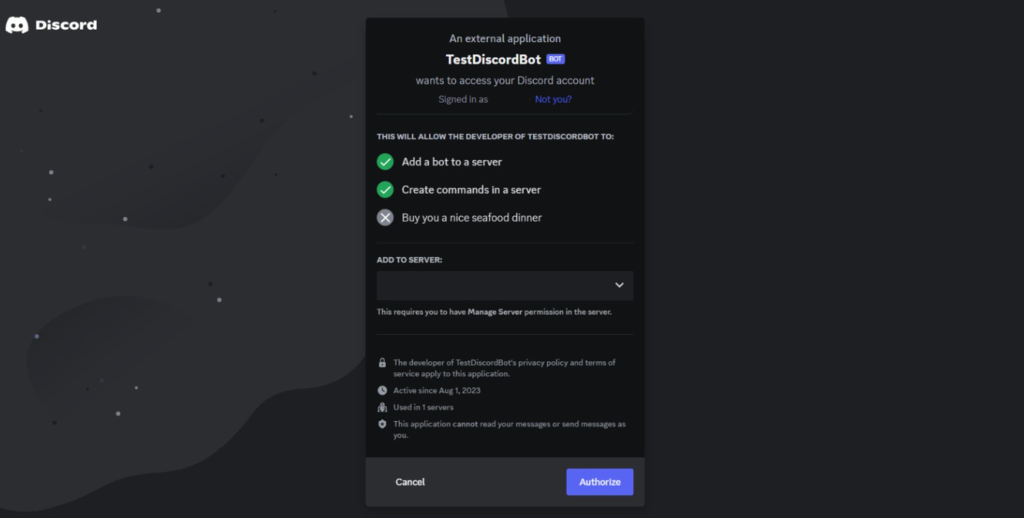
From the dropdown menu, select the server you want to add the bot into and click Continue. Review the permissions you will grant to the bot. If you wish to revoke any of them, uncheck the boxes. Then, click Authorize to confirm.
3. Choose a Programming Language
JavaScript and Python are popular programming languages for creating a Discord Bot. While you can use C++, the available Discord API wrappers only support these languages.
Discord API wrappers simplify the interaction between the software and your code, making the development easier. Since the language and wrapper don’t affect your bot’s functionality, choose one based on your familiarity and preferences.
For a beginner, we recommend using Python, one of the simplest and best programming languages to learn. It is easier to read and maintain than JavaScript, simplifying the debugging process. We will also use Python for this tutorial.
Before proceeding, download Python and a code editor. When choosing a code editor, pick one with features that help simplify your coding process, like syntax highlighting, auto-completion, error detection, and module integration.
We recommend Microsoft Visual Studio Code as it is free and offers various features.
4. Code the Bot
Once the software and tools are ready, create a folder for your Discord bot files. Then, open VSCode to access the folder and create working files:
- Click File → Open Folder
- Navigate to your new folder directory. Select the folder and click Select Folder.
- Go to the Explorer sidebar and click the add new file icon.
- Create a main.py file to store all your bot codes. For an advanced bot, you may need multiple files and that are linked to main.py.
- Create a .env file to store your bot token. Your Python code will call this file to authenticate the connection to the Discord API.
Important! Leave the .env file name blank. Otherwise, the bot code won’t find it and read the environment variable.
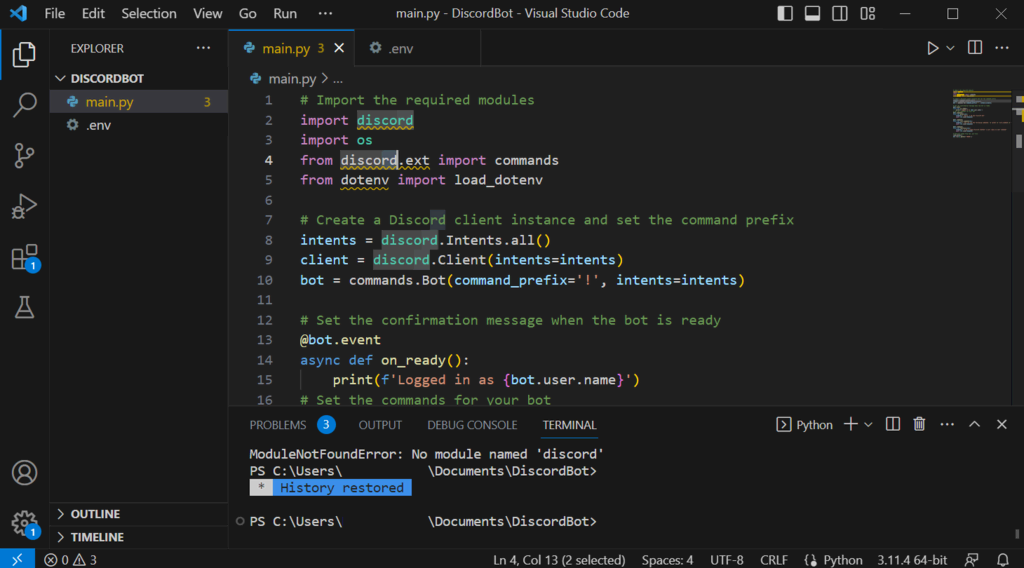
Depending on your Discord bot functionality, the code differs. For this tutorial, we will show you how to make a Discord bot that replies to a simple command:
# Import the required modules
import discord
import os
from discord.ext import commands
from dotenv import load_dotenv

# Create a Discord client instance and set the command prefix
intents = discord.Intents.all()
client = discord.Client(intents=intents)
bot = commands.Bot(command_prefix='!', intents=intents)

# Set the confirmation message when the bot is ready
@bot.event
async def on_ready():
    print(f'Logged in as {bot.user.name}')
# Set the commands for your bot
@bot.command()
async def greet(ctx):
    response = 'Hello, I am your discord bot'
    await ctx.send(response)

@bot.command()
async def list_command(ctx):
    response = 'You can use the following commands: \n !greet \n !list_command \n !functions'
    await ctx.send(response)

@bot.command()
async def functions(ctx):
    response = 'I am a simple Discord chatbot! I will reply to your command!'
    await ctx.send(response)

# Retrieve token from the .env file
load_dotenv()
bot.run(os.getenv('TOKEN'))
Here is the explanation of how the code snippet works:
- The import keywords retrieve code from a module and add it to your bot’s file, allowing you to use a function without writing it manually. For example, we import the Discord.py library to enable the bot.command decorator.
- We define the variables the code will use. In our case, they are the Discord bot intents, client, and bot.
- The @bot.event decorator defines events that trigger the coroutine function. In the snippet, we instruct the bot to print a confirmation message once it runs successfully.
- The @bot.command decorator sets the command that triggers the bot. We also determine how and when the bot responds.
- The load_dotenv function reads the environment variable from the .env file. In this case, it retrieves the token.
- Using the os.getenv method, the code extracts the token value and uses it to run the bot with the bot.run decorator.
In addition to responding to commands, you can add advanced features such as voice control or input field. To learn more about the functions, read the discord.py documentation.
On the .env file, paste the following snippet. Replace yourtoken with the authentication key:
TOKEN=yourtoken
To check whether your code runs properly, click the Run Python File button on the top right of VSCode. However, you must install the dependencies to run the bot.
Pro Tip
If you are in a team environment and are continuously updating the Discord bot, we recommend creating a Git repository to simplify the development process. Read our Git tutorials to learn more about it.
How to Host a Discord Bot
Host your Discord bot to make it accessible 24/7. For this tutorial, we will use a Hostinger VPS hosting plan running Ubuntu 22.04. For other hosting service providers and operating systems, the steps may differ.
1. Get VPS Hosting
While you can create a Discord bot hosting server on your local computer, the system must run 24/7. It can cause hardware damage in the long run and requires much effort to manage.
A Discord bot hosting service like a VPS is more convenient and time-efficient. The provider manages the server, allowing you to focus on developing and optimizing your bot.
However, choosing one can be difficult since various providers offer Discord bot hosting servers. To pick the best VPS hosting for Discord bots, consider their features, security, uptime, and price.
Check out our 10 best VPS hosting providers tutorial to learn more about the options. For instance, Hostinger offers VPS hosting plans starting at £4.99/month with various features:
- Snapshot. Users can capture their server’s current state for easy restoration.
- Reliable hardware. Hostinger VPS uses SSD storage and a high-performance CPU to ensure optimal performance and uptime.
- Multiple data centers. Hostinger users can choose from various data center locations to minimize latency.
- DDoS protection. Our VPS uses a firewall and built-in traffic filtering for DDoS protection.
- SSH support. Users can connect to their VPS using secure shell protocol (SSH) to efficiently manage their remote server.
- FTP access. All Hostinger VPS plans support FTP, allowing users to easily transfer files between systems.
- Dedicated IP. Users get a dedicated IP address to eliminate Cloudflare and Discord server rate limiting.
As different servers invite your bot, you need more resources to handle the requests. At Hostinger, our VPS plans are also easily upgradable to ensure your Discord Bot scalability.
After you buy a hosting plan from Hostinger, select your new server from the VPS menu on the top bar. Then, complete the Hostinger VPS setup process via hPanel, our custom-made intuitive control panel.

2. Configure the VPS Environment
Discord bot deployment on VPS requires setting up the hosting environment to ensure the necessary software is installed. The software differs depending on your bot’s language and functionality.
For a Discord.js bot, install Node.js and Node Package Manager. Meanwhile, here is what you need for a Python one:
- Python interpreter. An environment that converts your Python code into a machine-readable format, allowing your Discord bot to run.
- Pip package manager. A package management system used to install modules and dependencies for your Python application.
- Virtualenv. A tool for creating an isolated virtual private environment for your Python application. It lets you avoid installing the Python packages globally, which may break other projects.
Suggested Reading
Before proceeding, read our Linux Commands tutorial to learn more about their functions.
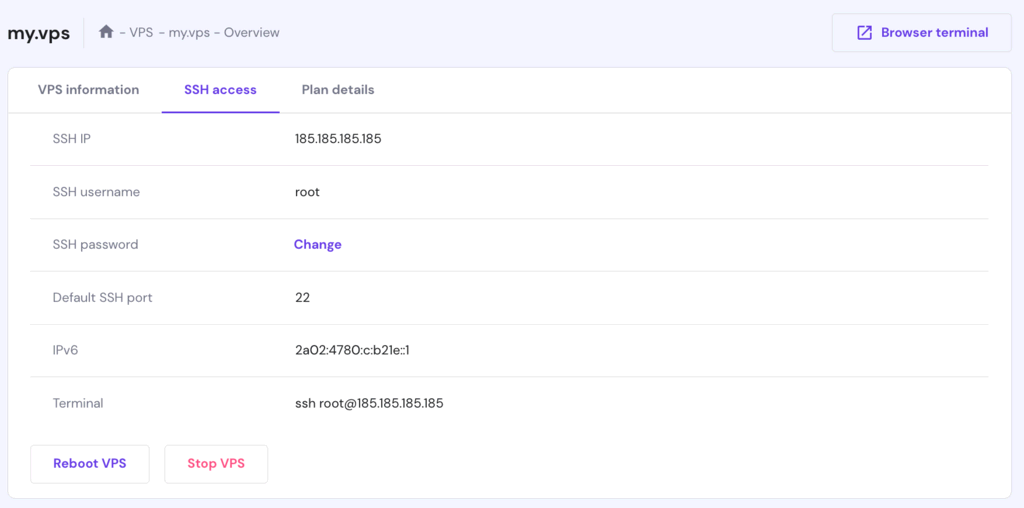
To install the components, connect to your server using SHH applications like PuTTY or Terminal. Hostinger users can find the login credentials under the SSH Access tab on their VPS overview menu.
Once connected, run the following commands to update your package manager and install the required software for hosting your Discord bot:
sudo apt update
sudo apt upgrade
sudo apt-get install software-properties-common -y
sudo add-apt-repository ppa:deadsnakes/ppa -y
sudo apt install python3 python3-dev python3-venv python3-pip -y
Then, follow these steps to create a virtual environment for your Python project:
- Run this command to create a new directory to store the files:
sudo mkdir DiscordBot
- Change the current directory to the new folder using this command:
cd DiscordBot
- Set the new virtual environment with the venv argument:
sudo python3 -m venv ./venv
- Activate the virtual environment using the source command:
source ./venv/bin/activate
Your command line should now start with (venv). If the source command isn’t found, navigate to the ~/DiscordBot/venv/bin directory path using the cd command and run the following:
source activate

3. Upload the Discord Bot
After setting the virtual environment, move the token and bot files into the new directory. You can do so using the rsync command, scp protocol, or an SFTP client.
We recommend using Secure File Transfer Protocol (SFTP) as it offers a graphical user interface and is more secure than standard FTP. The visual interface makes the process simpler and beginner-friendly.
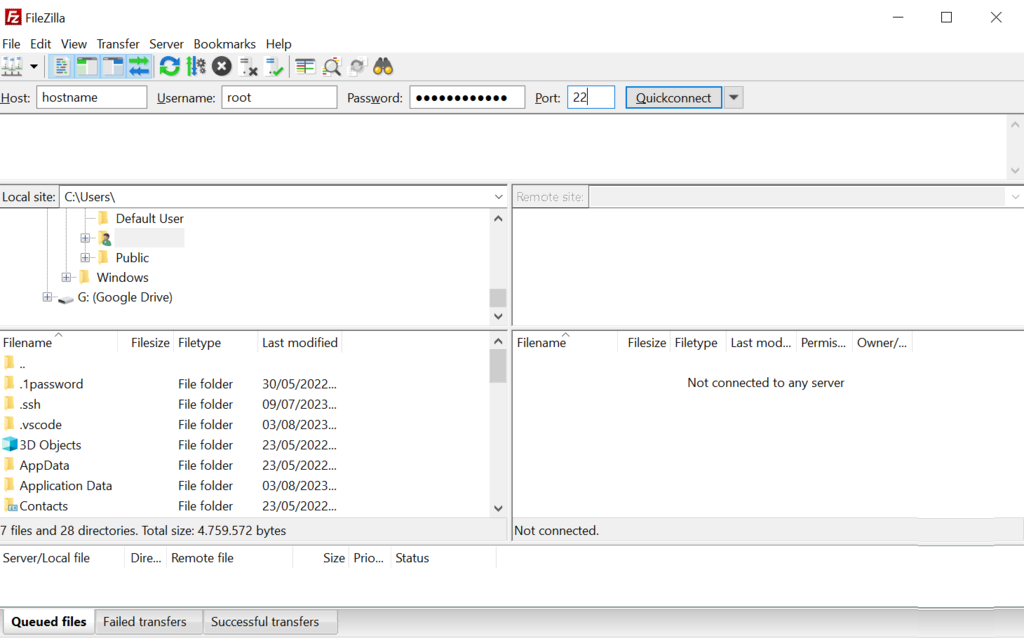
For this tutorial, we will use FileZilla to transfer the files via SFTP. Here are the steps:
- Download and install FileZilla.
- Open FileZilla. Enter your server IP address, username, password, and port number. By default, the port number is 22.
- Click Quickconnect.
- Once connected, locate the new ./venv directory under the Remote site tab.
- Drag and drop the bot files from your local computer to the remote directory.
Wait until the process is complete. The file transfer status is in the box under the connection tab.
Then, return to your SSH client or Terminal. Move to the bot directory and install all the dependencies. In this tutorial, we will install the discord.py wrapper and dotenv using this command:
sudo pip install discord.py python-dotenv
Pro Tip
Having difficulty writing bash commands or managing your Linux VPS? Enter AI prompts for VPS management in Hostinger VPS assistant to easily generate commands or code.
4. Start the Bot
To run the bot, set the current directory to the main.py file location and run the following command. If you use another file name, change it accordingly:
python3 main.py
Terminal should return the confirmation message written in the bot’s file, similar to the following:

If you open the Discord server where the bot is located, it will appear online. To check If your bot runs properly, enter a command, and it should reply accordingly.
However, this bot is only active on your current session. If you close the SSH client or Terminal, the session will end and shut down the bot. You can use different tools to keep your bot running:
- Linux Screen. A tool that lets users create multiple virtual Terminals inside a session. The virtual Terminals processes run in the background after you close the session and disconnect from the server.
- tmux. Terminal Multiplexer works similarly to Screen, allowing users to create virtual sessions and run processes in the background. It is more user-friendly than Screen but lacks some features and is less stable.
- PM2. A Node.js application process manager that keeps your application running constantly. It is native to JavaScript but works with other programming languages, including Python.
- Docker. A containerization tool that turns your Discord bot into a daemon. It allows your bot to run in the background and automatically reboot after a system failure.
In this tutorial, we will use Linux Screen, which is the simplest and most compatible with different environments. Here are the steps to install and use Screen to run your Discord bot on Ubuntu VPS:
- On Terminal or SSH application, run this command to install Screen:
sudo apt-get install screen
- Run this command to create a new session:
screen
- Use this command in the virtual Terminal to change the working directory:
cd /DiscordBot/venv
- Start your Discord bot using the following:
python3 main.py
- Once the bot is running, press Ctrl + A + D to detach the Screen session.
Important! For Red Hat Enterprise Linux (RHEL) derivatives like AlmaLinux and CentOS, use yum instead of apt to install Screen.
Now, the session will remain running in the background after disconnecting from the server. To reconnect to Screen, open your Terminal or SSH application and enter:
screen -r
Screen lets you create multiple sessions to run other Discord bots using this command:
screen -S session1
Replace session1 with your session name. Use a descriptive name to help you easily identify them and their process. To list the current user’s sessions, use the following:
screen -ls
5. Monitor and Maintain Bot Performance
After deploying the Discord bot, regularly monitor it to ensure optimal performance. In addition, it helps you catch potential issues quickly before they affect your bot’s usability.
The first monitoring task is to enable the logging Python module to track your Discord bot’s events and errors. It provides insights into your bot’s functionality for easier debugging and troubleshooting.
For example, add the following code snippet to your bot file to log command execution errors in a bot.log file and Discord server:
# Import the Python logging module
import logging
# Set the logging settings
logging.basicConfig(level=logging.INFO,
   format='[%(asctime)s] [%(levelname)s]: %(message)s',
   handlers=[
      logging.FileHandler('bot.log'),  # Save logs to a file
      logging.StreamHandler()         # Display logs in the console
])
Then, add the following bot.event decorator to print the error message on your Discord server:
# Set what the bot does when encountering an error
@bot.event
async def on_command_error(ctx, error):
   error_message = f’Error occurred while processing command: {error}’
   logging.error(error_message)
   await ctx.send(error_message)
In addition, use tools like UptimeRobot for Discord bot uptime monitoring. To track its usage and activity, use an application performance monitoring (APM) tool like Grafana. Since each tool’s setup process differs, check their manual for instructions.
Also, monitor your VPS hardware usage to ensure the bot has enough resources to perform optimally. Several important metrics to track include CPU usage, RAM consumption, storage load, and network condition.
If your server doesn’t have a control panel, use Python’s psutil or Linux commands like vmstat. These methods don’t offer a graphical user interface (GUI), making the process complicated and not beginner-friendly.
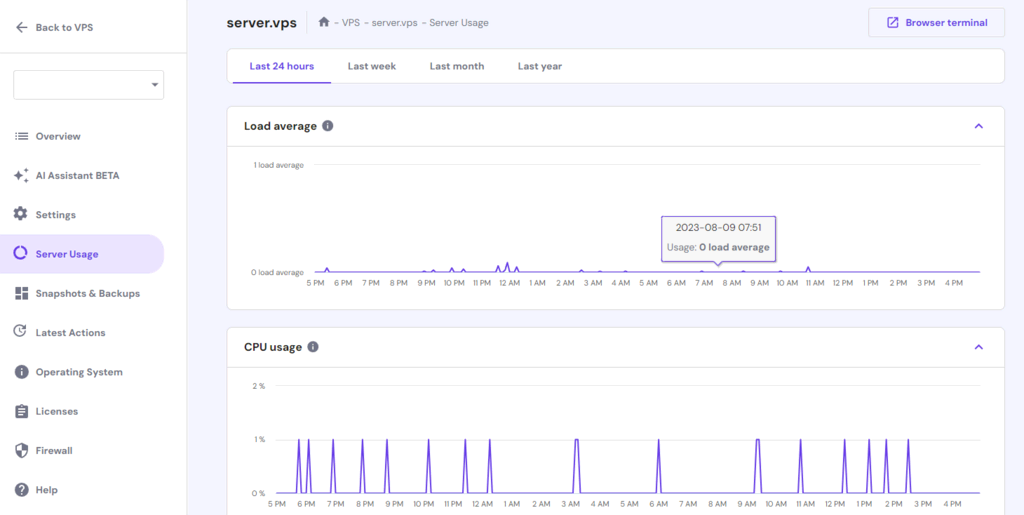
Web hosting providers usually provide a dashboard for tracking their server usage. For example, Hostinger offers a VPS resource usage monitor feature in hPanel.
We recommend submitting your application to a bot list website like top.gg to make it accessible to other Discord users.
Conclusion
Inviting bots to your Discord server lets you add new features and simplify moderation tasks. While many pre-programmed Discord bots are available, you may need to create a custom one for your particular use case.
In this article, we have explained the steps to create and host a Discord bot on Linux VPS. Here is the recap:
- Create a Discord account and application in the developer portal.
- Set the bot permissions and invite it to your Discord server.
- Choose a programming language and IDE.
- Write your Discord bot code.
- Purchase a Discord bot hosting service, like Hostinger’s VPS.
- Install dependencies to configure the hosting server environment.
- Upload the bot and token files via SFTP.
- Start your Discord bot and use Screen to keep it running 24/7.
- Monitor and maintain the bot’s performance.
We hope this article helped you develop and host your Discord bot. If you have any questions, leave a comment below. Good luck!
How to Host a Discord Bot FAQ
In this section, we will answer several common questions about custom Discord bot development and hosting.
What Is a Discord Bot?
Discord bots are applications you can invite to your server to run specific tasks. Popular examples include scheduling, moderation, and music bots. Bot list websites like top.gg have pre-built ones ready to use. However, you may want to make and host your own Discord bot from scratch.
How Do I Choose the Right VPS Hosting for My Discord Bot?
To pick the right Discord bot hosting service, consider its server resources, security, customer service, and built-in features. For example, Hostinger VPS offers features like 24/7 support, SSH support, and DDoS protection. It has a 99.9% uptime guarantee to ensure your Discord bot is constantly running.
What Programming Language Should I Use to Build My Discord Bot?
You can code a Discord bot using JavaScript or Python. Since the language doesn’t affect the bot’s functionality, choose one according to your expertise and preferences. For beginners, we recommend Python as it is easier to learn, read, and maintain than JavaScript, simplifying the bot development process.
Can I Run Multiple Discord Bots on the Same Server?
Yes, you can host multiple bots on the same server so long as it has sufficient storage and processing power. Otherwise, your bots will slow down or become offline. In addition, you may need to use a container or virtual environment to avoid incompatibility issues between bots.

Aris is a Content Writer specializing in Linux and WordPress development. He has a passion for networking, front-end web development, and server administration. By combining his IT and writing experience, Aris creates content that helps people easily understand complex technical topics to start their online journey. Follow him on LinkedIn.
