How to Use Hostinger’s DNS Zone Editor in 2024
The Domain Name System (DNS) plays a central role in how the internet functions. It acts as a directory, translating domain names, like example.com into numerical IP addresses that computers can understand. This process lets your web browser locate the server hosting a website and display its content on your screen.
Hostinger’s DNS Zone Editor, accessible through hPanel, is a valuable tool for web, cloud, and Managed WordPress hosting clients to oversee their domain’s DNS records.
This guide provides a comprehensive overview of the DNS Zone Editor’s functions, clear instructions on its proper use, and tips for better domain management.
Download guide to using Hostinger
How the Domain Name System (DNS) Works
Before discussing the specifics of the DNS Zone Editor, let’s revisit the fundamental process behind the Domain Name System (DNS).
Suppose you’re entering a website address like www.nytimes.com into your web browser. Here’s what happens behind the scenes:
- Browser queries DNS servers. Your web browser contacts a DNS server to translate the user-friendly domain name into its corresponding IP address.
- DNS servers locate the IP address. The DNS server consults its vast database of domain names and IP addresses to find the match for www.nytimes.com.
- An IP address is returned. Once the IP address is identified, the DNS server relays this information back to your web browser.
- The browser connects to the website. With the IP address found, your web browser can now establish a connection with the server hosting the nytimes.com website.
- The website’s content is delivered. The server sends the content back to your browser, allowing you to see the New York Times website displayed on your screen.
Sometimes, for example, when you switch web hosts or point your domain to a different IP address, you need to access the DNS Zone Editor through your web host’s control panel.
For Hostinger clients, the DNS Zone Editor is conveniently located within hPanel. The user-friendly interface makes it easy to modify your domain’s DNS records, granting you greater control over your website’s online visibility.

What Are Nameservers?
Nameservers store all DNS records of a domain name and use them to locate the domain’s associated IP address. They also direct traffic to the website the domain is associated with.
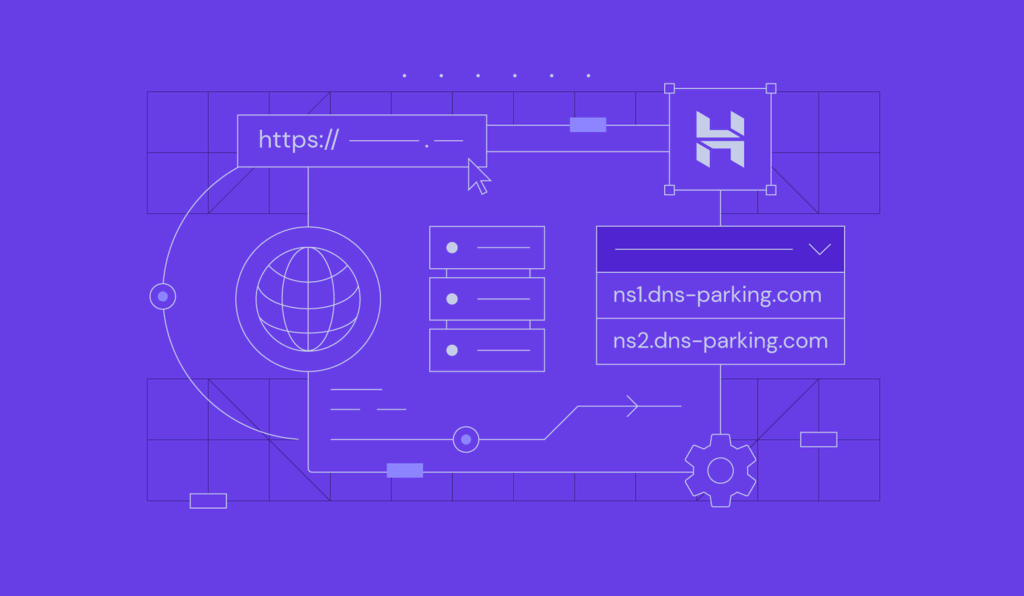
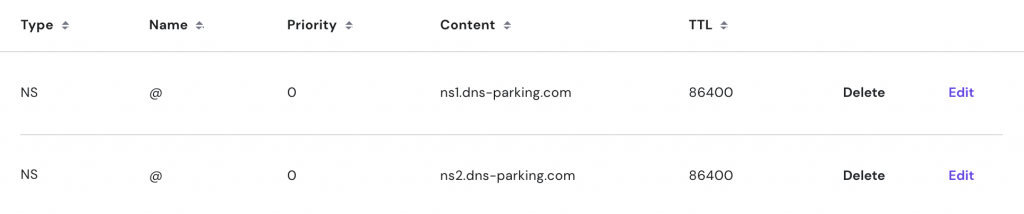
When a user registers a domain name, the host provides at least two nameserver values. One acts as a backup if the other fails. Hostinger’s nameservers look like this:
ns1.dns-parking.com

ns2.dns-parking.com
To modify a domain’s DNS records, the DNS settings must include the nameserver values of the website’s hosting provider. To use hPanel’s DNS Zone Editor, ensure that your domain points to Hostinger.
If you purchased a domain name from us, it will default to our nameserver values. Hostinger clients can verify this by navigating to hPanel → Domains and clicking Manage on their current domain.

The nameservers will be listed in the Domain Overview table:

For those who bought a domain name from a different provider, go to your registrar’s settings and replace the existing nameservers with the ones above. This action will point the domain to your new hosting account, directing visitors to the site hosted with Hostinger.
Exploring Hostinger’s DNS Zone Editor
If you have a Hostinger web hosting plan, open the DNS Zone Editor by going to hPanel → Websites and select your site. In the side menu, scroll down to the Advanced settings and select DNS Zone Editor.

If the DNS Zone Editor is inaccessible, check that your domain name already connects to your hosting plan and uses the correct nameservers.
Here’s what your DNS Zone Editor page should look like:

If you only purchased a domain name at Hostinger and don’t have web hosting, click on the Domains top menu and select the domain you’re using. On the left sidebar, choose DNS / Nameservers, and then navigate to the DNS records tab.

There will be several DNS records you can edit, add, and remove.
What Is an A Record?
An A record is the main DNS record that directs a domain or a subdomain to an IPv4 address.
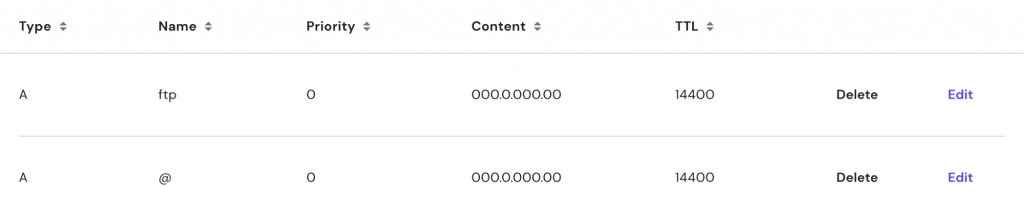
In the DNS Zone Editor, there are two default listings: one for the domain’s ftp subdomain and another for the main domain, represented by the @ symbol.
For example, using the domain loremipsum.com, these records will direct both ftp.loremipsum.com and loremipsum.com to the IP address 000.0.000.00.

To point the domain or its subdomains to a different IP address, simply add a new A record in the Manage DNS Records section. Here are the fields you need to fill in:
- Type. The type of DNS record you want to create.
- Name. Use @ to point the main domain to another IP address or enter a subdomain name.
- Points to. Enter the IP address that your domain or subdomain should resolve to.
- TTL (Time to Live). Specifies how long the DNS resolver should cache the query for this domain. Most hosting providers typically set this to 14400 seconds (4 hours).
After completing these fields, click Add Record to create the entry.
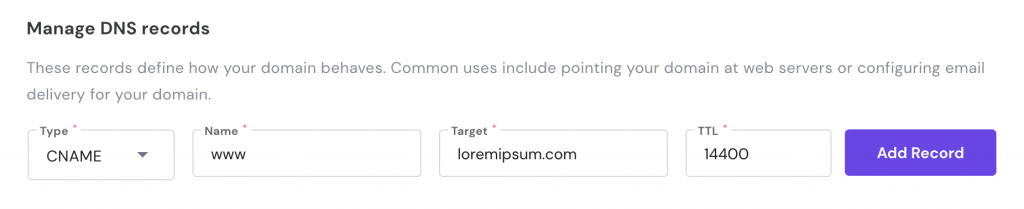
What Is a CNAME Record?
A CNAME, short for Canonical Name, record lets you make one domain or subdomain an alias of another domain.
For instance, if your website uses the domain loremipsum.com, you might want visitors who type www.loremipsum.com also to reach your site. The CNAME record makes this possible by pointing www.loremipsum.com to loremipsum.com.
When adding a new CNAME record, instead of entering an IP address in the Target field, you will enter the main domain name, as shown below:
If the IP address of the main domain changes in the A record, the CNAME records will automatically update to reflect this change.
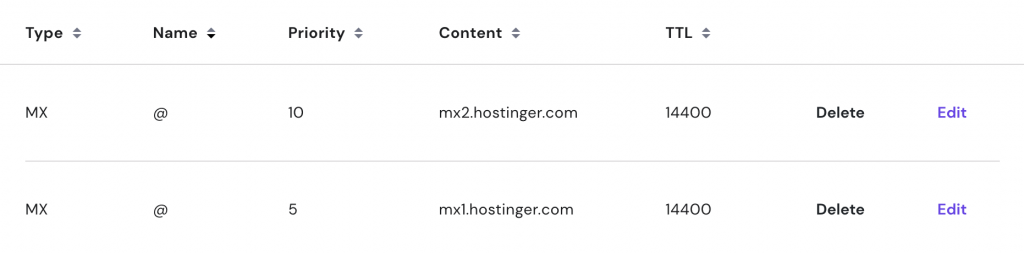
What Is an MX Record?
An MX record, short for Mail Exchanger, specifies the mail server responsible for receiving emails sent to your domain. By default, Hostinger domain clients use the following MX records:
mx1.hostinger.com

mx2.hostinger.com
These records appear in the DNS Zone Editor as shown below:
If you wish to use a third-party email hosting service, you need to remove these MX records and add new ones provided by your email service. Besides Name and TTL, you need to fill in the following fields:
- Mail server. The address of the server that will receive the emails.
- Priority. Indicates which mail server to use first. A lower number represents a higher priority.
Important! You can only use one email provider per domain name at a time. Ensure you only have one MX record per domain. If you are using different email providers for the main domain and subdomain, make sure to correctly use the Name section in the DNS zone.
Here is an example of an MX record using one of Google Workspace’s mail servers:

What Is a TXT Record?
A TXT record is a DNS entry that contains text information about a domain that is readable by external parties.
Common examples of TXT records include Sender Policy Framework (SPF) and DomainKeys Identified Mail (DKIM). Website owners use these to secure email exchanges from spoofing or phishing attempts. Google also uses TXT records for domain verification purposes.
The SPF TXT record specifies the IP addresses or hostnames authorized to send emails on behalf of a domain. The DKIM TXT record adds cryptographic signatures to emails to verify they come from a trustworthy source.
A domain can have multiple TXT records for various purposes but should only have one SPF and one DKIM record.
Hostinger’s DNS Zone Editor includes an SPF TXT record by default. It uses the v=spf1 tag within the TXT value, as shown here:

To add a new TXT record, follow the same steps as other entries. Use @ for the main domain or enter the subdomain’s name in the Name field, depending on the purpose of the information. For a DKIM record, include the selector name along with _domainkey.
Instead of a Points to field, a TXT value field will appear where you need to input the required information.
Below is an example of what the fields should look like when adding a new DKIM TXT record:

What Is an AAAA Record?
An AAAA record functions similarly to an A record, but it points your domain to an IPv6 address instead of an IPv4 address.
In Hostinger’s DNS Zone Editor, this record is left blank by default since many internet service providers (ISPs) and internet routers do not yet support IPv6. Luckily, it’s important to note that IPv6 adoption is increasing, and you might see more usage of AAAA records in the future.
What Is an NS Record?
In the DNS Zone Editor, NS records list the nameserver values provided by Hostinger. These should only be edited if you intend to transfer your website to a different web host.
Expert Tip
NS records should always point to ns1.dns-parking.com and ns2.dns-parking.com. Even if you plan to switch hosts, the DNS Zone Editor is not the place to change NS records. Instead, change the nameservers through your domain registrar, which can be checked via a WHOIS domain lookup.

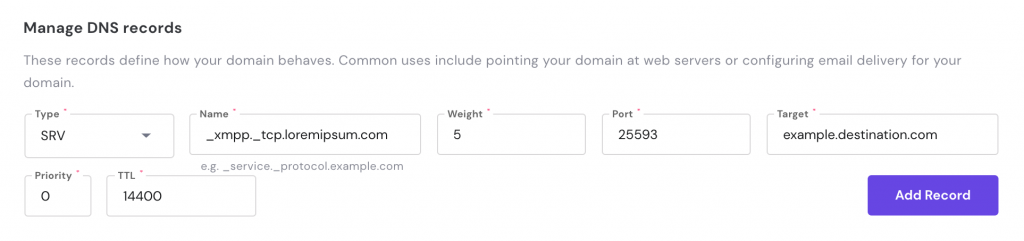
What Is an SRV Record?
An SRV record specifies the server location for a service to establish a connection. It is commonly used for protocols like VoIP and XMPP, which facilitate user communication over the Internet. By default, this entry is empty in the DNS Zone Editor.
The required information for an SRV record includes:
- Name. The service, protocol, and domain name, formatted as _service._protocol.example.com.
- Weight. Determines the order of contact if multiple SRV records have the same priority. A higher number indicates higher priority.
- Port. The port number used by the service.
- Target. The address of the destination server.
- Priority. Indicates the priority of the server. Lower numbers represent higher priority.
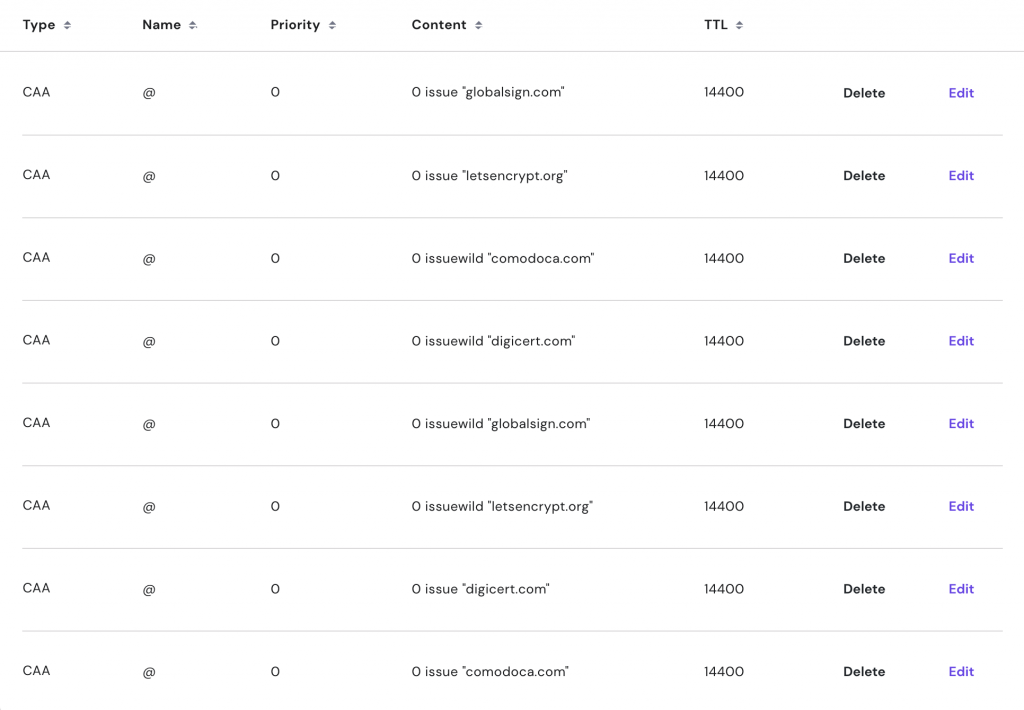
What Is a CAA Record?
A CAA record, short for Certification Authority Authorization, specifies which certificate authorities (CAs) can issue SSL certificates for a domain. This prevents unauthorized parties from issuing fake certificates.
If you have multiple subdomains, you only need to create one CAA record for the root domain, which will apply to all subdomains.
Hostinger includes the following CAA records by default:
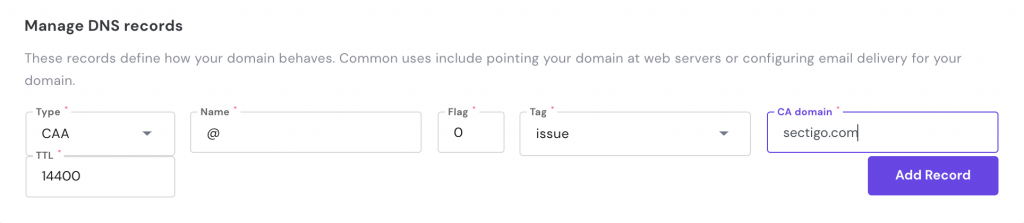
To add a new CAA record, fill in the following fields in addition to Name and TTL:
- Flag. An unsigned integer from 0 to 255, with 0 being the default.
- Tag. Choose between issue, issuewild, and iodef:
- Issue. Authorizes a single CA to issue any type of certificate.
- Issuewild. Allows the CA to issue only wildcard certificates.
- Iodef. Specifies the contact information for reporting CAA-related issues.
- CA domain. The domain name of the certificate authority.
Here’s an example of what you might enter to add a CAA record for Sectigo:
Resetting Your DNS Zone to Default Settings
If an error occurs after editing the DNS zone, you can fix it by restoring the default settings. Scroll down to the bottom of the DNS Zone Editor and click the Reset DNS Records button:

Conclusion
The DNS Zone Editor lets clients with web, cloud, and Managed WordPress hosting edit their domains’ DNS records easily within hPanel. The types of DNS records you can modify include:
- A record. Points to IPv4 addresses.
- CNAME record. Creates aliases for the main domain.
- MX record. Specifies mail servers for receiving emails.
- TXT record. Contains text information for security and verification.
- AAAA record. Points to IPv6 addresses.
- NS record. Lists the nameserver values.
- SRV record. Specifies the server location for a service.
- CAA record. Defines which CAs can issue SSL certificates.
We hope you refer to this guide when you need to use the DNS Zone Editor. If an error occurs, remember that you can always restore the DNS records to their default settings.

Matleena is a seasoned Content Writer with 5 years of content marketing experience. She has a particular interest in emerging digital marketing trends, website building, and AI. In her free time, Matleena enjoys cups of good coffee, tends to her balcony garden, and studies Japanese. Follow her on LinkedIn

Maisha is a proponent of high-quality, actionable content. When she's not writing for Hostinger Tutorials and Blog, she immerses herself in the English thesaurus. Her love for personal development essays drives her to help her fellow writers succeed in the world of content marketing.


Comments
August 19 2020
hi guys, When I was trying to access DNS Zone Editor, I received this: "Your domain must be pointing to our nameservers to access DNS Zone Editor" how to solve the problem pls?
August 25 2020
Hey there! To solve that problem you need to make sure you are pointing the domain to the correct nameservers! To find out how to point your domain to us, you can check this article here! :)
September 17 2020
What i will put on my DNS?
November 11 2020
Hey there Gwen. In your DNS you can connect your domain to other "features". For example, adding MX records will add an email service to your domain, if your MX records are matching with the records of your purchased email service.
September 17 2020
Thank you for your suggestions
November 11 2020
You are very welcome, Gwen.
September 20 2020
Hello, Despite editing my MX and TXT records, my domain is still not getting verified.
November 18 2020
Hey there. After you edit your DNS zone you need to give it up to 24 hours for the DNS propagation, before the changes are applied. Try again in 24 hours and it should be verified.
October 02 2020
Hi, I have a domain registered at register.com, but those geniuses have managed to disable email for my family and are hard to reach. I would like to go with hostinger, but then I'll need to set the MX records at register to point to you? If so, to what servers or IPs?
November 18 2020
Hey there. You can check the Hostinger MX records here.
November 16 2020
Hey team, are there limitations around priority settings for MX records? If I needed to set the priority on a record to 0 is that possible? If not, why not?
February 09 2021
Hi, Andrea! Yes, it is possible to set priority to 0 for MX record from your DNS zone.
June 01 2021
When I add 4 A record it shows record successfully added. But when I see the record it shows @ instead of the website name.
September 21 2021
Hi Akash, @ symbol is used in DNS zone to reflect your naked domain name. So if you set A record for @, that's the same as you would set for your domain.com domain :)
September 22 2021
Hello, I purchased domain from godaddy.com and hosting from Hostinger. For SSL, i got it from Cloudflare. However, I am getting an error on my website as below. Could you please help me out. "Please enable cookies. Error 1001 Ray ID: 692a03434e78d618 • 2021-09-22 08:02:44 UTC DNS resolution error What happened? You've requested a page on a website (mypharmacareer.com.cdn.cloudflare.net) that is on the Cloudflare network. Cloudflare is currently unable to resolve your requested domain (mypharmacareer.com.cdn.cloudflare.net). There are two potential causes of this: Most likely: if the owner just signed up for Cloudflare it can take a few minutes for the website's information to be distributed to our global network. Less likely: something is wrong with this site's configuration. Usually this happens when accounts have been signed up with a partner organization (e.g., a hosting provider) and the provider's DNS fails. Cloudflare Ray ID: 692a03434e78d618 • Your IP: 162.44.150.11 • Performance & security by Cloudflare"
September 24 2021
Hi Yunus, if the issue hasn't gone away yet, it looks like there might be something off with your configurations. Be sure to check with our Customer Success team to investigate this further!
May 11 2022
I've been trying to add a new CNAME record to point my domain to an app hosted on Heroku. However, when I try to save this new record I receive an error message stating "Record cannot be added, conflicts with A or AAAA records." Please can you let me know if there's a way to address this?
May 12 2022
Hi Nathan! It looks like you might have another A or AAAA record already added. Before adding a new one, make sure to remove any existing A or AAAA records :)
October 21 2022
Hi, I have a website domain on GoDaddy and hosting it through Hostinger. I've been trying verify my domain on Google Search Console. However, I haven't been able to do so. I tried doing through GoDaddy. I received an error. Then, I read their knowledge base and it told me to try configuring my DNS with Hostinger. So, I'm unable to find DNS configuration. Even if I do add the txt code required for verification, will it work?
October 28 2022
Hi, If your domain's nameservers are pointing to Hostinger, then your DNS zone is managed with us, hence to add your domain to Google Search Console, you'll need to verify the domain here at Hostinger. After adding the required DNS records for the verification, you would need to give it up to 24 hours for the DNS records to propagate. Once the propagation is done, the domain will be verified.
August 29 2023
I added google domain mx record but the 2 email is fine and the one email from a certain email doesn’t receive can you please tell me mx record is added is txt and other record required to change is also
September 01 2023
Hello there, if you can't receive emails from a specific email account it can mean that emails are getting blocked. I would suggest making sure that SPF and DKIM records are added as well
September 08 2023
Hello, not at the moment, however you can submit this idea to our roadmap and we'll look into it.
October 17 2023
Please my domain DNS recode set
November 02 2023
Hi there! If you need more detailed instructions or have any specific questions about managing your DNS records, feel free to contact our Customer Success team ?
February 02 2024
If i delete some default dns record by mistake then after click on reset dns records that record will restore or not.
February 07 2024
Hi Shahzaib! Yes, if you delete some default DNS records by mistake, clicking on "Reset DNS Records" in Hostinger's DNS zone editor will restore them to their default values. This action reverts all records to the original settings that were in place when you first started with Hostinger, which can be useful for correcting any accidental deletions or modifications. Remember that after resetting, it may take up to 24 hours for the DNS to fully propagate worldwide ?