What Is a WordPress Featured Image and How to Add It

Visual elements in a WordPress site can capture the attention of visitors – when paired with well-written text, they can also significantly boost content value.
The content management system (CMS) has various features that incorporate visuals into a website – one of them is the WordPress featured image. Featured images add more context to your posts and pages, encouraging people to click on them.
This article covers the featured image in WordPress – what it is, how to add it to a blog post, and how to enable it. We will also provide tips on using featured images on your WordPress website.

What Is WordPress Featured Image?
A WordPress featured image is the primary image that represents your post or page. It usually appears at the top of the post and on other social media platforms when you share the post.
How to Add a WordPress Featured Image
Adding a WordPress featured image is a straightforward process. You only need to upload or select an image for each post or page.
That said, there are other ways to utilize featured images on WordPress, such as using them as thumbnail previews and automatically setting one from post images.
How to Add a Featured Image to a WordPress Page or Post
Most WordPress themes enable featured images by default. You can also manually add one to any post or page via the Gutenberg block editor.
These are the steps to add a featured image to a new blog post:
- Open the block editor by navigating to Posts → Add New. Alternatively, select any existing post or page.
- The right sidebar should appear in the block editor. If not, click the Settings button on the top-right corner of the editor.
- Scroll down to the Featured image section and click Set featured image.
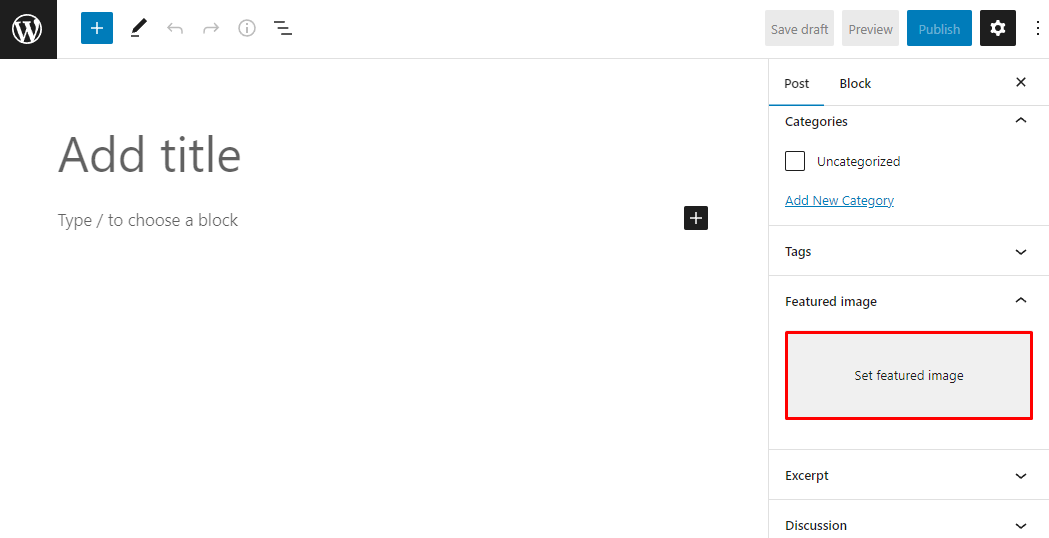
- Upload the featured image to WordPress or select from the images in your media library. After choosing the featured image, add the alternative text in the Attachment details section.
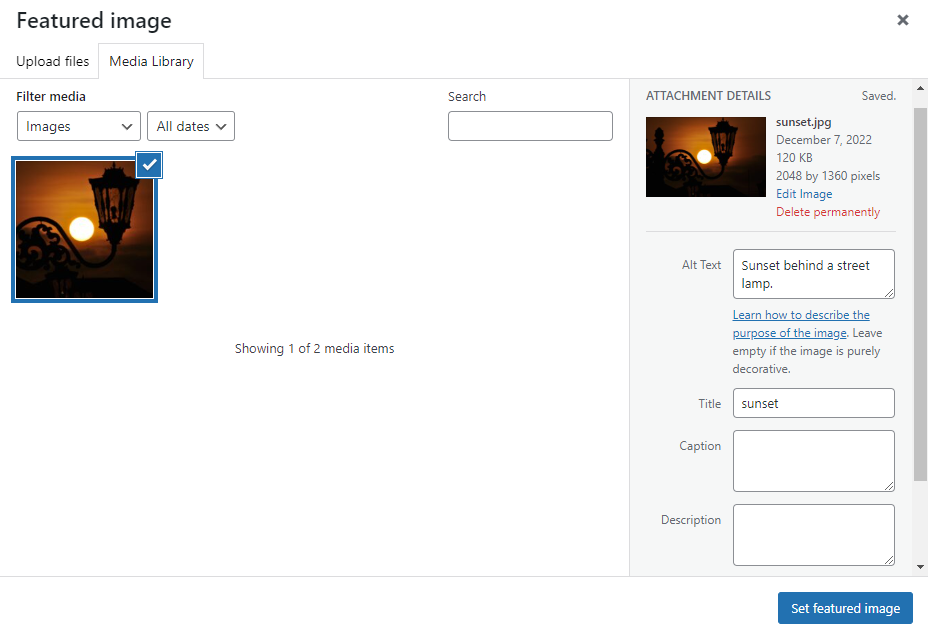
- Click Set featured image on the bottom right corner.
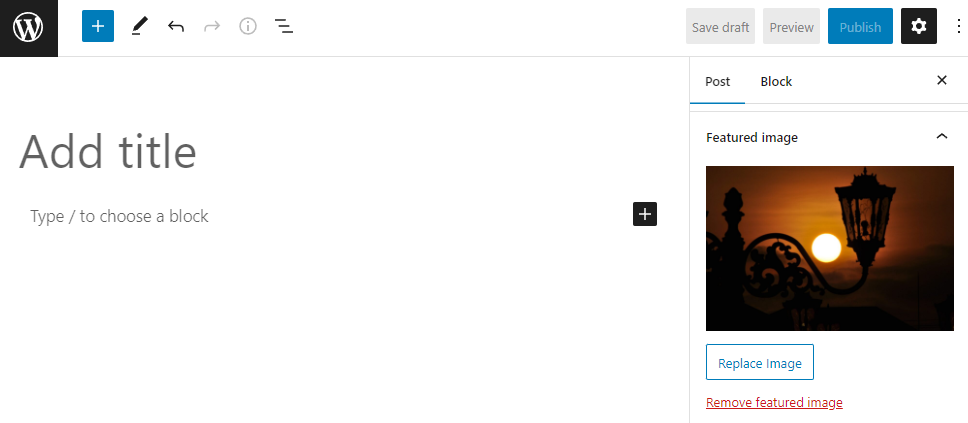
The featured image is now set. It doesn’t appear on the editor panel, but you can see it in the Featured image section or the post preview.
You will now see the Replace Image button. This lets you change the featured image by uploading a new one or an existing image uploaded to the media library. Alternatively, use the Remove featured image button to clear the featured image from the post or page.
For further guidance on working with images, explore our guide on how to insert an image in HTML, which complements these WordPress techniques.
How to Set WordPress Featured Image Size
Choosing the right featured image size is important. It makes your overall page look great and ensures the post thumbnail looks good on other platforms.
While you can choose your preferred WordPress featured image size, 1200 x 628 pixels or 16:8.4 aspect ratio is a good starting point. You can use smaller images to speed up the load time, especially on mobile devices.
WordPress themes have default featured image size settings that may not suit your preferences. Consider changing the image dimensions using one of the following methods.
Classic Themes
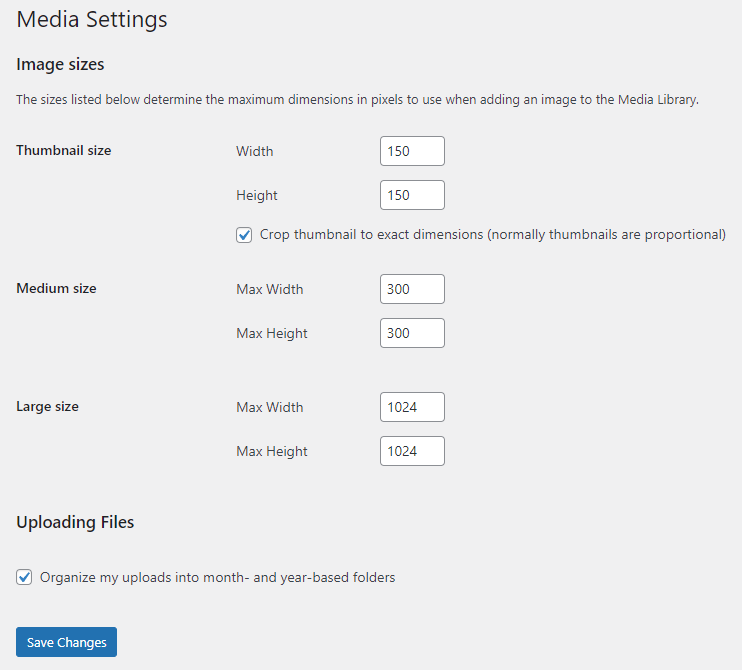
Whenever you upload images to WordPress, you will find four default image sizes in the WordPress settings:
- Thumbnail (150 px square)
- Medium (maximum 300 px width and height)
- Large (maximum 1024 px width and height)
- Full-size (original image)
Some WordPress themes use one of these default image sizes for the featured image. You can change its size by following these steps:
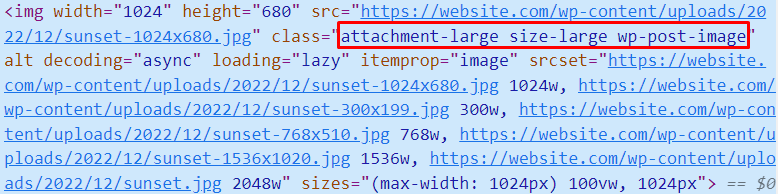
- Inspect the size by opening a blog post with a featured image. Right-click on the blog featured image and select the Inspect tool on your browser.
- See the image class in the <img> tag. For example, if the class shows attachment-large size-large, the featured image uses the default Large media settings.
- Open your WordPress dashboard and navigate to Settings → Media. In this media settings panel, you’ll see all settings for each image size. Change the dimension to your preferred image size, then click Save Changes.
Some WordPress themes use proprietary featured image dimensions. In this case, check the theme settings in the Customizer by navigating to Appearance → Customize. You may find the option to adjust the featured image size on the sidebar.
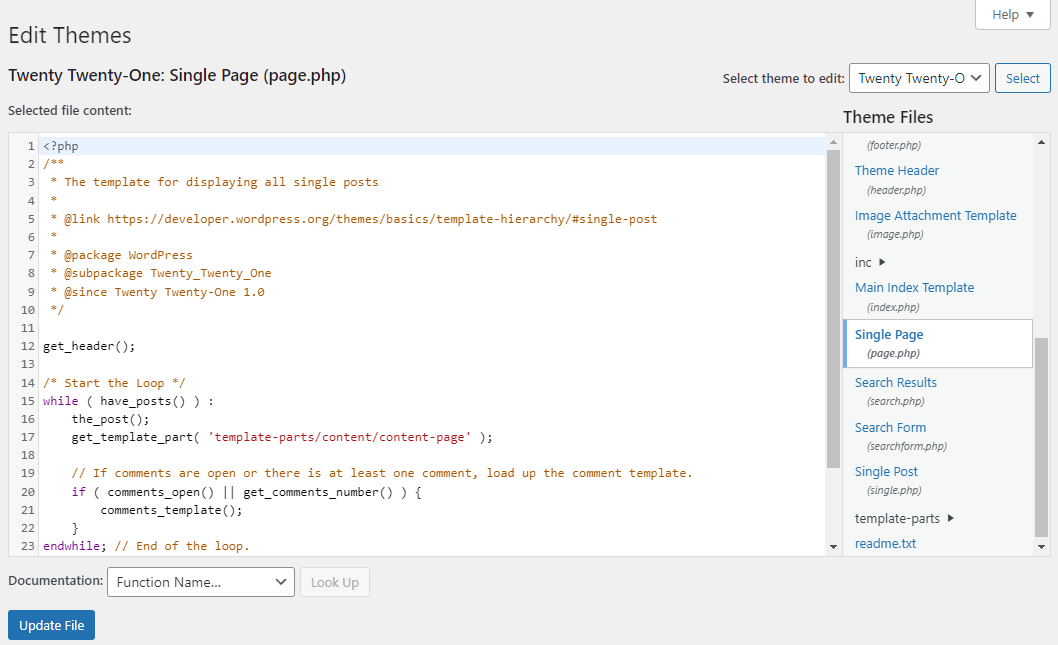
Important! If you don’t find any option to change the default featured image size, modify the theme’s file. This requires technical knowledge, and the method may vary between themes. We recommend reading the theme’s documentation or seeking help from its support team.
Sometimes, you must regenerate the image thumbnails. You can do this by installing and activating the reGenerate Thumbnails Advanced WordPress plugin.
Access the tool from Tools → Regenerate Thumbnails and click Regenerate on the plugin’s panel. It will automatically adjust WordPress thumbnail dimensions for all existing images.
Block Themes
Adjust WordPress featured image dimensions by modifying the template in Site Editor. First, open the template by following these steps:
- Go to Appearance → Editor from your WordPress dashboard.
- Click the WordPress or your website icon on the top left corner to open the navigation sidebar. Select Templates.
- Choose the Single template to customize the post template or Page to customize the page template.
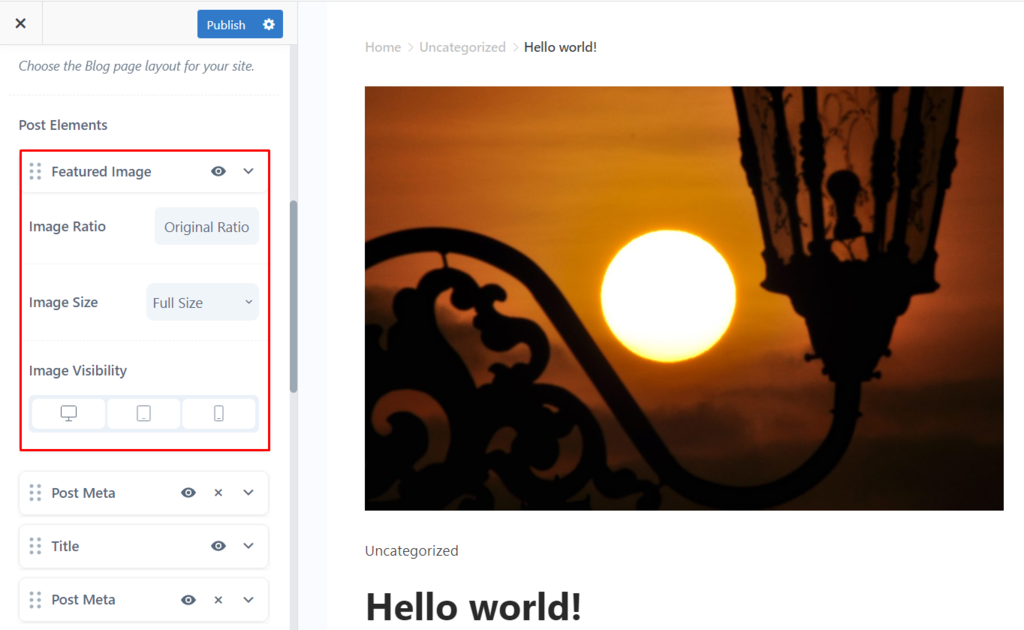
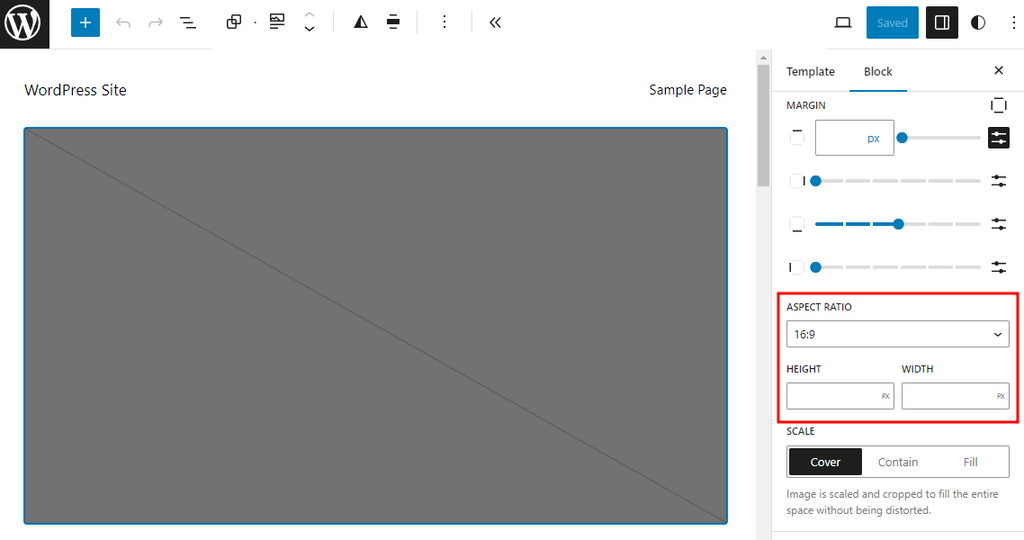
Most block themes already include the featured image block in the template. To adjust the featured image width, transform the block into a nested group block by following these steps:
- Click on the featured image block.
- Open the block settings panel and open the styles tab.
- Scroll down and find the Aspect ratio section. You will find the drop-down menu to select the featured image’s aspect ratio. Alternatively, you can specify the height and width of the featured image using the fields below.
How to Set the Featured Images in WordPress Automatically
Sometimes, you may want to publish a post but forget to add a featured image or haven’t found the right one yet. In this case, setting up a default featured image can help you maintain blog consistency.
Use the Quick Featured Images plugin to easily create a default featured image rule. Once the plugin is installed and activated, navigate to Featured Images → Default Images from your WordPress dashboard.
There are two default rules to choose from. We recommend activating the second rule, which assigns the first photo in the post or page as its featured image.
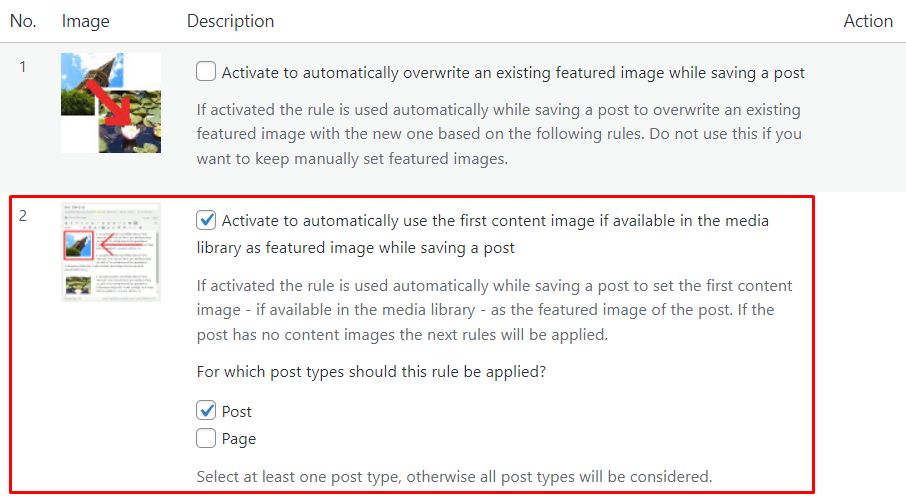
Alternatively, create a custom rule that assigns a default featured image.
Click Choose Image on the third row and select the default featured image. Then, select the taxonomy to apply the default featured image. For example, you can apply the rule to all posts or a certain category. Once you’re done, click Save Changes.
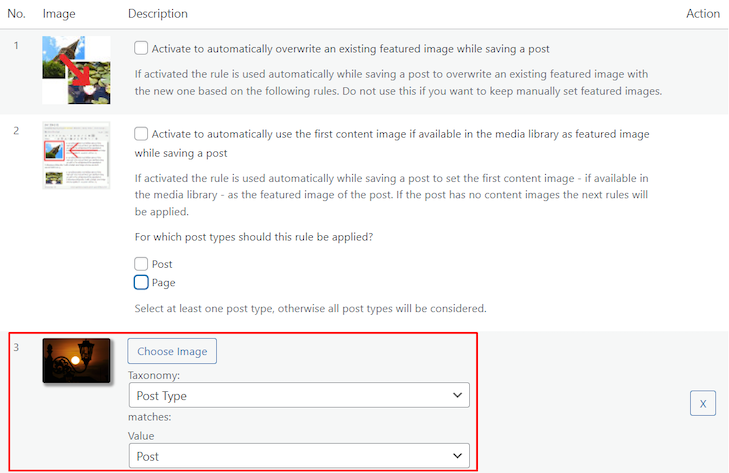
To add more rules, click the Add rule button below the table. This way, you can assign unique featured images to different categories and post types.
How to Add Thumbnail Previews For Your Posts and Pages Lists
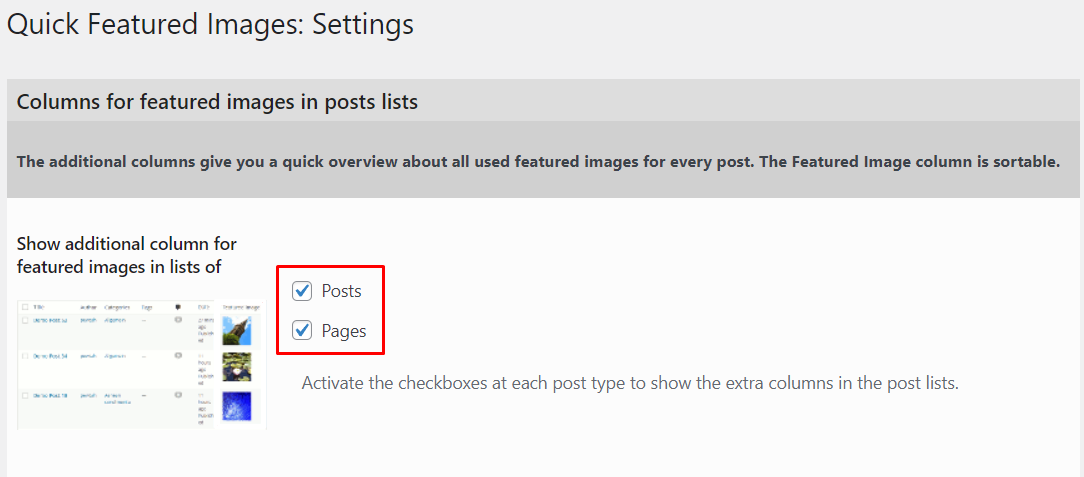
The default WordPress admin panel shows various WordPress posts and pages information, such as author, date, categories, and comment count. With the Quick Featured Images plugin, you can add thumbnails to the list to check whether it already has a featured image.
Go to Featured Images → Settings from your dashboard. In the Columns for featured images in posts lists section, check Posts and Pages. Then, click Save Changes at the bottom of the page.
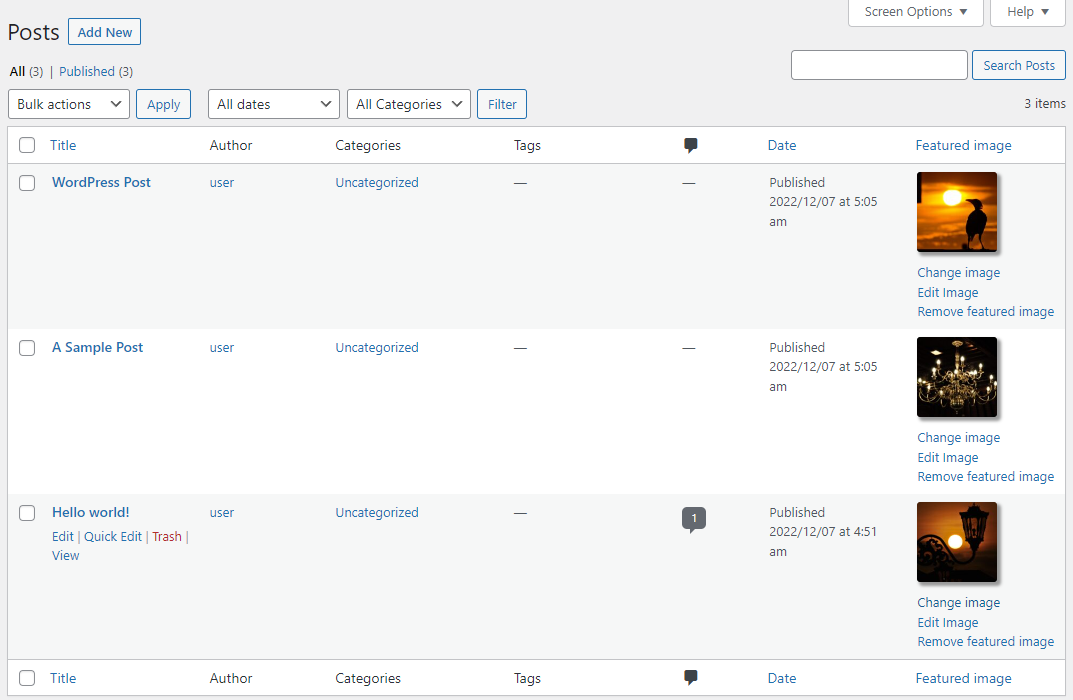
Now, go to the post list by navigating to Posts → All Posts. You should see the new column that previews the featured images. There should be links to change, edit, and remove old featured images. If a post doesn’t have a featured image, there’s a link to quickly add one.
How to Enable WordPress Featured Images
Most WordPress themes support featured images and allow you to upload one to any post or page. However, a select few may not support featured images. In this case, you won’t see the Set featured image option on the block editor and must manually enable it.
Classic themes
Manually add featured image support to any WordPress theme by adding the following code snippet into the theme’s functions.php file:
add_theme_support( 'post-thumbnails' );
The theme now should support featured images, and the settings should be available on the editor. However, the add theme support flag only enables the support, not displaying the image on the front-end.
To make the theme display featured images on all posts and pages, add the following code snippet to the theme’s templates:
<?php the_post_thumbnail(); ?>
The specific file that needs to be edited will vary depending on your theme.
To display the image on posts and pages, add the code to the corresponding templates – usually single.php and page.php. You can apply the PHP code to any custom template files, too.
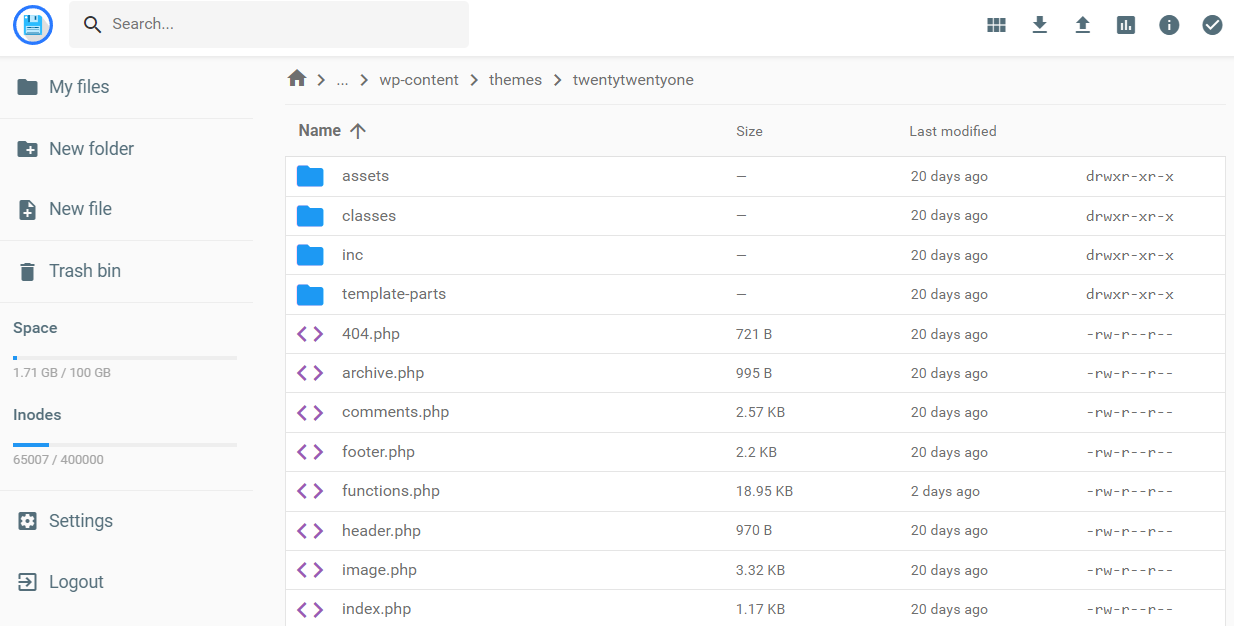
To open the template files, open the file manager from your host’s control panel or an FTP client. Go to public_html → wp_content → themes, and select the active theme’s folder. You should find all the template files there.
Alternatively, use the theme file editor by navigating to Appearance → Theme File Editor. Find the template files on the right sidebar.
You should now be able to use featured images in WordPress. As an alternative to the method above, install WordPress plugins that fix compatibility issues, such as Featured Image From URL.
Block themes
To add featured images on WordPress block themes, modify the theme files via the Site Editor. Follow these steps to open the template in the Site Editor:
- Go to Appearance → Editor from your dashboard.
- Click the WordPress icon on the top left corner to open the navigation sidebar and select Templates.
- Choose the Single template to customize the post template or Page to customize the page template.
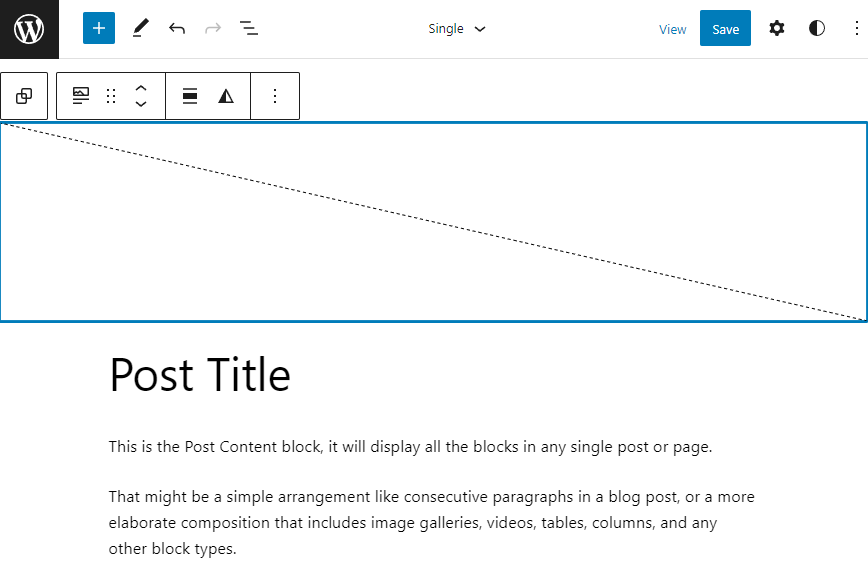
Click on the editor area where you want to locate the featured image. Then, add the featured image block by typing /featured-image or clicking the + icon on the editor and searching post featured image.
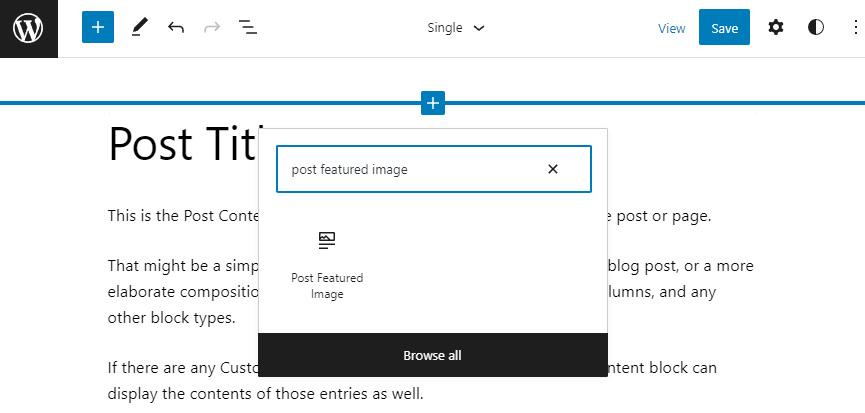
The featured image placeholder will now appear on the template. When you open any post with the featured image set, it will appear in the placeholder area.

Tips for WordPress Featured Images
Using featured images strategically is important as they are prominent visual aspects of a WordPress website. Let’s look at ways to maximize the use of WordPress featured images.
Use a Suitable Image
WordPress featured images should properly represent the content. Visitors will see featured images when they first open the post or page. They may leave if the featured image is unrelated to the topic or search intent.
One of the best practices is creating uniquely designed featured images that have the same style as your blog. However, this may require more time and a dedicated team of graphic designers, which is hard to afford for new blogs.
If you have just started your blog, third-party Creative Common-licensed pictures are the easiest way to find suitable featured images.
There are various Creative Common license types available. We recommend choosing images that are CC0-licensed. You can freely adapt CC0-licensed images for your website, including adjusting the color tone and remixing them.
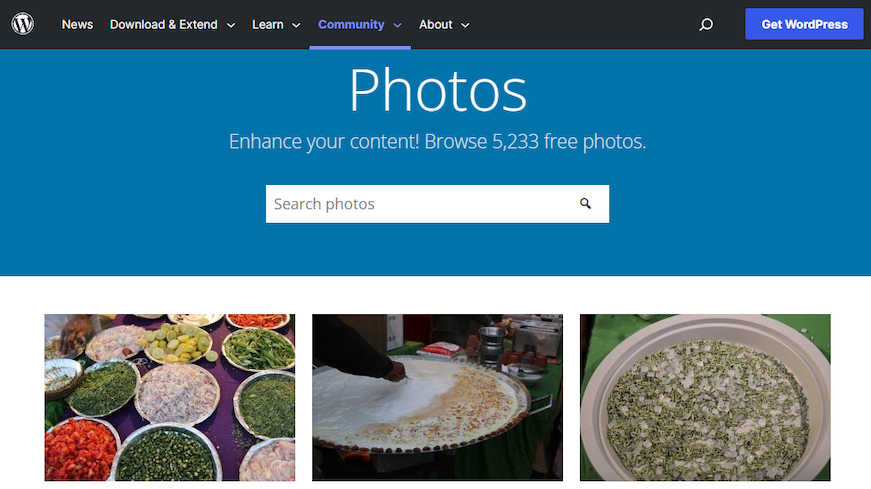
Find CC0 images on platforms like Pexels and Unsplash. WordPress also has a photo directory containing thousands of CC0 images uploaded by contributors.
Important! Don’t use Google Images as they may be protected by copyright. Using a copyrighted image can lead to legal issues.
We also recommend keeping the featured image style consistent. For example, if you use 3D graphic design, all featured images should have the same style. Or, if you apply duotone filters to all posts, ensure that all featured images are duotone, as well.
Optimize Your Featured Images
Image sizes are larger, making them slower to load than text-based content. Optimizing featured images in WordPress is important to speed up the loading time.
The easiest way to optimize images is by using image optimization plugins. They can compress images in the WordPress media library while retaining quality. They also automatically compress new featured images when you upload them to WordPress.
Here are some of the best image optimizer plugins:
- ShortPixel Image Optimizer – uses lossy and lossless image compression to optimize files of any type, including PNG, JPG, and GIF.
- Imagify – offers three different levels of compression – normal, aggressive, and ultra.
- WP Smush – scans images both on your WordPress site and media library. The free version can compress up to 50 files at once.
- Optimole – provides lazy loading and serves images via a Content Delivery Network (CDN).
Check out our image optimization guide for tips and recommended tools.
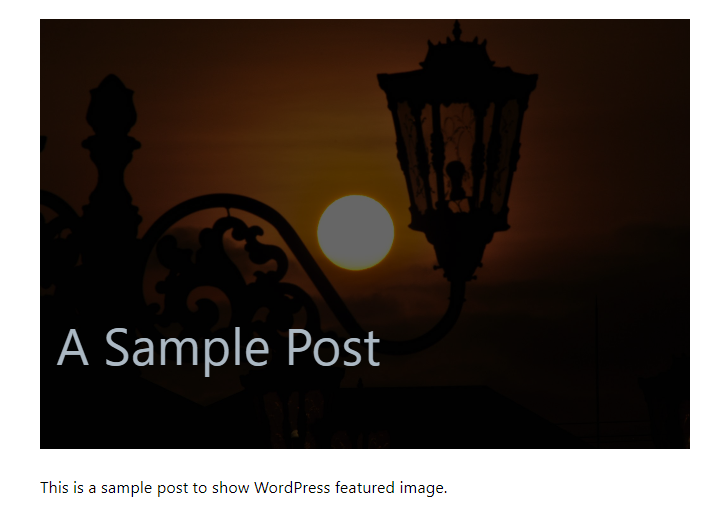
Use the Featured Image in a Cover Block
A new feature included in WordPress 6.0 allows users to use a featured image in the cover block. This adds the possibility to display featured images with text or color overlays.
Firstly, open the template by following these steps:
- Go to Appearance → Editor to open the Site Editor.
- Click the WordPress or website icon on the top left corner to open the navigation sidebar and select Templates.
- Choose the Single template to customize the post template or Page to customize the page template.
Usually, the template already has a featured image block. You can remove and replace it with a cover block. To do this, click the Use featured image option on the cover block placeholder. The cover block will load the post’s featured image on the front-end.
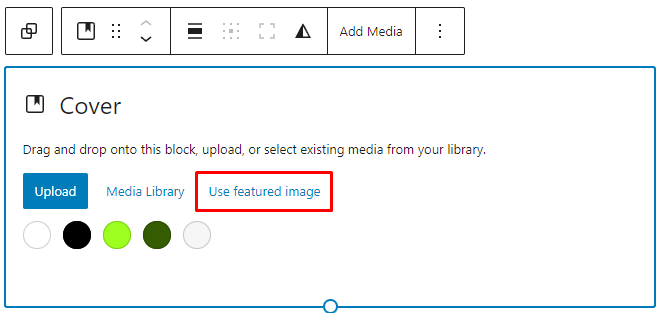
Now you can customize the overlay. For example, set the post title to overlay the cover block. You can add color overlay from the cover block’s settings panel and adjust its opacity.
Conclusion
A WordPress featured image enhances your site’s visuals and captures your visitors’ attention. It also provides contextual information to encourage people to click on your posts.
WordPress has built-in featured image support. You can also set the featured image automatically to ensure your post always has one.
We hope this guide has helped you understand more about WordPress featured images and their importance to your site. And remember, optimizing images and adding alt text help maximize your SEO opportunities.
Learn What Else You Can Do With WordPress
Complete WordPress Tutorial
How to Use WordPress Tags
How to Install WordPress
How to Enable Maintenance Mode in WordPress
How to Change User Password in WordPress
How to Add Related Posts in WordPress
What Is a WordPress Featured Image – FAQ
We’ve discussed all you need to know about the featured image in WordPress. If you have questions, check out the following FAQ answers or leave a comment.
Why Should I Use a Featured Image?
The featured image captures viewers’ attention by using eye-catching visuals that represent the post content. Featured images also appear on the WordPress homepage and social media shares, helping you increase your blog posts’ traffic.
Why Is My Featured Image Not Showing?
There are many possible reasons why your featured image is not showing in your WordPress CMS. For example, an HTTP error when uploading a featured image, a lazy loading plugin error, and missing featured image support from the theme. Read our tutorial to solve the featured images not showing error.
Are Featured Images Good for SEO?
Yes, featured images and thumbnails are good for search engines as they grab viewers’ attention, encouraging them to click on your post. Adding relevant alt texts to featured images also helps them rank on the image search results page. Be sure to optimize the featured image to make it load quickly.

Nabilla is a website hosting and development enthusiast. She loves to share her knowledge with others in order to help them grow their online presence. When she's not busy writing, Nabilla enjoys exploring nature and going on adventures. She is passionate about helping people achieve their online goals.

Leo is a Content Specialist and WordPress contributor. Armed with his experience as a WordPress Release Co-Lead and Documentation Team Representative, he loves sharing his knowledge to help people build successful websites. Follow him on LinkedIn.


Comments
November 17 2020
Hi Dina, thanks for your article. I was wondering in terms of how google treats the featured image, is it treated the same way as if you had inserted that image into your blog post? I have a theme that displays my featured image at the top of my blog post so I'm just wondering if that's all I need for SEO or if I should add additional images into my body in case google doesn't recognise featured images.
February 09 2021
Hi there, Jessie! Regarding SEO and images, it's most important that they have correct caption and alt text. You can check out Yoast SEO plugin to help you understand the effectiveness of it.