Lossy vs Lossless Image Compression
Image compression is a method used to reduce the size of images, which can improve the loading speed and the overall performance of a website.
To help you learn more about which compression method is the best fit for your website, this article will discuss the differences between the lossy and lossless techniques.
We will also explain why compressing images is an important practice and provide a list of our favorite WordPress plugins to help you get started.
What’s the Difference Between Lossy and Lossless?
The main difference between lossy and lossless is the way data is compressed and the resulting quality of the compressed file. Lossy compression sacrifices data to reduce file size, resulting in lower-quality files. Lossless compression preserves data integrity for higher-quality files and is often used for text-based files, where data integrity is critical.
Lossy Image Compression
Lossy image compression is a process that removes some of the data from your image file, reducing the overall file size. This process is irreversible, meaning that the file information will be removed permanently.
Some of the algorithms used for lossy compression include the discrete wavelet transform, fractal compression, and transform encryption.
These lossy compression algorithms can reduce the file size considerably, but that usually comes with a trade-off – the image quality will also degrade. That’s why it’s better to have a backup file before making any changes.
The .JPEG format is an excellent example of lossy compression. Files in the .JPEG format are suitable for pictures and photographs with no transparency. They’re great for a site that needs faster loading times, as you can adjust the compression ratios while keeping the right balance.
Here’s an example of lossy compression with ShortPixel:
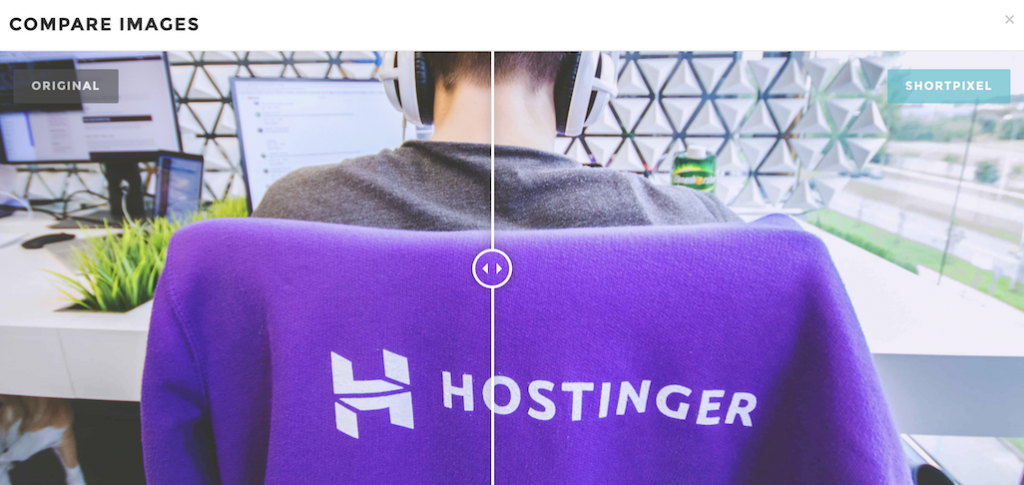
As you see, we can’t tell the difference between the original and compressed photo. You can only notice information loss if you zoom in on the compressed image. All of that said, the file size was reduced by 85%.
If you use WordPress, it will automatically compress .JPEG images when you upload the file to the media library. By default, the .JPEG image will be reduced by about 82% of its original file size.
You can increase the percentage or disable the feature. We’re going to discuss how to do that later on in the article.
Lossless Image Compression
Unlike lossy compression, lossless image compression won’t reduce image quality. That’s because lossless compression only removes additional, non-essential data automatically added by the device used to take the photo.
The trade-off is that you won’t see a significant reduction in image file size. As a result, it likely won’t save you much storage space.
Standard lossless compression algorithms include Huffman coding, arithmetic encoding, and run-length encoding.
The lossless compression technique is best for text-heavy images and pictures with a transparent background. The types of format that can benefit from lossless image compression are .RAW, .BMP, .GIF, and .PNG.
Here’s a sample image of a lossless compression outcome.
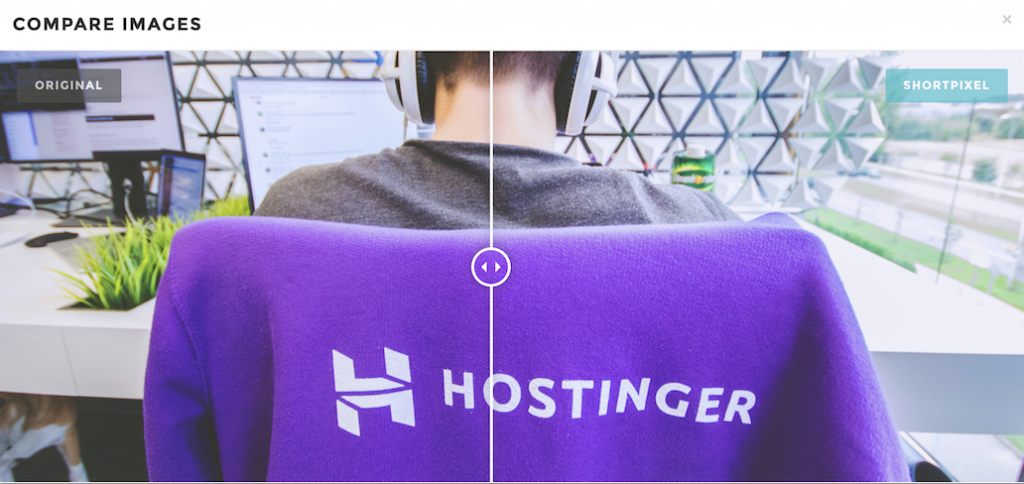
As you see, there’s no identifiable quality loss. However, the image file size was reduced by only 5%. Therefore, lossless compression is best for images that need to stay of high quality, like photography showcases or detailed product images.
Lossy vs Lossless: Which One Is Better?
We believe that the correct answer depends on your needs.
An eCommerce site, a blog, or a portfolio website may find lossy compression more beneficial as it offers a significant file size reduction which helps the site performance. This, in turn, creates a better user experience and improves SEO ranking.
On the other hand, a photography website would be better off using lossless compression. This data compression method prioritizes high quality over reducing the size, which means you can showcase your photographs in more detail.
Another tip is to use both types of compression depending on the needs of your site’s individual pages.
For example, you should optimize your eCommerce site with lossy compression for thumbnails and preview images to reduce the load times.
However, when it comes to the product pictures, you should go for the lossless compression method to avoid quality loss. This is especially true for small and detailed products like earrings or handicrafts.
Keep in mind that this tip can be applied to almost any type of website.
Why Do You Need to Compress Your Images?
Large image file sizes can slow down your website’s performance, negatively affecting the user experience and SEO. Unoptimized images can create a delay when loading the site or even make it unresponsive or completely inaccessible.
This is why you need to optimize the images on your site. You can do so by resizing the resolution or compressing the image file data. Both ways will reduce the file size and help the website load faster.
A Google study found that 45% of visitors are less likely to return to a website if their first visit was not pleasant. Google has also confirmed that page speed contributes to a significant ranking factor on SERPs (Search Engine Result Pages).
Slow page performance can affect your conversion rates too. For example, the outdoor lifestyle company Dakine reported that faster page speeds improved their mobile revenue by around 45%.
Smaller image sizes are also beneficial for your hosting subscription. They use less storage space, so you have more room for other content. In addition to that, backing up your website is also a much faster process when your site’s images are compressed.
Lossy Image Compression in WordPress
If you choose lossy compression and use WordPress, the CMS can do it automatically. If you want to tweak the compression ratios, you can modify the code.
Important! Always create a backup before making any changes on your site. Learn how to back up your WordPress site.
If you want to increase WordPress’s automatic compression ratio, you can do so by adding the following filter. In the example snippet, the image would be compressed to 70% of its original quality.
add_filter( 'jpeg_quality', create_function( '', 'return 70;' ) );
You have to remember that this method won’t impact the images already present on your site. To include the existing images, you need to regenerate them using a plugin such as Regenerate Thumbnails.
To disable automatic image compression, add the following filter to your active theme’s function.php file. Then, try a manual compression method using software such as Adobe Photoshop, Affinity Photo, or other image editors.
add_filter( 'jpeg_quality', create_function( '', 'return 100;' ) );
If you don’t have much technical knowledge, we recommend using a plugin to help you with image compression. For this tutorial, we will take a look at three different image compression plugins.
If you’re new to WordPress, you should read our tutorials on installing WordPress plugins and activating them first. We also recommend you install and activate one image compression plugin at a time to prevent any conflict between the file reduction plugins.
Imagify
Imagify helps speed up your website with lighter images while optimizing compression ratios. It offers both lossy and lossless compression, depending on your needs of image quality.
This plugin works for .JPEG, .PNG, and .GIF format files. Not only will it help to compress new image files, but it will also automatically optimize all the thumbnails you have already uploaded.
There are three compression levels available with this plugin:
- Normal – will use a standard lossless compression algorithm, and the image quality won’t be affected much.
- Aggressive – will use a stronger lossy compression method, resulting in some quality loss that will be hard to notice.
- Ultra – will use the strongest lossy compression method, which can make the quality loss more noticeable.
Imagify also helps to convert and serve WebP too. This is an image format developed by Google, offering better quality and significant file size reduction ability.
Smush
Smush is an image optimizer plugin for WordPress. This feature-rich plugin offers image compression and enables lazy loading.
Smush works well for lossless compression. There’s a bulk smush feature that allows you to optimize and compress up to 50 images with one click, saving you time when optimizing images.
Another way to compress images with Smush is by setting up a maximum height and width. The plugin will automatically resize and compress the data as the images scale down. Smosh also detects images with the incorrect size, so you know which images still need optimization.
There’s no limitation on the number of file compressions when using the free version of Smush. It accepts .JPEG, .PNG, and .GIF image formats.
However, if you wish to have lossy compression or convert an image file to WebP format, you can only do so with the plugin’s premium version that starts from $5/month.
ShortPixel
ShortPixel is a freemium WordPress plugin that helps to compress images and .PDF documents.
This plugin can convert multiple .JPEG, .PNG, and .GIF files as well as can convert them into the WebP image format.
ShortPixel offers both lossy and lossless compression methods, which you can test with a single click in your media library.
As for photographers, this plugin comes with a glossy .JPEG compression option, which is a form of lossy compression algorithm that produces higher quality .JPEGs.
ShortPixel works for thumbnails too. You can select individual thumbnails or compress them all with a single click.
The free version of this compression plugin only offers 100 free credits/month. If you need more, the extra credits are available at $4.99/5,000 images.

Conclusion
Both lossy and lossless compression methods have their own advantages and disadvantages. We recommend picking the compression method that suits your website’s needs or using both depending on the purpose of individual pages.
Keep in mind that compressing and optimizing images has a variety of benefits. Not only will it make your site load faster, but it will also help with SEO and save more storage space. Plus, it makes it easier to backup a smaller website.
We hope this article helps you to understand the difference between lossy compression and lossless compression. Let us know which one works best for your site.

Leo is a Content Specialist and WordPress contributor. Armed with his experience as a WordPress Release Co-Lead and Documentation Team Representative, he loves sharing his knowledge to help people build successful websites. Follow him on LinkedIn.