How to install WordPress plugins
As one of the most popular content management systems (CMS), WordPress offers high flexibility and numerous customization options. It offers a wide variety of WordPress plugins, which allow you to tweak your website’s functionality.
WordPress has its own plugin directory, which includes free and premium plugins. These plugins let you add various features, ranging from contact forms and custom newsletters to website caching and WordPress security.
Some plugins can also alter your WordPress site to make it a functional online store with a WooCommerce plugin or an eLearning platform with LMS plugins. In fact, you can even create your own WordPress plugin.
In this tutorial, we will show the step-by-step process of installing WordPress plugins using three different methods. At the end of this article, we will also include a few tips you can follow when looking for new WordPress plugins to improve your site.
How to install WordPress plugins from the official plugins directory
The easiest way to install WordPress plugins is by accessing the official plugins directory through your WordPress admin area. However, this WordPress plugin directory is limited to free plugin options only.
Log in to your WordPress dashboard and navigate to Plugins -> Add New. Proceed to search the name of the plugin in the search bar. You can also browse the featured, popular, or recommended plugins by clicking on the provided tabs on the left.
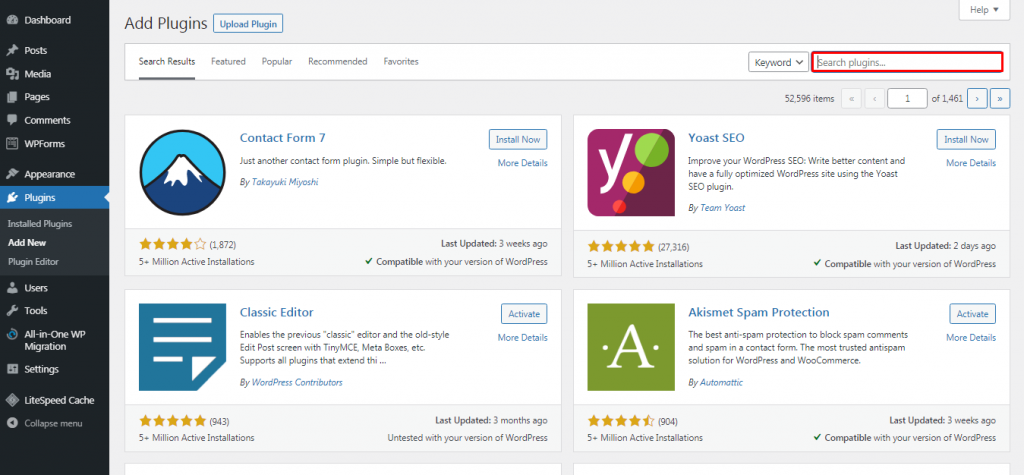
For example, if you search for the MonsterInsights plugin, you will see it come up as the first result. Click on the Install Now button to start the plugin installation.
Wait for the process to finish and click the Activate button to start using the WordPress plugin.
Once you activate the plugin, check and configure the plugin settings by heading to Plugins -> Installed Plugins.
How to install WordPress plugins manually
Another way to install WordPress plugins is by manually uploading the plugin files through your WordPress dashboard.
This method allows you to install a plugin that may not be in the official WordPress directory but available from third-party directories instead, such as CodeCanyon and Codester.
Before starting the plugin installation process, you need to first download the plugin ZIP file from your chosen source.
Expert Tip
If you are looking for plugins, make sure you are downloading them from a trusted source. Plugins from untrustworthy sites may contain hidden malware or viruses.
Next, access your WordPress admin area and click Plugins -> Add New. Then, locate the Upload Plugin button at the top-left side of the page.

Select the plugin ZIP file from your computer that you want to upload, then click Install Now.

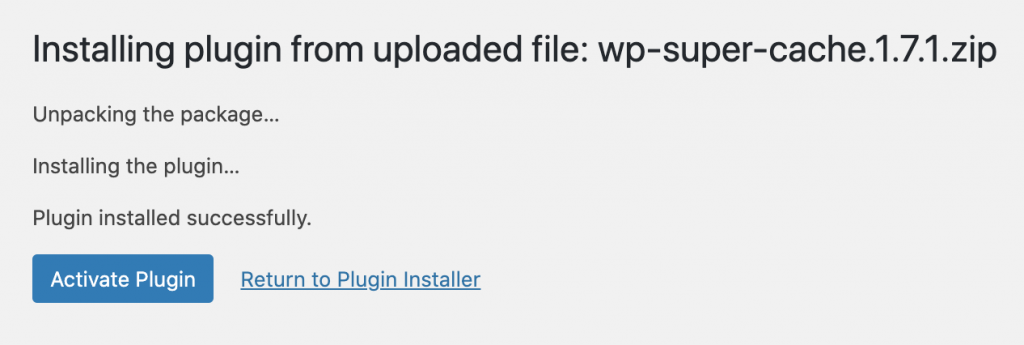
Wait for the plugin installation to finish and press Activate Plugin.
How to install WordPress plugins using an FTP client
There are several premium and custom WordPress plugins that require you to install them manually using an FTP client. For a beginner, the process might be slightly more complicated because you will need to learn how to configure an FTP client first.
Not to worry – the following guide will walk you through the process step-by-step. All you have to do is simply follow the steps.
First, extract the ZIP file of the plugin and save it to a folder on your computer. Keep in mind that the extracted plugin file folder will be the one you need to upload through the FTP client.
Then, connect your website to the FTP server. To do so, find the FTP details from your hosting provider.
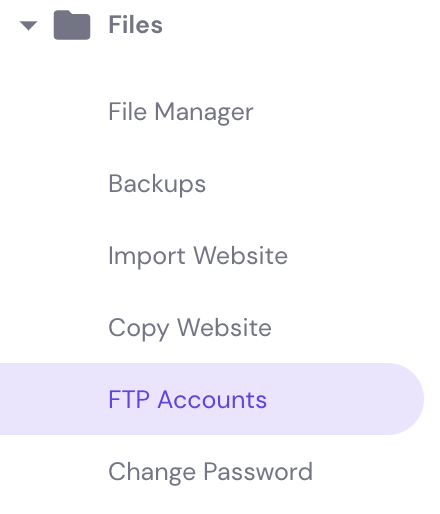
For Hostinger users, simply log in to your hPanel and open your hosting account Dashboard. Then navigate to the sidebar menu → Files → FTP Accounts.
Once connected, access your FTP client – for this example, we use FileZilla. There, input your login credentials and press the Quickconnect button. Next, navigate to the Remote Site panel and locate the wp-content/plugins/ folder.
On the Local Site panel, upload the extracted plugin folder from your computer to wp-content/plugins/ folder on your server.
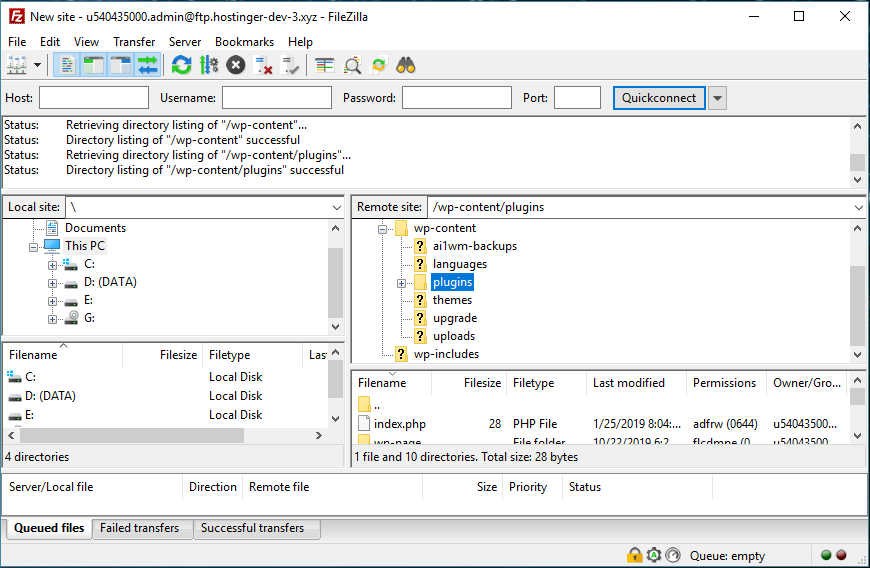
Once the transfer is complete, the WordPress plugin will be installed on your site.
To activate the plugin, you need to access your WordPress dashboard. Go to the plugin section -> Installed Plugins, locate the plugin, and click Activate.
How to install suggested WordPress plugins in hPanel
Hostinger suggests installing several plugins when you create a new WordPress website using hPanel.
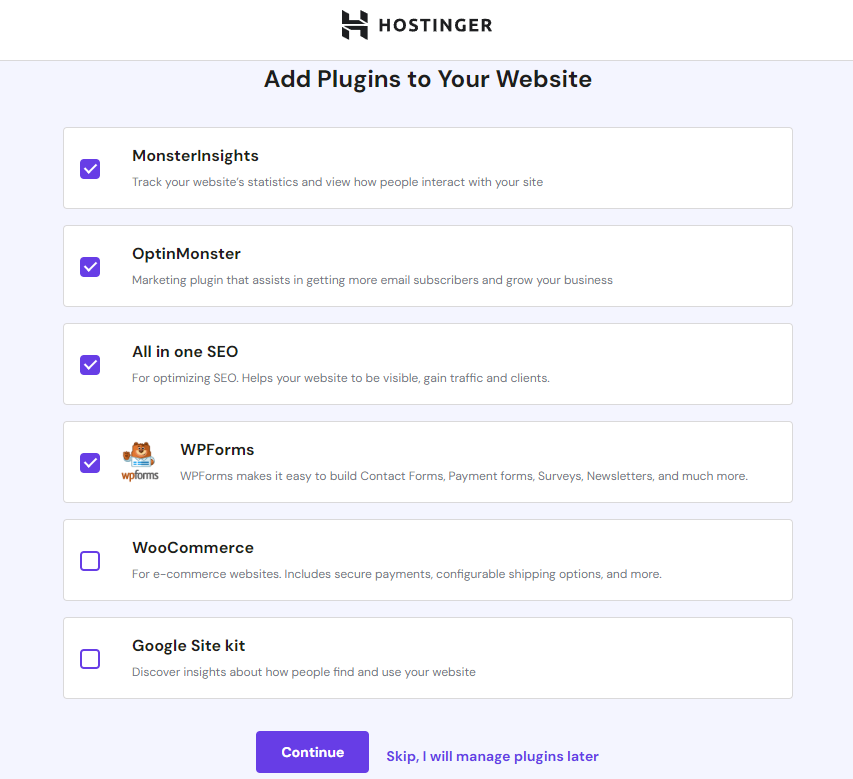
During the onboarding process, you will reach this window offering you some plugins to install. Simply check the plugins you want and click Continue to proceed with the installation.
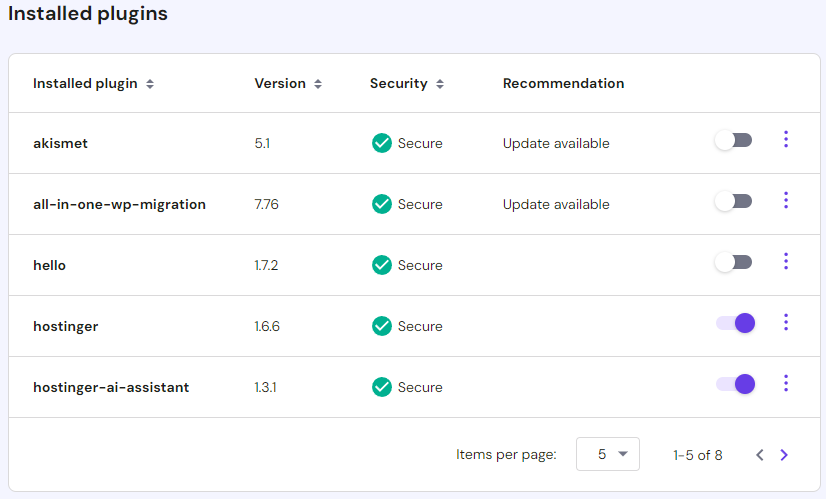
In addition, we also pre-install these plugins on a new WordPress installation:
- Akismet Anti-Spam
- All-in-One WP Migration
- Hostinger AI Assistant (AI assistant for Business and Cloud plans only)
- LiteSpeed Cache
You can manage all your plugins via hPanel, too. Navigate to WordPress → Security, and you’ll find the list of your themes and plugins. Use the toggle switches to deactivate or activate any plugin. You can also delete or update the plugins in this section.
What to remember when selecting a plugin
There are many plugins in the WordPress plugin directory and even more available from third-party websites. This number of options can feel overwhelming, especially for beginners trying to figure out what’s suitable for their site.
The following sections will show you some essential things to consider when selecting a plugin for your website.
Regular updates
WordPress releases regular updates to keep its system up-to-date. That’s how they enhance performance, maintain security, fix bug issues, and add new features.
So before you install a plugin, consider these points:
- Last updated. Choosing a WordPress plugin that is frequently updated can prevent you from security breaches. This also shows that the developers are still actively managing and improving the plugin.
- Installation numbers. This number shows how popular said WordPress plugin is. As a rule of thumb, the higher the number of active installations a plugin has, the better quality it offers.
- Ratings. Reviews and feedback from users can help you weigh in the pros and cons of a specific plugin. This gives you insight into how the plugin performs in real-time situations.
- Compatibility. A plugin that receives regular updates from its developers is usually compatible with the latest version of WordPress. Always check the description tab to see which version of WordPress is required to run the plugin.
Making sure it is right for the job
Before you download and install a plugin to your WordPress website, be sure to check the claims made by the developers. Read through the plugin documentation, check the plugin’s support forums and read the reviews.
Researching through blog posts is also a good practice as many websites provide plugin reviews. At Hostinger, we also review and test WordPress plugins with various functionality, including menu plugins, Google Analytics plugins and review plugins.
Install one plugin at a time
When testing out a plugin in WordPress, remember to install and test each plugin individually. This way, you will quickly see if it causes any problems to your site and if you can fix them.
If you decide to test several different plugins on WordPress, remember to deactivate the previous plugin before trying another.
Moreover, when you have several inactive plugins, it is best to delete them as too many downloads, and installations can overload your WordPress website and impact its performance.
Use only one plugin for each function
Although WordPress plugins are add new features and enhance your website functionality, installing too many of them can slow your site down.
This is because whenever you install plugins in WordPress, you’re adding new code to your website. When used excessively, the plugins will send too many HTTP requests to load their assets, such as CSS stylesheets, JavaScript files, and images, slowing down your website’s loading speed.
In addition, installing WordPress plugins that perform similar functionality can cause conflicts, risking one or both plugins to break. Thus, the best practice is to install one WordPress plugin for each functionality.
For example, both Yoast SEO and AIOSEO have similar sets of features – you only need to choose one to prevent plugin conflict.

Conclusion
We hope this tutorial has helped you learn how add plugins in WordPress. Now you have the option to enhance the functionality of your site even if you have no previous technical knowledge or skills.
If you’re unsure which plugin to begin with, consider what your current website lacks. Then, look at the available plugins and compare important factors such as compatibility, reviews, and last update.
Below are some of our recommended essential WordPress plugins to help you get started:
- Yoast SEO. This plugin helps improve your WordPress blog post and page SEO through keyword optimization and meta descriptions
- Elementor or Beaver Builder. Helps you build your website by providing an easy-to-use drag-and-drop interface.
- Ultimate Blocks. Helps enhance content creation and design within the WordPress block editor.
- W3 Total Cache or WP Super Cache. Boosts your website performance and reduces loading time by caching and integrating with CDN.
- Google XML Sitemaps. Automatically generates XML sitemaps for better search engine optimization.
- Akismet Spam Protection. This plugin detects and filters out spam in your comments and contact form submissions to prevent any malicious attacks.
If you feel like there are more essential plugins that a website may need, let us know in the comments below.
How to install WordPress plugins FAQ
How do I manually install a WordPress plugin?
First, download the plugin. Then, in the WordPress dashboard, head to Plugins and click on the Add New button. Click on the Upload Plugin button and choose the downloaded file. After the WordPress installation process, activate the plugin.
Can I install plugins on free WordPress?
Yes, you can install free WordPress plugins that are available in the WordPress official directory. However, keep in mind that you may have to use the premium version to get all the features.
What access do I need to install a WordPress plugin?
You need the administrator user role to install a plugin from the WordPress dashboard. Alternatively, you need access to the /wp-content/plugins/ directory of your WordPress installation to install a plugin manually.



Comments
May 14 2017
Hi, I have migrated my blog http://www.imnepal.com yesterday. All the things are good but got error in the plugin. I have deleted all the plugins. While i am starting to install the plugin, then No, any plugin is adding. While adding.... Messages appears like this... Could not create directory. /home/danfeh5/public_html/imnepal.com/wp-content/plugins/boombox-theme-extensions Can you help me?
April 26 2018
really helpful tutorial and it worked
May 26 2022
Hellow Ms. Nabilla, Thanks for the post
August 18 2022
hello i would like to know if i can install third party plugins of mature ads (crackrevenue etc) and if yes does it require to pay for premium plan as in regular wordpress ? thanks in advance
August 19 2022
Hey there! When referring to 3rd party plugins, it's usually done by WordPress.com, as they limit what kind of plugins you can install, however with WordPress.org, 3-rd party plugins are fully supported, so you can either install them from the plugins directory or by downloading the plugin from the plugin's website and installing the plugin manually ?
July 19 2023
Can I install plugins with a Business or Cloud startup plan on hostinger?
July 21 2023
Hey there! You can install WordPress plugins with all of our hosting plans. After installing WordPress, you will be able to access your WordPress dashboard and install your desired WordPress plugins.
May 22 2024
My wordpress dashboard does NOT have an Add Plugin button. I have always had to do it in the cpanel and now that won't even work.
May 29 2024
Hello! It sounds like there may be a technical issue with your WordPress dashboard. Have you tried clearing your browser cache or accessing it from a different browser? If the problem persists, you might want to consider reaching out to our Customer Success Team so they can investigate this issue further for you.
January 11 2025
Hi, If I buy a hosting plan from hostinger, do I still need to buy a business plan on Wordpress to access the plugins? As I understand that Wordpress requires you to upgrade to a business plan so that you can use the plugins.
January 15 2025
Great question! When you buy a hosting plan from Hostinger, you don’t need to purchase a WordPress.com Business plan to access plugins. With Hostinger, you can install WordPress and have the freedom to add any plugins you need for your site ;)