How to Install, Configure, and Secure Redis on Ubuntu
Redis is an in-memory database used to store data temporarily as a cache to reduce server load and improve application performance. It is also a message broker that facilitates data flow between services.
Setting up Redis can be tricky since it has various commands and configuration parameters. Moreover, this software provides several utilities that can be dangerous if you are not careful.
To help you get through this process safely, this article will explain how to install Redis on Ubuntu. We will also explain how to properly secure and maintain this software so you can use it safely on your virtual private server (VPS).

Prerequisites For Installing Redis
Before installing Redis, ensure you have a VPS running Ubuntu since the steps differ for other Linux operating systems. Also, we recommend using Ubuntu 22.04 or later since the older versions might use different commands.
Your VPS must meet the Redis system requirements to ensure optimal performance. Moreover, your local computer must have the PuTTY secure shell (SSH) client installed since we will use it to connect to the server. Alternatively, Linux and MacOS users can use Terminal.
If you haven’t purchased a plan, we recommend looking into Hostinger’s virtual private servers. Users can connect to our servers via SSH or through the built-in Browser terminal to simplify the installation process.
In addition, our plans have different hardware resource allocations to cater to various needs. You can easily upgrade anytime to up to KVM 8, which offers powerful 8 vCPU cores and 32 GB of RAM.

How To Install Redis On A Ubuntu VPS
After uncovering the prerequisites, let’s dive into the steps to install Redis on an Ubuntu VPS. Before proceeding, connect to your server using an SSH client like PuTTY or Hostinger’s Browser terminal.
Important! Back up your VPS data before proceeding to simplify file restoration in case of errors or misconfigurations.
1. Install Redis Server
Since the SSH connection uses root by default, create and switch to a new superuser before installing Redis. Since this account asks for confirmation before running utilities, doing so will help to minimize the risk of accidental command executions that might cause issues.
To make a new user in your Ubuntu system, run the following command. Replace your-username with your desired account name:
adduser your-username
Enter the user’s password and other details. Now, grant the account sudo privileges to run administrative commands:
usermod -a -G sudo your-username
Then, switch to the new user by entering the following:
su your-username
Enter cd to return to the home directory. Now, let’s start the Redis installation by updating your system repository to ensure you receive the latest software version:
sudo apt update
After the update is completed, run the following to install Redis. Press Y and Enter if the command-line interface (CLI) asks for confirmation:
sudo apt install redis
Note there are redis-server and redis packages in the Ubuntu repository. Both will install the same software, so you can use either and have the same outcome.
Check the Redis command-line client version by entering the following to ensure it is configured properly:
redis-cli --version

If the Terminal returns the version number, the caching database is installed correctly. Now, query the Redis service status to ensure it is running and active:
sudo systemctl status redis
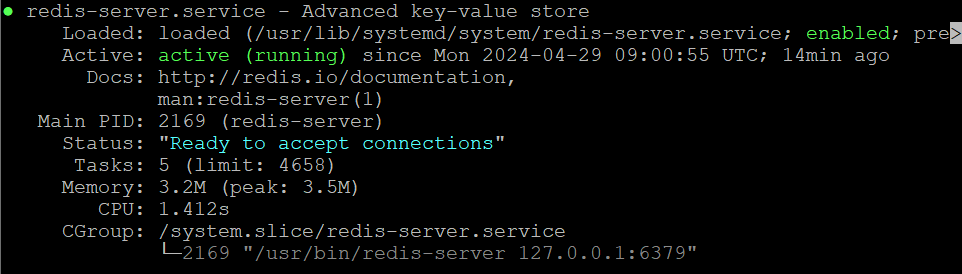
If you see Redis status as disabled or stopped, run the following command to start it manually:
sudo systemctl start redis
Now, enable the Redis service to start automatically after a system reboot using this command:
sudo systemctl enable redis
2. Configure Redis
Redis listens to all connections by default, which can present network security risks. To ensure it works properly and securely, you must bind only the necessary IP addresses.
If your web application and Redis are within the same server, bind the localhost’s address of 127.0.0.1. If you are using another system to host the application, specify its IP.
To change the default configuration, open the redis.conf file using a text editor like nano. Here’s the command:
sudo nano /etc/redis/redis.conf
Locate the line containing bind 127.0.0.1 ::1. You can quickly search the file content by pressing Ctrl + W and entering the queried phrase.

Change the network configuration based on your needs. If you need Redis to connect to multiple interfaces, list their IP addresses separated by space like the following:
bind 127.0.0.1 185.185.185.185 185.185.185.186
Ensure you removed the hash symbol (#) at the beginning of the line. Otherwise, the configuration won’t apply, and Redis will remain listening to all IPs.
Important! Don’t delete the localhost address in the bind settings since it’s essential for testing.
In addition to optimizing network security, safeguard the Redis client by setting up password authentication. To do so, look for the requirepass directive under the SECURITY section of the redis.conf file.
Remove the hash symbol to enable the directive and replace the default value with a strong passphrase like so:
requirepass your-password
Once finished, press Ctrl + X, Y, and Enter to save the settings. Then, restart the Redis service to apply the new changes using this command:
sudo systemctl restart redis
3. Check Redis Functionality
After configuring Redis, check the database connection to ensure it works correctly based on your settings. To do so, enter the Redis CLl using the following:
redis-cli
Now, let’s check whether the password authentication works using the auth command. Replace your-secure-password with the actual value specified in the Redis configuration file:
auth your-secure-password
Redis CLI should return an OK confirmation message, meaning you can now run commands in the database. To start, test connectivity by sending data using the ping command:
ping
It should return the PONG message. Otherwise, open the Redis configuration file and ensure you bind the localhost’s address of 127.0.0.1.

Next, check if Redis caching is functioning correctly by sending a test message and retrieving it. To do so, enter the following commands subsequently:
set test "Redis is working"
get test
Redis should return the message you specified in the first command, which is “Redis is working.”

While this quick test should be enough to confirm that the database works properly, you can also run other Redis commands if needed. After checking the functionalities, quit the shell by entering this:
quit
4. Rename Dangerous Commands
Several Redis commands can manipulate or permanently wipe your database entries. While you might need them for specific tasks, they can be dangerous if unauthorized users gain access to your server.
Since there are many potentially destructive commands, check the Redis Access Control List documentation to learn more about them. Here are some of the common ones and their functions:
- FLUSHALL – deletes all keys and data in your entire Redis instance.
- FLUSHDB – wipes data in the current database.
- SHUTDOWN – shuts down the Redis server without saving the data.
- DEL – removes one or multiple keys from your current database.
- RENAME – rename a key in the currently selected database.
- SAVE – saves a dataset to the server’s storage while blocking other running processes.
To improve Redis security, you can either rename or disable such commands depending on your needs. Start by opening the redis.conf file using nano:
sudo nano /etc/redis/redis.conf
Scroll down to the SECURITY section and add the settings for renaming commands. You can use any name, but we recommend unique, memorable, and difficult-to-guess phrases.
For example, we will rename the FLUSHALL command to IWANTTO_FLUSHALL and change SHUTDOWN into SHUTDOWN_MYDB by inserting the following lines:
rename-command FLUSHALL IWANTTO_FLUSHALL

rename-command SHUTDOWN SHUTDOWN_MYDB
Add more lines with the same syntax to modify other commands. To disable them, simply use empty quotation marks as the new name. For example, this setting will deactivate FLUSHALL:
rename-command FLUSHALL ""
Save the file and restart Redis to apply the changes. Now, let’s check whether you have successfully renamed or deactivated the commands by running them.
Warning! For fresh Redis installation, it is okay to check dangerous commands directly since you haven’t added any data. However, use a local development environment for future testing since they might cause data loss.
To begin, run redis-cli to access the database shell. Then, enter the renamed commands using their original name. For example, we will check FLUSHALL:
FLUSHALL
If the renaming is successful, Redis will return an error message stating the command is unknown like so:

Now run the command using its new name. Redis should return an output or empty string, depending on the command you tested. For example, FLUSHALL doesn’t give any message after it successfully runs.
5. Maintaining Redis
After installing Redis, maintain it to ensure optimal performance and security. Here are several practices to consider:
- Regular backup – enable your web host’s automatic backup feature to create a restore point for your Redis data. Also, regularly create a snapshot of your dataset using Redis’ SAVE command.
- Server monitoring – track your Redis server’s memory usage, CPU utilization, latency, and other performance metrics to ensure responsiveness. You can use tools like Prometheus or Grafana.
- Periodical update – immediately install the new Redis version using the apt update && apt upgrade command to apply the latest security and bug fixes.
- Security control – enable password authentication for the Redis CLI, apply a secure sockets layer (SSL) certificate, and configure firewall rules to safeguard the database port.
- Log files analysis – check Redis event logs periodically to quickly catch unauthorized actions or changes that might compromise the server’s security.
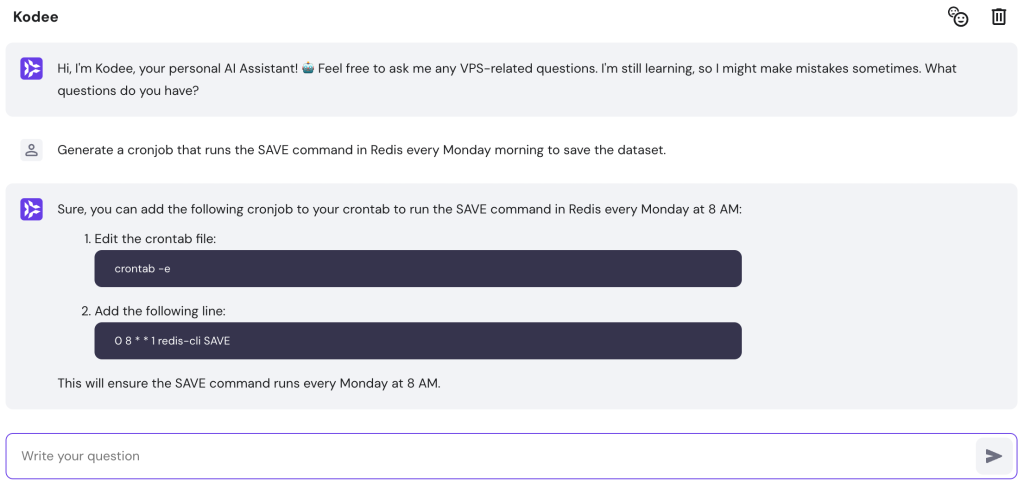
Due to various measures, maintaining Redis can be difficult, especially for beginners. If you need help administering your server, use our AI assistant, Kodee, to simplify the tasks.
You can generate commands and instructions for server management using simple prompts. For example, ask, “Generate a cronjob that runs the SAVE command in Redis every Monday morning to save the dataset.”
Conclusion
Setting up Redis on your VPS helps reduce load and latency to improve your application performance. In this article, we have explained the five steps to install and configure this tool on an Ubuntu system via SSH:
- Install Redis using the apt package manager.
- Configure Redis’ connection and password authentication.
- Enter the Redis shell and check its commands’ functionality.
- Rename or deactivate dangerous Redis commands.
- Maintain Redis by applying practices like regular backup and log auditing.
Since Redis is complex, we recommend reading its documentation for more information about its features. Meanwhile, check our other VPS tutorials if you want to learn more about server management.
How To Install Redis FAQ
In this section, we will answer several questions about installing Redis on an Ubuntu system.
What Is Redis Used For?
Redis is an in-memory cache database used to temporarily store your application’s data. It reduces the travel distance between endpoints to reduce latency, minimize server load, and improve performance. It is also a message broker that optimizes data flow between services.
How Do I Install a Specific Version of Redis?
You can install a specific version of Redis from the official Ubuntu repositories by running apt install redis-server=. Replace the number placeholder with the actual value. You can also download other releases by adding third-party repos or the Redis source code.
Can I Install Redis Using a Docker Container Instead of Directly on Ubuntu?
Absolutely! You can install Redis using a Docker container by pulling the Redis image from the Docker Hub. You can then manage Redis or enter its shell from outside the container using the docker command.

Aris is a Content Writer specializing in Linux and WordPress development. He has a passion for networking, front-end web development, and server administration. By combining his IT and writing experience, Aris creates content that helps people easily understand complex technical topics to start their online journey. Follow him on LinkedIn.
Comments
October 30 2023
Pretty useful guide. Thanks for sharing.
October 30 2023
You're welcome! I'm glad you found the guide useful ?